.NET Core 3.0 Preview 9 is now available and it contains a number of improvements and updates to ASP.NET Core and Blazor.
Here’s the list of what’s new in this preview:
- Blazor event handlers and data binding attributes moved to Microsoft.AspNetCore.Components.Web
- Blazor routing improvements
- Render content using a specific layout
- Routing decoupled from authorization
- Route to components from multiple assemblies
- Render multiple Blazor components from MVC views or pages
- Smarter reconnection for Blazor Server apps
- Utility base component classes for managing a dependency injection scope
- Razor component unit test framework prototype
- Helper methods for returning Problem Details from controllers
- New client API for gRPC
- Support for async streams in streaming gRPC responses
Please see the release notes for additional details and known issues.
Get started
To get started with ASP.NET Core in .NET Core 3.0 Preview 9 install the .NET Core 3.0 Preview 9 SDK.
If you’re on Windows using Visual Studio, install the latest preview of Visual Studio 2019.
.NET Core 3.0 Preview 9 requires Visual Studio 2019 16.3 Preview 3 or later.
To install the latest Blazor WebAssembly template also run the following command:
dotnet new -i Microsoft.AspNetCore.Blazor.Templates::3.0.0-preview9.19424.4
Upgrade an existing project
To upgrade an existing ASP.NET Core app to .NET Core 3.0 Preview 9, follow the migrations steps in the ASP.NET Core docs.
Please also see the full list of breaking changes in ASP.NET Core 3.0.
To upgrade an existing ASP.NET Core 3.0 Preview 8 project to Preview 9:
- Update all Microsoft.AspNetCore.* package references to 3.0.0-preview9.19424.4
- In Blazor apps and libraries:
- Add a using statement for
Microsoft.AspNetCore.Components.Webin your top level _Imports.razor file (see Blazor event handlers and data binding attributes moved to Microsoft.AspNetCore.Components.Web below for details) - Add a using statement for
Microsoft.AspNetCore.Components.Authorizationin your top level _Imports.razor file. - Update all Blazor component parameters to be public.
- Update implementations of
IJSRuntimeto returnValueTask<T>. - Replace calls to
MapBlazorHub<TComponent>with a single call toMapBlazorHub. - Update calls to
RenderComponentAsyncandRenderStaticComponentAsyncto use the new overloads toRenderComponentAsyncthat take aRenderModeparameter (see Render multiple Blazor components from MVC views or pages below for details). - Update App.razor to use the updated
Routercomponent (see Blazor routing improvements below for details). - (Optional) Remove page specific _Imports.razor file with the
@layoutdirective to use the default layout specified through the router instead. - Remove any use of the
PageDisplaycomponent and replace withLayoutView,RouteView, orAuthorizeRouteViewas appropriate (see Blazor routing improvements below for details). - Replace uses of
IUriHelperwithNavigationManager. - Remove any use of
@ref:suppressField. - Replace the previous
RevalidatingAuthenticationStateProvidercode with the newRevalidatingIdentityAuthenticationStateProvidercode from the project template. - Replace
Microsoft.AspNetCore.Components.UIEventArgswithSystem.EventArgsand remove the “UI” prefix from allEventArgsderived types (UIChangeEventArgs->ChangeEventArgs, etc.). - Replace
DotNetObjectRefwithDotNetObjectReference. - Replace
OnAfterRender()andOnAfterRenderAsync()implementations withOnAfterRender(bool firstRender)orOnAfterRenderAsync(bool firstRender).
- Add a using statement for
- In gRPC projects:
- Update calls to
GrpcClient.Createwith a callGrpcChannel.ForAddressto create a new gRPC channel and new up your typed gRPC clients using this channel. - Rebuild any project or project dependency that uses gRPC code generation for an ABI change in which all clients inherit from
ClientBaseinstead ofLiteClientBase. There are no code changes required for this change. - Please also see the grpc-dotnet announcement for all changes.
- Update calls to
You should now be all set to use .NET Core 3.0 Preview 9!
Blazor event handlers and data binding attributes moved to Microsoft.AspNetCore.Components.Web
In this release we moved the set of bindings and event handlers available for HTML elements into the Microsoft.AspNetCore.Components.Web.dll assembly and into the Microsoft.AspNetCore.Components.Web namespace. This change was made to isolate the web specific aspects of the Blazor programming from the core programming model. This section provides additional details on how to upgrade your existing projects to react to this change.
Blazor apps
Open the application’s root _Imports.razor and add @using Microsoft.AspNetCore.Components.Web. Blazor apps get a reference to the Microsoft.AspNetCore.Components.Web package implicitly without any additional package references, so adding a reference to this package isn’t necessary.
Blazor libraries
Add a package reference to the Microsoft.AspNetCore.Components.Web package package if you don’t already have one. Then open the root _Imports.razor file for the project (create the file if you don’t already have it) and add @using Microsoft.AspNetCore.Components.Web.
Troubleshooting guidance
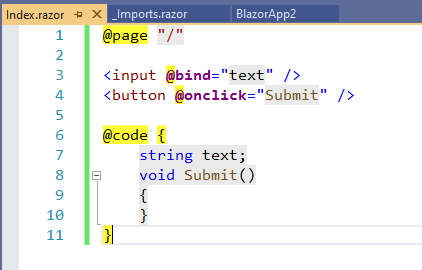
With the correct references and using statement for Microsoft.AspNetCore.Components.Web, event handlers like @onclick and @bind should be bold font and colorized as shown below when using Visual Studio.

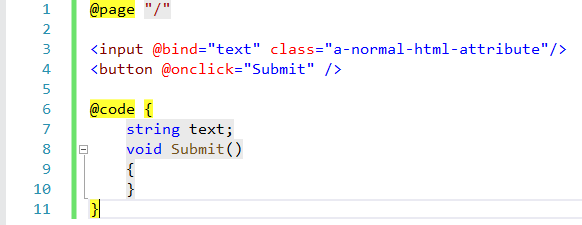
If @bind or @onclick are colorized as a normal HTML attribute, then the @using statement is missing.

If you’re missing a using statement for the Microsoft.AspNetCore.Components.Web namespace, you may see build failures. For example, the following build error for the code shown above indicates that the @bind attribute wasn’t recognized:
CS0169  The field 'Index.text' is never used
CS0428  Cannot convert method group 'Submit' to non-delegate type 'object'. Did you intend to invoke the method?
In other cases you may get a runtime exception and the app fails to render. For example, the following runtime exception seen in the browser console indicates that the @onclick attribute wasn’t recognized:
Error: There was an error applying batch 2.
DOMException: Failed to execute 'setAttribute' on 'Element': '@onclick' is not a valid attribute name.
Add a using statement for the Microsoft.AspNetCore.Components.Web namespace to address these issues. If adding the using statement fixed the problem, consider moving to the using statement app’s root _Imports.razor so it will apply to all files.
If you add the Microsoft.AspNetCore.Components.Web namespace but get the following build error, then you’re missing a package reference to the Microsoft.AspNetCore.Components.Web package:
CS0234 The type or namespace name 'Web' does not exist in the namespace 'Microsoft.AspNetCore.Components' (are you missing an assembly reference?)
Add a package reference to the Microsoft.AspNetCore.Components.Web package to address the issue.
Blazor routing improvements
In this release we’ve revised the Blazor Router component to make it more flexible and to enable new scenarios. The Router component in Blazor handles rendering the correct component that matches the current address. Routable components are marked with the @page directive, which adds the RouteAttribute to the generated component classes. If the current address matches a route, then the Router renders the contents of its Found parameter. If no route matches, then the Router component renders the contents of its NotFound parameter.
To render the component with the matched route, use the new RouteView component passing in the supplied RouteData from the Router along with any desired parameters. The RouteView component will render the matched component with its layout if it has one. You can also optionally specify a default layout to use if the matched component doesn’t have one.
<Router AppAssembly="typeof(Program).Assembly">
    <Found Context="routeData">
        <RouteView RouteData="routeData" DefaultLayout="typeof(MainLayout)" />
    </Found>
    <NotFound>
        <h1>Page not found</h1>
        <p>Sorry, but there's nothing here!</p>
    </NotFound>
</Router>
Render content using a specific layout
To render a component using a particular layout, use the new LayoutView component. This is useful when specifying content for not found pages that you still want to use the app’s layout.
<Router AppAssembly="typeof(Program).Assembly">
    <Found Context="routeData">
        <RouteView RouteData="routeData" DefaultLayout="typeof(MainLayout)" />
    </Found>
    <NotFound>
        <LayoutView Layout="typeof(MainLayout)">
            <h1>Page not found</h1>
            <p>Sorry, but there's nothing here!</p>
        </LayoutView>
    </NotFound>
</Router>
Routing decoupled from authorization
Authorization is no longer handled directly by the Router. Instead, you use the AuthorizeRouteView component. The AuthorizeRouteView component is a RouteView that will only render the matched component if the user is authorized. Authorization rules for specific components are specified using the AuthorizeAttribute. The AuthorizeRouteView component also sets up the AuthenticationState as a cascading value if there isn’t one already. Otherwise, you can still manually setup the AuthenticationState as a cascading value using the CascadingAuthenticationState component.
<Router AppAssembly="@typeof(Program).Assembly">
    <Found Context="routeData">
        <AuthorizeRouteView RouteData="@routeData" DefaultLayout="@typeof(MainLayout)" />
    </Found>
    <NotFound>
        <CascadingAuthenticationState>
            <LayoutView Layout="@typeof(MainLayout)">
                <p>Sorry, there's nothing at this address.</p>
            </LayoutView>
        </CascadingAuthenticationState>
    </NotFound>
</Router>
You can optionally set the NotAuthorized and Authorizing parameters of the AuthorizedRouteView component to specify content to display if the user is not authorized or authorization is still in progress.
<Router AppAssembly="@typeof(Program).Assembly">
    <Found Context="routeData">
        <AuthorizeRouteView RouteData="@routeData" DefaultLayout="@typeof(MainLayout)">
            <NotAuthorized>
                <p>Nope, nope!</p>
            </NotAuthorized>
        </AuthorizeRouteView>
    </Found>
</Router>
Route to components from multiple assemblies
You can now specify additional assemblies for the Router component to consider when searching for routable components. These assemblies will be considered in addition to the specified AppAssembly. You specify these assemblies using the AdditionalAssemblies parameter. For example, if Component1 is a routable component defined in a referenced class library, then you can support routing to this component like this:
<Router
    AppAssembly="typeof(Program).Assembly"
    AdditionalAssemblies="new[] { typeof(Component1).Assembly }>
    ...
</Router>
Render multiple Blazor components from MVC views or pages
We’ve reenabled support for rendering multiple components from a view or page in a Blazor Server app. To render a component from a .cshtml file, use the Html.RenderComponentAsync<TComponent>(RenderMode renderMode, object parameters) HTML helper method with the desired RenderMode.
| RenderMode | Description | Supports parameters? |
|---|---|---|
| Static | Statically render the component with the specified parameters. | Yes |
| Server | Render a marker where the component should be rendered interactively by the Blazor Server app. | No |
| ServerPrerendered | Statically prerender the component along with a marker to indicate the component should later be rendered interactively by the Blazor Server app. | No |
Support for stateful prerendering has been removed in this release due to security concerns. You can no longer prerender components and then connect back to the same component state when the app loads. We may reenable this feature in a future release post .NET Core 3.0.
Blazor Server apps also no longer require that the entry point components be registered in the app’s Configure method. Only a single call to MapBlazorHub() is required.
Smarter reconnection for Blazor Server apps
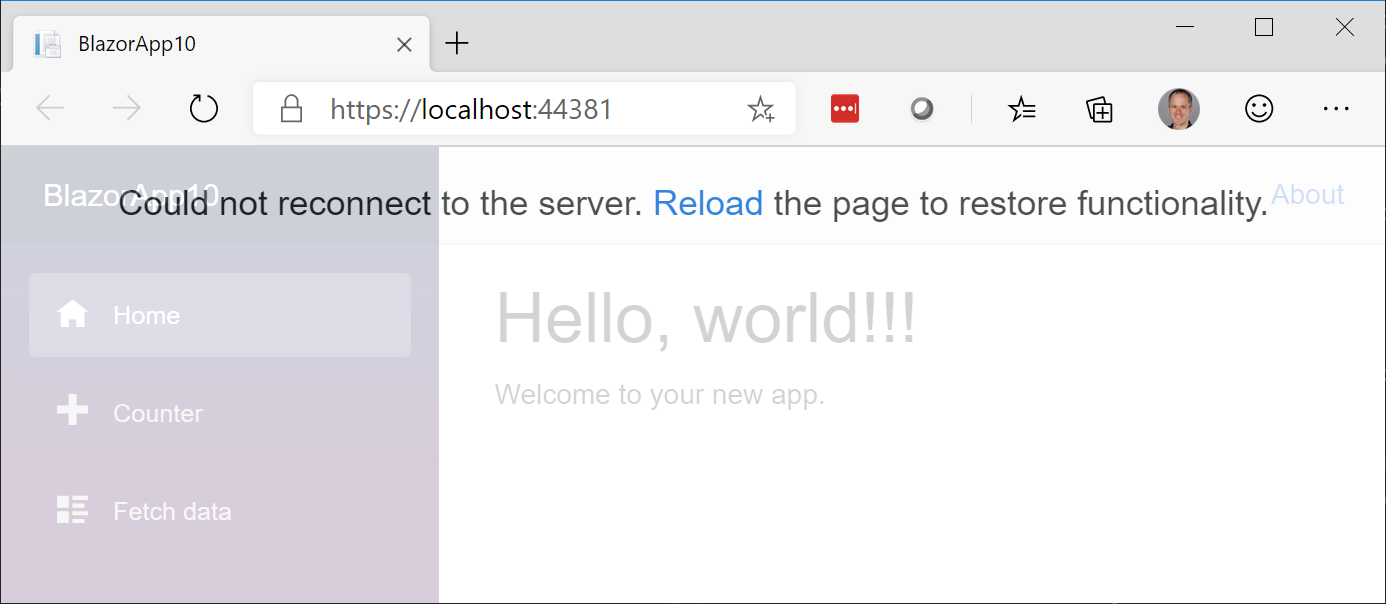
Blazor Server apps are stateful and require an active connection to the server in order to function. If the network connection is lost, the app will try to reconnect to the server. If the connection can be reestablished but the server state is lost, then reconnection will fail. Blazor Server apps will now detect this condition and recommend the user to refresh the browser instead of retrying to connect.

Utility base component classes for managing a dependency injection scope
In ASP.NET Core apps, scoped services are typically scoped to the current request. After the request completes, any scoped or transient services are disposed by the dependency injection (DI) system. In Blazor Server apps, the request scope lasts for the duration of the client connection, which can result in transient and scoped services living much longer than expected.
To scope services to the lifetime of a component you can use the new OwningComponentBase and OwningComponentBase<TService> base classes. These base classes expose a ScopedServices property of type IServiceProvider that can be used to resolve services that are scoped to the lifetime of the component. To author a component that inherits from a base class in Razor use the @inherits directive.
@page "/users"
@attribute [Authorize]
@inherits OwningComponentBase<Data.ApplicationDbContext>

<h1>Users (@Service.Users.Count())</h1>
<ul>
    @foreach (var user in Service.Users)
    {
        <li>@user.UserName</li>
    }
</ul>
Note: Services injected into the component using @inject or the InjectAttribute are not created in the component’s scope and will still be tied to the request scope.
Razor component unit test framework prototype
We’ve started experimenting with building a unit test framework for Razor components. You can read about the prototype in Steve Sanderson’s Unit testing Blazor components – a prototype blog post. While this work won’t ship with .NET Core 3.0, we’d still love to get your feedback early in the design process. Take a look at the code on GitHub and let us know what you think!
Helper methods for returning Problem Details from controllers
Problem Details is a standardized format for returning error information from an HTTP endpoint. We’ve added new Problem and ValidationProblem method overloads to controllers that use optional parameters to simplify returning Problem Detail responses.
[Route("/error")]
public ActionResult<ProblemDetails> HandleError()
{
    return Problem(title: "An error occurred while processing your request", statusCode: 500);
}
New client API for gRPC
To improve compatibility with the existing Grpc.Core implementation, we’ve changed our client API to use gRPC channels. The channel is where gRPC configuration is set and it is used to create strongly typed clients. The new API provides a more consistent client experience with Grpc.Core, making it easier to switch between using the two libraries.
// Old
using var httpClient = new HttpClient() { BaseAddress = new Uri("https://localhost:5001") };
var client = GrpcClient.Create<GreeterClient>(httpClient);

// New
var channel = GrpcChannel.ForAddress("https://localhost:5001");
var client = new GreeterClient(channel);

var reply = await client.GreetAsync(new HelloRequest { Name = "Santa" });
Support for async streams in streaming gRPC responses
gRPC streaming responses return a custom IAsyncStreamReader type that can be iterated on to receive all response messages in a streaming response. With the addition of async streams in C# 8, we’ve added a new extension method that makes for a more ergonomic API while consuming streaming responses.
// Old
while (await requestStream.MoveNext(CancellationToken.None))
{
  var message = requestStream.Current;
  // …
}

// New and improved
await foreach (var message in requestStream.ReadAllAsync())
{
  // …
}
Give feedback
We hope you enjoy the new features in this preview release of ASP.NET Core and Blazor! Please let us know what you think by filing issues on GitHub.
Thanks for trying out ASP.NET Core and Blazor!
The post ASP.NET Core and Blazor updates in .NET Core 3.0 Preview 9 appeared first on ASP.NET Blog.