Quantcast
Channel: ASP.NET Blog
Viewing all 7144 articles
Browse latest View live

ASP.NET providers and SQL Azure

$
0
0

We have two sets of ASP.NET providers which currently exist; the ASP.NET SQL providers, and the ASP.NET Universal Providers. In VS 2010 the SQL providers were in only providers used for our project templates. In VS 2012 we have switched to using the Universal Providers. One of the drawbacks of the SQL providers is that it leverages DB objects of SQL server which are not available in SQL Azure.

In our updated web publish experience we have an Update Database checkbox which can be used to incrementally publish the database to the destination database. In this case if the source connection string is used by the ASP.NET SQL providers and you are publishing to SQL Azure then you will see the following message on the dialog.

SNAGHTML48cbb8

Note: you may see the Update Database checkbox disabled, please visit http://sedodream.com/2012/06/07/VSPublishDialogUpdateDatabaseDialogDisabled.aspx for more info on why.

The publish dialog is letting you know that the SQL providers are not compatible with SQL Azure and helps you convert to using the Universal Providers. After you install the Universal Providers the web.config entry will be commented out and new entries will be inserted for the Universal Providers. Your existing database will not be impacted, we’ll create a new connection string pointing to a new database. If you had any data in the SQL Providers database you will have to re-create those objects in the new database.

If you have any questions please feel free to directly reach out to me at sayedha(at){MicrosoftDOTCom}.

Sayed Ibrahim Hashimi @SayedIHashimi

Cross posted to: http://sedodream.com/2012/06/07/ASPNETProvidersAndSQLAzure.aspx


Visual Studio 2010 Web Publish Updates

$
0
0

Last week we rolled out some updates for our Visual Studio 2010 Web Publishing Experience. This post will give you an overview of the new features which we released. In the coming weeks there will be more posts getting into more details regarding individual features.

You can get these updates in the Windows Azure SDK for Visual Studio 2010. When you download that package there you will also get the latest tools for Azure development.

The new high level features include the following.

  • Updated Web Publish dialog
  • Support to import publish profiles (.publishSettings files)
  • Support to configure EF Code First migrations during publish
  • Support to create web packages in the publish dialog
  • Publish profiles now a part of the project and stored in version control by default
  • Publish profiles are now MSBuild files
  • Profile specific web.config transforms

Overview

When you right click on your Web Application Project (WAP) you will now see the new publish dialog.

image

On this tab you can import a .publishSettngs file, which many web hosts provide, and you can also manage your publish profiles. If you are hosting your site on Windows Azure Web Sites then you can download the publish profile on the dashboard of the site using the Download publish profile link. After you import this publish profile you will be brought to the Connection tab automatically.

image

On this tab you can see all the server configuration values which are needed for your client machine to connect to the server. Typically you don’t have to worry about the details of these values. Next you’ll go to the Settings tab.

image

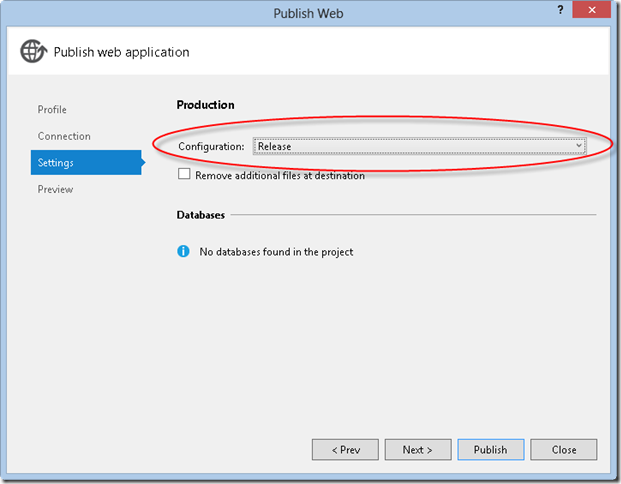
On the Settings tab you can set the build configuration which should be used for the publish process, the default value here is Release. There is also a checkbox to enable you to delete any files on the server which do not exist in the project.

Below that checkbox you will see a section for databases. The sample project shown has an Entity Framework Code First model, named ContactsContext, and it uses Code First Migrations to manage the database schema. If you have any non-EF Code First connection strings in web.config then those databases will show up as well but the support for incrementally publishing the schema for those has not yet been finalized. We are currently working on that. You can visit my previous blog entry for more info on that.

If you imported a .publishSettings file with a connection string then that connection string would automatically be inserted in the textbox/dropdown for the connection string. If you did not then you can use the … button to create a connection string with the Connection String Builder dialog or you can simply type/paste in a connection string. For the EF Code First contexts you will see the Execute Code Frist Migrations checkbox. When you check this when your site is published the web.config will be transformed to enable the Code First migrations to be executed the first time that the context is accessed. Now you can move to the Preview tab.

When you first come to the Preview tab you will see a Start Preview button. Once you click this button you will see the file operations which would be performed once you publish. Since this site has never been published all the file operations are Add, as you can see in the image below. The other Action values include; Update and Delete.

image

Once you are ready to publish you can click the Publish button. You can monitor the progress of the publish process using the Output Window. If your publish profile had a value for the Destination URL then the site will automatically be opened in the default browser after the publish has successfully completed.

Publish Profiles

One of the other changes in the publish experience is that publish profiles are now stored as a part of your project. They are stored under the folder Properties\PublishProfiles (for VB projects its My Project\PublishProfiles) and the extension is .pubxml. You can see this in the image below.

image

These .pubxml files are MSBuild files and you can modify these files in order to customize the publish process. If you do not want the publish profile to be checked into version control you can simply exclude it from the project. The publish dialog will look at the files in the PublishProfiles folder so you will still be able to publish using that profile. You can also leverage these publish profiles to simply publishing from the command line. For example you can use the following syntax to publish from the command line.

msbuild.exe WebApplication2.csproj /p:DeployOnBuild=true;PublishProfile="pubdemo - Web Deploy";Password={INSERT-PASSWORD}


Resources

If you have any questions please feel free to directly reach out to me at sayedha(at){MicrosoftDOTCom}.

Sayed Ibrahim Hashimi @SayedIHashimi

Cross posted at: http://sedodream.com/2012/06/15/VisualStudio2010WebPublishUpdates.aspx

Visual Studio 2012 RC Web Tooling Extensions update

$
0
0

If you have been following our blog and twitter accounts then you most likely have heard that some of the Web components of Visual Studio 2012 are now “Out of Band”. What that means is that we can update those components separately from Visual Studio itself. Because of this we will be posting updates on a regular basis. Today marks the first of these updates, and its targeting Visual Studio 2012 RC. In this post I will describe how to get the update and then what the update contains.

How to get the update

If you already have Visual Studio 2012 RC installed when you launch VS you will see a notification in the task tray like the image below.

image

Note: VS checks for updates once a day so if you don’t see this notification today its likely that the check has already been performed

After you click on the notification you will be brought to the Extension and Updates dialog. To get the web updates you should go to the Visual Studio Gallery tab and then click Update on the Web Tooling Extensions item.

image

After installing the update you will need to restart VS.

What is contained in the update

The goals that we had when creating this update mainly consisted of.

  1. Fix key customer reported bugs which we didn’t have time to complete for the RC release
  2. Test out the update mechanism publicly

Since the intent of this release was not to light up any new features you won’t find any new functionality, but you may discover that an issue you are running into has been fixed. Most of the bugs which we fixed were filed by customer on Microsoft Connect, though some came in through other channels. For the Connect bugs you will see a link to the bug details, for Connect bugs filed as private there will not be a link. Below you will find a list of the fixed bugs as well as a brief description of the bug.

Web publishing raises an exception due to <connectionStrings> content

If the root web.config contained elements under <connectionStrings> that did not have a name attribute an exception was raised.

Reported Bugs


Web publish to the File system doesn’t always include all files

When publishing a web project to the file system there are cases where files are not getting updated on publish.

Reported Bugs

  • Publishing Web Forms project to filesystem (Connect private)
  • File system publish not copying files in destination folder (Connect private)

Web publish doesn’t handle read-only profiles correctly

In certain cases if a web publish profile is read-only it can cause VS to crash.

Reported Bugs

  • Publishing ASP.Net to UNC crashes (Connect private)
  • Visual Studio crashes while publishing (Connect private)
  • VS 2012 Crashing when trying to run Publish
  • VS2012 RC consistently crashes when publishing WCF service to file share (Connect private)

Web publish doesn’t include all files if there is no project configuration matching the solution configuration

The drop down for Configuration on the publish dialog was mapped to Solution Configurations instead of Project Configurations. Because of this if a Solution Configuration was selected which did not have a corresponding Project Configuration the files would not be published. We have updated the dialog to show the correct value.

Reported Bugs

  • File export for web application not working properly (Connect private)
  • Publish Web Application FAILS!
  • One-click Web Deployment using FTP does not work (Connect private)

Wrap up

We are really excited to be able to publish updates on a more regular basis and we hope that you will find that helpful as well. In case you guys were wondering if we listen to feedback/Connect bugs I hope that this post helps to show that we are listening to feedback and working to resolve bugs which get filed on Connect. Keep filing the bugs so that we can make our product even better. If you have already filed bugs on Connect then Thank You!

'


Sayed Ibrahim Hashimi | @SayedIHashimi

Cross posted to: http://sedodream.com/2012/07/12/VisualStudio2012RCWebToolingExtensionsUpdate.aspx

Plans regarding Website projects and Web Deployment Projects

$
0
0

The release of Visual Studio 2012 is right around the corner. If you’ve been following our blog/twitter then you may know that many of the Web related components of Visual Studio are now“out-of-band”, meaning that we can update them independently of Visual Studio itself. Because of this we are planning to ship updates a few times a year. We are currently in the process for planning our first update for VS 2012 and we wanted to share some of the items that we are planning to work on. We would like to get your feedback on these ideas to ensure that we are doing the right things. If you have comments please do let us know. FYI the updates that I describe below will be made available for both VS 2012 as well as VS 2010.

Website Project Updates

When you use Visual Studio there are two types of web projects you can create: a Web Application Project (WAP, this includes MVC) and a Website Project (WSP). In VS 2012 we did a lot of work to update the publish experience for WAPs. When we set out for these updates we planned to take these enhancements and make the available to Website projects as well. As we progressed it became evident that we did not have the resources to implement the features for both WAP and WSP in time for VS 2012. So we focused on creating the right experience for WAPs and we also added an extensibility point into WSP which will allow us to replace the existing publish dialog. The reason why we focused on WAP first was because WAPs already have support for Web Deploy (MSDeploy) based publishing as well as a formal build/publish process captured in MSBuild. WSP does not have either of these so it would have taken more time to start with WSP.

When VS 2012 is released the publish experience for WSP will be the same which was available in VS2010 but we will have a release a few months after the release which will bring all the publish goodness to Website Projects! This will include all the features which are available to Web Application Projects including; the ability to publish using.

  • Publishing methods MSDeploy / MSDeploy package / FTP / File System / FPSE
  • Ability to have multiple publish profiles, which can be stored in version control
  • Command line publishing
  • web.config transforms
  • Enabling Entity Framework CF migrations in web.config during publish
  • Incremental database schema publish
  • File preview
  • etc

Since both project systems will be using the exact same code whenever we add a feature it will immediately be available to both. In today’s world they are two entirely different code bases (the WSP publishing experience is currently native code where as the WAP publish dialog is managed). This will allow us to maintain a consistent publish experience and also enable us to deliver features more quickly.

Since WSP does not have a “build” process you might be wondering how we are planning to hook this all together since our entire publish pipeline is captured in MSBuild. Here is a rough idea of what we are currently thinking. After you use the new publish dialog to create a publish profile for the first time we will do a number of things:

  1. Create a new folder to contain needed artifacts
    1. The folder may be in the root of the Website project, but we are considering placing it somewhere outside as well
    2. The name of this folder is not yet finalized, but it could be something like _Publish or _Project
  2. Create an MSBuild file for the Website in that folder, this will capture information like; included files, references, properties to control publish process
    1. The primary purpose of dropping this file is to facilitate command line publish scenarios, without this we could publish from Visual Studio but not from the command line
    2. When you make changes in Visual Studio like adding a reference we will automatically keep this file up to date
  3. Create the publish profile in that folder (this is a .pubxml file)
  4. When the site is being published the working directory (i.e. obj\ folder) will be outside the root of the website, most likely in the same folder which contains the WSP root

After we have those things in place for the most part the publish dialog will be able to treat both projects in the same way. These files will by default be stored in version control and can be shared with other team members. Sensitive information such as the MSDeploy password will be stored in another file and encrypted per-user/per-machine in a .user file which is not checked in.

Web Deployment Projects

A few months after Visual Studio 2005 shipped we released the first version of Web Deployment Projects, and we updated WDP for both VS 2008 and VS 2010 and released them a few months after each of those releases as well. WDPs are used for a few different scenarios including the following.

  1. Publishing a Website project using MSDeploy
  2. Command line publish support
  3. Customizing the publish process for a WAP
  4. Running ASP.NET precompile/merge for a WSP or WAP

When we looked at the scenarios that WDPs are typically used for and then compared that to features which we have for WAP and WSP (after the updates mentioned above) we noticed that most (if not all) scenarios where WDP is used can be covered without requiring a WDP. Our new publish experience already has first class support for MSDeploy, command line publishing, and for extensibility so that covers #1-#3. Regarding #4 for WAPs we have already added ASP.NET precompile/merge as a publish option (you can find it in the Package/Publish Web tab). Since WSP does not have any property pages we are likely to move that option to being on the publish dialog itself or we will expose those options in another way for WSP. We have not yet settled on that design.

It may not seem like it but updating WDP to support VS2012 is a significant effort. Knowing that, and that most of the scenarios where WDP are used can now be transitioned to the new experience, we have decided to invest in giving WSP projects first class publishing support instead of updating VS 2012 to support WDP. We think that this is the right decision because we are unifying the publish experience for both project systems and it allows us to create a deeper set of features going forward instead of investing in different things and wasting effort. If you have a scenario that you think we have missed please do not hesitate to reach out to me by email at sayedha@microsoft.com and let me know.

Cross posted at: http://sedodream.com/2012/08/06/PlansRegardingWebsiteProjectsAndWebDeploymentProjects.aspx


Sayed Ibrahim Hashimi | @SayedIHashimi

How to create Web Deploy packages in Visual Studio 2012

$
0
0

When building Visual Studio 2012 we made an effort to reduce the amount of menu options which are shown on toolbars as well as context menus. If you have used any of the pre-release versions of VS 2012 then you might have noticed that the Build Deployment Package and Package/Publish Settings context menu options are gone from Web Application Project.

In VS2010 when creating a Web Deploy package the publish dialog was not used because there were no relevant settings. Now that we have enabled features like integration to enable Entity Framework Code First migrations, incremental database updates (coming in the final release), connection string updates, etc. we needed to find a way that you could leverage these great features when creating Web Deploy packages. The solution that we decided to go with was to have first class support for creating packages directly from the publish dialog.

After that, we felt that it would be better to have a single way to create a package than two different ways with pros and cons. And we would benefit by being able to simplify our context menu. To create a package for your Web Application Project in VS 2012 (or in VS 2010 if you have the Azure SDK 1.7+) you can follow the steps below.

  1. Right click on your project and select Publish
  2. Create a new profile for your Web Deploy package
  3. Specify the path where the package should go (must end with a .zip)
  4. Click Publish

After the initial create for the profile, creating additional packages is even easier. You just right click on your project select Publish and then click the Publish button.

The reason why we remove the context menu for the Package/Publish Settings is that most of the package and publish related settings are on the publish dialog. The existing settings from VS 2010 are still available on the property pages if you need to get to them.

One other change which we made was to hide the One Click toolbar. This is a toolbar which can be used to publish your web project in one click after the web publish profile has been created. After looking at the number of times that the button was used we determined that it did not meet the bar to be shown by default. Don’t worry if that was your favorite button (I know it was mine), you can bring it back quickly. The easiest way to turn it on is to press CTRL + Q (to bring up the quick launch), type in ‘one click’ and then click on the single result. That should show the One Click toolbar.

FYI if you want to learn more we have a great walk through on publishing a web project with an EF Code First model at Deploying an ASP.NET Web Application to a Windows Azure Web Site and SQL Database.

If you have any questions feel free to email me at sayedha@microsoft.com.

Cross posted to: http://sedodream.com/2012/08/09/HowToCreateWebDeployPackagesInVisualStudio2012.aspx

Sayed Ibrahim Hashimi | @SayedIHashimi

Using Dynamic Data with Entity Framework DbContext

$
0
0

In Visual Studio 2012, if you create a ADO.NET Data Model then the generated Context class derives from a type called DbContext instead of ObjectContext. DbContext is also used when you are using EntityFramework Code First

This post outlines the changes you have to do to your Dynamicdata project template if you want your context to derive from DbContext

1. Change Global.asax to get the ObjectContext

 DefaultModel.RegisterContext(() =>
            {
                return ((IObjectContextAdapter)new YourContextType()).ObjectContext;
            }, new ContextConfiguration() { ScaffoldAllTables = true });

2. Change ManyToMany.ascx.cs in the Dynamicdata\Fieldtemplates folder

protected override void OnDataBinding(EventArgs e)
        {
            base.OnDataBinding(e);
 
            object entity;
            ICustomTypeDescriptor rowDescriptor = Row as ICustomTypeDescriptor;
            if (rowDescriptor != null)
            {
                // Get the real entity from the wrapper
                entity = rowDescriptor.GetPropertyOwner(null);
            }
            else
            {
                entity = Row;
            }
 
            // Get the collection and make sure it's loaded
            var entityCollection = Column.EntityTypeProperty.GetValue(entity, null);
            var realEntityCollection = entityCollection as RelatedEnd;
            if (realEntityCollection != null && !realEntityCollection.IsLoaded)
            {
                realEntityCollection.Load();
            }
 
 
            // Bind the repeater to the list of children entities
            Repeater1.DataSource = entityCollection;
            Repeater1.DataBind();
        }
 
        public override Control DataControl
        {
            get
            {
                return Repeater1;
            }
        }

3. Change ManyToMany_Edit.ascx.cs in the Dynamicdata\Fieldtemplates folder

protected ObjectContext ObjectContext { get; set; }
 
        public void Page_Load(object sender, EventArgs e)
        {
            // Register for the DataSource's updating event
            EntityDataSource ds = (EntityDataSource)this.FindDataSourceControl();
 
            ds.ContextCreated += (_, ctxCreatedEnventArgs) => ObjectContext = ctxCreatedEnventArgs.Context;
 
            // This field template is used both for Editing and Inserting
            ds.Updating += new EventHandler<EntityDataSourceChangingEventArgs>(DataSource_UpdatingOrInserting);
            ds.Inserting += new EventHandler<EntityDataSourceChangingEventArgs>(DataSource_UpdatingOrInserting);
        }
 
        void DataSource_UpdatingOrInserting(object sender, EntityDataSourceChangingEventArgs e)
        {
            MetaTable childTable = ChildrenColumn.ChildTable;
 
            // Comments assume employee/territory for illustration, but the code is generic
            if (Mode == DataBoundControlMode.Edit)
            {
                ObjectContext.LoadProperty(e.Entity, Column.Name);
            }
 
            // Get the collection and make sure it's loaded
            dynamic entityCollection = Column.EntityTypeProperty.GetValue(e.Entity, null);
 
            // Go through all the territories (not just those for this employee)
            foreach (dynamic childEntity in childTable.GetQuery(e.Context))
            {
 
                // Check if the employee currently has this territory
                var isCurrentlyInList = ListContainsEntity(childTable, entityCollection, childEntity);
 
                // Find the checkbox for this territory, which gives us the new state
                string pkString = childTable.GetPrimaryKeyString(childEntity);
                ListItem listItem = CheckBoxList1.Items.FindByValue(pkString);
                if (listItem == null)
                    continue;
 
                // If the states differs, make the appropriate add/remove change
                if (listItem.Selected)
                {
                    if (!isCurrentlyInList)
                        entityCollection.Add(childEntity);
                }
                else
                {
                    if (isCurrentlyInList)
                        entityCollection.Remove(childEntity);
                }
            }
        }
 
        private static bool ListContainsEntity(MetaTable table, IEnumerable<object> list, object entity)
        {
            return list.Any(e => AreEntitiesEqual(table, e, entity));
        }
 
        private static bool AreEntitiesEqual(MetaTable table, object entity1, object entity2)
        {
            return Enumerable.SequenceEqual(table.GetPrimaryKeyValues(entity1), table.GetPrimaryKeyValues(entity2));
        }
 
        protected void CheckBoxList1_DataBound(object sender, EventArgs e)
        {
            MetaTable childTable = ChildrenColumn.ChildTable;
 
            // Comments assume employee/territory for illustration, but the code is generic
 
            IEnumerable<object> entityCollection = null;
 
            if (Mode == DataBoundControlMode.Edit)
            {
                object entity;
                ICustomTypeDescriptor rowDescriptor = Row as ICustomTypeDescriptor;
                if (rowDescriptor != null)
                {
                    // Get the real entity from the wrapper
                    entity = rowDescriptor.GetPropertyOwner(null);
                }
                else
                {
                    entity = Row;
                }
 
                // Get the collection of territories for this employee and make sure it's loaded
                entityCollection = (IEnumerable<object>)Column.EntityTypeProperty.GetValue(entity, null);
                var realEntityCollection = entityCollection as RelatedEnd;
                if (realEntityCollection != null && !realEntityCollection.IsLoaded)
                {
                    realEntityCollection.Load();
                }
            }
 
            // Go through all the territories (not just those for this employee)
            foreach (object childEntity in childTable.GetQuery(ObjectContext))
            {
                // Create a checkbox for it
                ListItem listItem = new ListItem(
                    childTable.GetDisplayString(childEntity),
                    childTable.GetPrimaryKeyString(childEntity));
 
                // Make it selected if the current employee has that territory
                if (Mode == DataBoundControlMode.Edit)
                {
                    listItem.Selected = ListContainsEntity(childTable, entityCollection, childEntity);
                }
 
                CheckBoxList1.Items.Add(listItem);
            }
        }
 
        public override Control DataControl
        {
            get
            {
                return CheckBoxList1;
            }
        }
 

At this point you should be good to run your application and use DbContext or EntityFramework Code First with Dynamicdata templates

OAuth/OpenID Support for WebForms, MVC and WebPages

$
0
0

[Update]

Adding relevant links at the bottom of the post

One of the coolest features in Visual Studio 2012 is the ability to login using your Microsoft, Facebook, Twitter or Google account. The project templates showcase a social way of logging in along with the usual way of logging in by creating a local account

This post highlights how you can turn on support for logging through these services in the project  templates. Head over the following video to get a quick glance on this feature http://www.asp.net/vnext/overview/videos/oauth-in-the-default-aspnet-45-templates

Enable OAuth login using Facebook, Twitter

Steps to get keys for Facebook

  • Go to the Facebook developers site (log in if you're not already logged in).
  • Choose the Create New App button, and then follow the prompts to name and create the new application.
  • In the section Select how your app will integrate with Facebook, choose the Website section.
  • Fill in the Site URL field with the URL of your site (for example, http://www.example.com). The Domain field is optional; you can use this to provide authentication for an entire domain (such as example.com).
    Note   If you are running a site on your local computer with a URL like http://localhost:12345 (where the number is a local port number), you can add this value to the Site URL field for testing your site. However, any time the port number of your local site changes, you will need to update the Site URL field of your application.
  • Choose the Save Changes button.
  • Choose the Apps tab again, and then view the start page for your application.
  • Copy the App ID and App Secret values for your application and paste them into a temporary text file. You will pass these values to the Facebook provider in your website code.
  • Exit the Facebook developer site.

Steps to get keys for Twitter

  • Browse to the Twitter developers site.
  • Choose the Create an App link and then log into the site.
  • On the Create an Application form, fill in the Name and Description fields.
  • In the WebSite field, enter the URL of your site (for example, http://www.example.com).
    Note   If you're testing your site locally (using a URL like http://localhost:12345), Twitter might not accept the URL. However, you might be able to use the local loopback IP address (for example http://127.0.0.1:12345). This simplifies the process of testing your application locally. However, every time the port number of your local site changes, you'll need to update the WebSite field of your application.
  • In the Callback URL field, enter a URL for the page in your website that you want users to return to after logging into Twitter. For example, to send users to the home page of the Starter Site (which will recognize their logged-in status), enter the same URL that you entered in the WebSite field.
  • Accept the terms and choose the Create your Twitter application button.
  • On the My Applications landing page, choose the application you created.
  • On the Details tab, scroll to the bottom and choose the Create My Access Token button.
  • On the Details tab, copy the Consumer Key and Consumer Secret values for your application and paste them into a temporary text file. You'll pass these values to the Twitter provider in your website code.
  • Exit the Twitter site.

Steps to enable OAuth support in WebForms

    • Create a new ASP.NET WebForms Application
    • Goto App_Start\AuthConfig.cs and uncomment the following lines of code
OpenAuth.AuthenticationClients.AddTwitter(
                 consumerKey: "your Twitter consumer key",
                 consumerSecret: "your Twitter consumer secret");
 
            OpenAuth.AuthenticationClients.AddFacebook(
                 appId: "your Facebook app id",
                 appSecret: "your Facebook app secret");

    Steps to enable OAuth support in MVC

      • Create a new ASP.NET MVC Internet Application
      • Goto App_Start\AuthConfig.cs and uncomment the following lines of code
    //OAuthWebSecurity.RegisterTwitterClient(
                // consumerKey: "",
                // consumerSecret: "");
     
                //OAuthWebSecurity.RegisterFacebookClient(
                // appId: "",
                //    appSecret: "");

    Steps to enable OAuth support in WebPages

      • Create a new ASP.NET WebSite(Razor2)
      • Goto _AppStart.cshtml and uncomment the following lines of code
    //OAuthWebSecurity.RegisterTwitterClient(
                // consumerKey: "",
                // consumerSecret: "");
     
                //OAuthWebSecurity.RegisterFacebookClient(
                // appId: "",
                //    appSecret: "");

    OpenID services such as Google

    Steps to enable OpenID support in WebForms

    • Create a new ASP.NET WebForms Application
    • Goto App_Start\AuthConfig.cs and uncomment the following lines of code
    OpenAuth.AuthenticationClients.AddGoogle();


    Steps to enable OpenID support in MVC

    • Create a new ASP.NET MVC Internet Application
    • Goto App_Start\AuthConfig.cs and uncomment the following lines of code

    OAuthWebSecurity.RegisterGoogleClient();

    Steps to enable OpenID support in WebPages

    • Create a new ASP.NET WebSite(Razor2)
    • Goto _AppStart.cshtml and uncomment the following lines of code

    OAuthWebSecurity.RegisterGoogleClient();

    Links to relevant posts

    http://blogs.msdn.com/b/webdev/archive/2012/08/22/extra-information-from-oauth-openid-provider.aspx

    http://blogs.msdn.com/b/pranav_rastogi/archive/2012/08/23/plugging-custom-oauth-openid-providers.aspx

    http://blogs.msdn.com/b/webdev/archive/2012/08/24/customizing-the-login-ui-when-using-oauth-openid.aspx

    Happy Logging in a social way!!!

    More info on publish links in Visual Studio 2012

    $
    0
    0

    Within the web publishing tools in Visual Studio there are a few places where we point to more resources. For example if you open a VS publish profile (.pubxml) file you will see a link in the comments pointing to http://go.microsoft.com/fwlink/?LinkID=208121.

    Note: you can find the VS publish profiles in your web project under Properties\PublishProfiles or My Project\PublishProfiles

    This is an “FWLink” and we can set the destination URL to whatever value we want. In this case the FWLink points to How to: Edit Deployment Settings in Publish Profile (.pubxml) Files and the .wpp.targets File in Visual Studio Web Projects. In some cases the FWLink ends up pointing to a blog post instead of a formal doc page.

    I will point a few FWLinks to the blog post for more info on the specific topics. See below for each item.

     Publish message indicating 4.5 is not supported by hosting provider

    If you publish an ASP.NET 4.5 web project to a Windows Azure Web Site (WAWS) before ASP.NET 4.5 is supported by WAWS you will receive the following error.

    Error : Your hosting provider does not yet support ASP.NET 4.5, which your application is configured to use. To learn more about this please visit: http://go.microsoft.com/fwlink/?LinkId=247936

    Since we know that the end point will not be able to run an ASP.NET 4.5 we let you know about it before your site is published. If you switch to ASP.NET 4.0 you will be able to publish your project. If you want to bypass the 4.5 check you can do that too. Just edit the VS publish profile (.pubxml file) and add the following immediately above the closing </Project> tag.

    <PropertyGroup>
      <_Enable45Check>false</_Enable45Check>
    </PropertyGroup>

    Database publishing in Visual Studio 2010 when running on Windows XP

    One of the features that we added is the ability to incrementally publish database schema along with your web project. We rely on technology created by the SQL group which are a part of SQL Server Data Tools (SSDT). Unfortunately these tools do not support Windows XP. Because of that you will see the following message.

    clip_image002

    When we shipped Visual Studio 2010 we added support for non-incremental database publishing. You can use those features when running on Windows XP. You can read more at Deploying a SQL Server Database. Note: for users not running on XP its recommended to configure database publishing on the publish dialog. You can find more info on that at How to: Deploy a Web Application Project Using One-Click Publish in Visual Studio.


    Sayed Ibrahim Hashimi | @SayedIHashimi


    Visual Studio 2012 RTW

    $
    0
    0

    Visual Studio 2012 is now released to the web. Please visit Jason Zander’s Blog for detailed announcement. This page lists what’s new in ASP.NET 4.5 and Visual Studio for Web.

    We are updating the Visual Studio 2010 publish experience as well to align with the features available in Visual Studio 2012 RTW. The bits are inside Windows Azure SDK for .NET which can be downloaded in https://www.windowsazure.com/en-us/develop/net/.

    Also, we are releasing the following at the same time:

    You can get the details of the Web API release from this post.

    Videos about the new features by Scott Hanselman:

    Tell Us What You Think


    Enjoy!

    Web Platform and Tools

    Update 8/16/2012: Add the links for WebAPI nuget packages.

    Migration for user accounts from the SqlMembershipProvider to the Universal Providers

    $
    0
    0

    As you know ASP.Net SqlMembershipProvider / SqlRoleProvider only support Microsoft SQL Server and Microsoft SQL Server Express. There is no support for Microsoft SQL Azure and Microsoft SQL Server Compact. The ASP.NET Universal Providers have been created in order to add support for SQL Azure to be ready for cloud environments like Azure.

    Here we will talk about how to migrate your existing project with the SqlMembershipProvider for your user accounts and passwords to the Universal Providers.

    First, install the Universal Providers Nuget package. This will update the existing project to use Universal Providers. You can also migrate the existing user accounts and passwords from the SqlMembershipProvider to the Universal Providers using the instructions below.

    Migrate all the accounts from the old tables to the new tables:

    • For Microsoft ASP.NET Universal Providers 1.1 /1.2, below is sample SQL scripts for the membership and role providers (this doesn’t cover the profile provider):
    INSERT INTO dbo.Applications (ApplicationName, ApplicationId, Description)
    SELECT ApplicationName, ApplicationId, Description FROM dbo.aspnet_Applications
    GO
     
    INSERT INTO dbo.Roles (ApplicationId, RoleId, RoleName, Description)
    SELECT ApplicationId, RoleId, RoleName, Description FROM dbo.aspnet_Roles
    GO
     
    INSERT INTO dbo.Users (ApplicationId, UserId, UserName, IsAnonymous, LastActivityDate)
    SELECT ApplicationId, UserId, UserName, IsAnonymous, LastActivityDate FROM dbo.aspnet_Users
    GO
     
    INSERT INTO dbo.Memberships (ApplicationId, UserId, Password, 
    PasswordFormat, PasswordSalt, Email, PasswordQuestion, PasswordAnswer,
    IsApproved, IsLockedOut, CreateDate, LastLoginDate, LastPasswordChangedDate,
    LastLockoutDate, FailedPasswordAttemptCount,
    FailedPasswordAttemptWindowStart, FailedPasswordAnswerAttemptCount,
    FailedPasswordAnswerAttemptWindowStart, Comment)
    SELECT ApplicationId, UserId, Password, 
    PasswordFormat, PasswordSalt, Email, PasswordQuestion, PasswordAnswer,
    IsApproved, IsLockedOut, CreateDate, LastLoginDate, LastPasswordChangedDate,
    LastLockoutDate, FailedPasswordAttemptCount,
    FailedPasswordAttemptWindowStart, FailedPasswordAnswerAttemptCount,
    FailedPasswordAnswerAttemptWindowStart, Comment FROM dbo.aspnet_Membership
    GO
     
    INSERT INTO dbo.UsersInRoles SELECT * FROM dbo.aspnet_UsersInRoles
    GO

    After all the accounts are migrated from the old tables to the new tables, you could update the config setting for Universal Providers (if needed) to map to the appropriate settings on the SqlMembershipProvider. In this case, a password reset won’t be needed and existing users will still be able to logon

    Here is a list of the settings for SqlMembershipProvider that should be mapped to the settings on the Universal Providers DefaultMembershipProvider:

    1. Default setting in membership and SqlMembershipProvider (here are 2 examples for same results of settings):

    In SqlMembershipProvider, by default passwordCompatMode is Framework20.

    In DefaultMembershipProvider, by default passwordCompatMode is Framework40.

    SqlMembershipProvider DefaultMembershipProvider
    e.g. e.g.

    <membership defaultProvider="AspNetSqlMembershipProvider">

          <providers>

            <clear />

            <add name="AspNetSqlMembershipProvider" type="System.Web.Security.SqlMembershipProvider" connectionStringName="ApplicationServices" applicationName="test" />

          </providers>

    </membership>

    <membership defaultProvider="DefaultMembershipProvider">

          <providers>

            <add name="DefaultMembershipProvider" type="System.Web.Providers.DefaultMembershipProvider" connectionStringName="DefaultConnection" applicationName="test" passwordCompatMode="Framework20" />

          </providers>

    </membership>

    <membership defaultProvider="AspNetSqlMembershipProvider">

          <providers>

            <clear />

            <add name="AspNetSqlMembershipProvider" type="System.Web.Security.SqlMembershipProvider" connectionStringName="ApplicationServices" applicationName="test" passwordCompatMode="Framework20" />

          </providers>

    </membership>

    <membership defaultProvider="DefaultMembershipProvider">

          <providers>

            <add name="DefaultMembershipProvider" type="System.Web.Providers.DefaultMembershipProvider" connectionStringName="DefaultConnection" applicationName="test" passwordCompatMode="Framework20" />

          </providers>

    </membership>


    2. Specified hashAlgorithmType setting in membership with SqlMembershipProvider (here are 2 examples for same results of settings):

    In SqlMembershipProvider, specified hashAlgorithmType will be used,  no matter what passwordCompatMode.

    In DefaultMembershipProvider, because of Medium trust security issue on reading hashAlgorithmType setting in membership, only when passwordCompatMode is Framework40, specified hashAlgorithmType will be used.

    SqlMembershipProvider DefaultMembershipProvider
    e.g. e.g.

    <membership defaultProvider="AspNetSqlMembershipProvider" hashAlgorithmType="SHA256">

          <providers>

            <clear />

            <add name="AspNetSqlMembershipProvider" type="System.Web.Security.SqlMembershipProvider" connectionStringName="ApplicationServices" applicationName="test" passwordCompatMode="Framework20" />

          </providers>

    </membership>

    <membership defaultProvider="DefaultMembershipProvider" hashAlgorithmType="SHA256">

          <providers>

            <add name="DefaultMembershipProvider" type="System.Web.Providers.DefaultMembershipProvider" connectionStringName="DefaultConnection" applicationName="test" passwordCompatMode="Framework40" />

          </providers>

    </membership>

    <membership defaultProvider="AspNetSqlMembershipProvider" hashAlgorithmType="SHA256">

          <providers>

            <clear />

            <add name="AspNetSqlMembershipProvider" type="System.Web.Security.SqlMembershipProvider" connectionStringName="ApplicationServices" applicationName="test" passwordCompatMode="Framework40" />

          </providers>

    </membership>

    <membership defaultProvider="DefaultMembershipProvider" hashAlgorithmType="SHA256">

          <providers>

            <add name="DefaultMembershipProvider" type="System.Web.Providers.DefaultMembershipProvider" connectionStringName="DefaultConnection" applicationName="test" passwordCompatMode="Framework40" />

          </providers>

    </membership>


    3. Specified Framework40 passwordCompatMode in SqlMembershipProvider:

    SqlMembershipProvider DefaultMembershipProvider
    e.g. e.g.

        <membership defaultProvider="AspNetSqlMembershipProvider">

          <providers>

            <clear />

            <add name="AspNetSqlMembershipProvider" type="System.Web.Security.SqlMembershipProvider" connectionStringName="ApplicationServices" applicationName="test" passwordCompatMode="Framework40" />

          </providers>

        </membership>

        <membership defaultProvider="DefaultMembershipProvider">

          <providers>

            <add name="DefaultMembershipProvider" type="System.Web.Providers.DefaultMembershipProvider" connectionStringName="DefaultConnection" applicationName="test" passwordCompatMode="Framework40" />

          </providers>

        </membership>

    Links to ASP.NET WebAPI blog posts and Data Access blog posts

    $
    0
    0

    Here are some blog posts about ASP.NET WebAPI that we just released.

    Here are some ASP.NET Data access blog posts intended for newcomers to ASP.NET. The purpose is basic guidance for making data access choices for ASP.NET application development.  The two SQL Server docs may also be useful to people who have been using ASP.NET but aren’t familiar with LocalDB and SSDT.


    Enjoy web development!

    Profile specific web.config transforms and transform preview

    $
    0
    0

    When we released VS2010 we add support for web.config (XDT) transforms during publish/package. Note: From now on I’ll only use the word publish from now on but the full content relates to packaging as well. In the original implementation when you published your web project the web.config file would be transformed by the file web.{Configuration}.config, where {Configuration} is the project build configuration. For example Debug, or Release. If you publish on Release and there exists a web.release.config we will take your web.config and transform it with web.release.config before publishing.

    Cascading web.config transformations

    In VS 2012 (as well as the publishing updates for VS2010 through the Azure SDK) now support the concept of publish specific transforms. You can also now specify the project configuration used for a profile when publishing on the publish dialog.

    SNAGHTML45b19fc

    In this case I have created a profile named Production and set the Configuration to Release. When I publish this project the following transformations will be applied (if the files exist) in this order.

    1. web.release.config
    2. web.production.config

    I think that we got this wrong when we initially implemented the support. We should have created profile specific transforms instead of ones based on build config, but having these cascading transforms are still pretty useful. For example I may want to remove the attribute debug=”true” from the compilation element and then inside of the profile specific transform we would override appSettings/WCF endpoints/logging config/etc for that environment.

    In VS there is a right-click option on web.config for Add Config Transform, but we were not able to update the functionality of that to automatically create profile specific transforms. Don’t worry, it will be released soon with one of our updates for web tooling. For now you will need to create a new file with the correct name and add it to your project. Note: if you want it to show up nested under web.config you’ll need to add the metadata <DependentUpon>Web.config</DependentUpon> to the item in the .csproj/.vbproj file.

    web.config transform preview

    Previously the only way to test the functionality for these transformation was to actually publish or package the web project. This gets old pretty quick. In order to simplify creating these transforms we have introduced the Preview Transform menu option. This is the coolest feature in VS 2012 (OK I’m a bit biased, but still its the coolest).

    image

    In my web.release.config I have left the default contents, which just removes the debug attribute. Here is what I see when I select this on web.release.config for my project.

    image

    You can see that in the image above we can see that the debug flag was indeed removed as expected.

    In my web.production.config I have a transform which simply updates the email app setting value. Here is the really cool part when I preview the transform for web.production.config the previewer will look into the profile and determine the build configuration which has been configured, and it will ensure that transform is applied before the profile specific one. For example take a look at the result for web.production.config.

    image

    In the image above you can see the note that web.release.config was applied first followed by web.production.config. In the result we can see that web.release.config removed the debug flag and that web.production.config updated the email address value.

    We also do a little bit to help out in case there are errors in either the web.config or a transform. You can see errors in the Output Window and double click it to go directly to where the error exists.

    Note: Scott Hanselman has a 5 minute video showing this and other updates.

    Another note: If you need to transform any file besides web.config during publish then install my extension SlowCheetah.


    Cross posted to http://sedodream.com/2012/08/19/ProfileSpecificWebconfigTransformsAndTransformPreview.aspx

    Sayed Ibrahim Hashimi | @SayedIHashimi

    Getting Started with ASP.NET 4.5 Web Forms

    $
    0
    0

    The best way to learn what’s new in ASP.NET 4.5 Web Forms, is to work through the latest tutorial series by Erik Reitan: Getting Started with ASP.NET 4.5 Web Forms.

    The 10 tutorials in the series progressively guide you through building a Web Forms application, which is a simplified example of a store front web site that sells items online. Each tutorial builds on the previous tutorial. When you’re finished, you’ll be familiar with common ASP.NET concepts, as well as many of the new features available in ASP.NET 4.5, including effective use of the new model binding features.

    dataitems-01

    In addition, you’ll learn about, Entity Framework Code First, unobtrusive validation, the Anti-XSS library, HTML5, data annotations, Local DB, value providers, PayPal integration, ASP.NET Membership, URL routing, and more.

    Here's an outline of the tutorial series:

    Introduction and Overview

    • Introduction
    • Audience
    • Application Features
    • Application Scenarios and Tasks
    • Overview
    • Prerequisites
    • Download the Sample Application
    • Tutorial Support and Comments

    Create the Project

    • Creating the Project
    • Reviewing the Project
    • Running the Default Web Application
    • ASP.NET Web Forms Background
    • Web Application Features in the Web Forms Application Template
    • Touring Visual Studio
    • Summary
    • Additional Resources

    Create the Data Access Layer

    • Creating the Data Models
    • Configuring the Application to Use the Data Model
    • Building the Application
    • Summary
    • Additional Resources

    UI and Navigation

    • Modifying the UI
    • Updating the Master Page
    • Adding Image Files
    • Adding Pages
    • Updating the StyleSheet
    • Modifying the Default Navigation
    • Adding a Data Control to Display Navigation Data
    • Linking the Data Control to the Database
    • Running the Application and Creating the Database
    • Reviewing the Database
    • Summary
    • Additional Resources

    Display Data Items and Details

    • Adding a Data Control to Display Products
    • Displaying Products
    • Adding Code to Display Products
    • Running the Application
    • Adding a Data Control to Display Product Details
    • Running the Application
    • Summary

    Shopping Cart

    • Creating a Shopping Cart
    • Managing the Shopping Cart Business Logic
    • Creating the Shopping Cart Class
    • Creating the Add-To-Cart Functionality
    • Creating the Shopping Cart UI
    • Retrieving the Shopping Cart Items
    • Adding Products to the Shopping Cart
    • Testing the Shopping Cart
    • Calculating and Displaying the Order Total
    • Modify the Shopping Cart Display
    • Testing the Shopping Cart Total
    • Adding Update and Checkout Buttons to the Shopping Cart
    • Updating and Removing Shopping Cart Items
    • Adding a Shopping Cart Counter
    • Testing the Completed Shopping Cart
    • Summary
    • Addition Information

    Checkout and Payment with PayPal

    • Adding Order Tracking
    • Adding Checkout Access
    • Enabling Logins from Other Sites Using OAuth and OpenID
    • Modifying Login Functionality
    • Migrating the Shopping Cart
    • Updating the Database Connection
    • Integrating PayPal
    • Running the Application
    • Reviewing the Database
    • Summary
    • Disclaimer

    Membership and Administration

    • Adding an Administrator
    • Restricting Access to the Administration Page
    • Including Administrator Navigation
    • Enabling Product Administration
    • Running the Application
    • Summary
    • Additional Resources

    URL Routing

    • ASP.NET Routing Overview
    • Mapping and Registering Routes
    • Retrieving and Using Route Data
    • Running the Application
    • Summary

    ASP.NET Error Handling

    • Overview
    • Adding Error Logging Support
    • Adding an Error Page
    • Displaying Unhandled Error Messages for the Application
    • Including an Exception for Testing Purposes
    • Adding Application-Level Error Handling
    • Adding Page-Level Error Handling
    • Removing the Exception Used for Testing
    • Adding Code-Level Error Logging
    • Inspecting the Error Logging Information
    • Safe Error Messages
    • Using ELMAH
    • Viewing the ELMAH Log
    • Summary
    • Conclusion
    • Additional Resources
    • Acknowledgements

    Releasing Microsoft ASP.NET Universal Providers Core 1.2

    $
    0
    0

    I hope everyone has been busy downloading Visual Studio 2012 and have started building awesome web applications. We have been busy too during this time.

    We have just released an update to the version of Universal Providers that shipped with VS2012. Following are the key changes with this release

    • Address key performance issues with the providers
    • Depends on EntityFramework Code First


    What should you do

    This version of Universal Providers Core that shipped with VS2012 was 1.1. Take a moment and update to 1.2

    You can follow this documentation on  how to update a nuget package.

    While updating you will get the EntityFramework 5.0.0 package as well from the nuget.org

    Some common FAQ

    • Works on .NET v4.0/4.5
    • Works on VS2010/VS2012
    • 1.2 is compatible with 1.1

    Please do reach out to us on the following forum channels for any questions on universal providers

    All the best building awesome applications.

    Cross posted to http://blogs.msdn.com/b/pranav_rastogi/archive/2012/08/20/releasing-microsoft-asp-net-universal-providers-core-1-2.aspx

    Visual Studio project compatibility and VisualStudioVersion

    $
    0
    0

    One of the most requested features of Visual Studio 2012 was the ability to open projects in both VS 2012 as well as VS 2010 (requires VS 2010 SP1). In case you haven’t heard we did implement that feature. You may be wondering how we were able to do this and how this may impact you.

    If you open the .csproj/.vbproj for a Web Project created in VS2010 you will see the following import statement.

    <Import Project="$(MSBuildExtensionsPath32)\Microsoft\VisualStudio\
    v10.0\WebApplications\Microsoft.WebApplication.targets" />

    When you open this project in VS 2012 there are a few changes made to your project file to ensure that it can be opened in both VS 2010 SP1 and VS 2012. One of the changes made to the project when it is first loaded in VS 2012 is to add the following to replace that import statement.

    <PropertyGroup>
      <VisualStudioVersion Condition="'$(VisualStudioVersion)' == ''">10.0</VisualStudioVersion>
      <VSToolsPath Condition="'$(VSToolsPath)' == ''">
        $(MSBuildExtensionsPath32)\Microsoft\VisualStudio\v$(VisualStudioVersion)</VSToolsPath>
    </PropertyGroup>
    <Import Project="$(VSToolsPath)\WebApplications\Microsoft.WebApplication.targets" Condition="'$(VSToolsPath)' != ''" />

    We removed the hard-coded 10.0 and instead used the property VisualStudioVersion. When building in Visual Studio 2012 this value will always be 11.0, but for VS 2010 it doesn’t exist. That is why we defaulted it to 10.0 above.

    There are some scenarios where building from the command line will require to set this property explicitly. Before we get there let me explain how this property gets set (in this order)

    1. If VisualStudioVersion is defined as an environment variable/global MSBuild property, that is used.
      • This is how VS and the VS developer command prompt set this value
    2. Based on the file format version of the .sln file (toolset used is sln file format –1)
      • To simplify this statement, the .sln file will build with specifying VisualStudioVersion to the value of the version of VS which created the .sln file.
    3. Choose default
      • 10.0 if VS 2010 is installed
      • Highest-versioned sub-toolset version installed

    For #2 when you are building a .sln file the value of VisulStudioVersion will be –1 of the Format Version found in the .sln file. The important thing to note here is that if you build a .sln file it will build with the value of VisulStudioVersion corresponding to the version of VS which created the .sln file. So if you create a .sln file in VS2012 and you always build that .sln file the value for VisualStudioVersion will be 11.0. In many cases if you build the .sln file you are good.

    If you are building .csproj/.vbproj files w/o going through a .sln file? If you build a web project from the command line (not the developer prompt) then the value for VisualStudioVersion used will be 10.0. That is an artifact of the properties which I showed above. In this case you should pass this in as an MSBuild property. For example

    msbuild.exe MyAwesomeWeb.csproj /p:VisualStudioVersion=11.0

    In this case I’m passing in the property explicitly. This will always override any other mechanism to determine the value for VisualStudioVersion. If you are using the MSBuild task in a build script, then you can specify the property either in the Properties attribute or the AdditionalProperties attribute. See my previous blog post on the difference between Properties and AdditionalProperties.

    If you encounter any funny behavior when building/publishing and you notice that the wrong .targets files are being imported then you may need to specify this property.

    Cross posted to: http://sedodream.com/2012/08/19/VisualStudioProjectCompatabilityAndVisualStudioVersion.aspx

    Sayed Ibrahim Hashimi | @SayedIHashimi


    Announcing the Release of SignalR 0.5.3

    $
    0
    0

    SignalR 0.5.3 Release Notes

    The SignalR team has been working long hours in their team room in Building 18 for the past few months adding features, resolving issues, and cranking out code. Today the team has released the 0.5.3 release of SignalR. This post will cover some of the key items in the release and explain how you can make use of the great new features, like improved error handling, extended logging functionality, and client hubs.

    New Connection Syntax, Simpler Cross-Domain Connections

    The 0.5.3 release adds a new method of establishing a connection to a SignalR Hub on the server, the hubConnection object.

    var connection = $.hubConnection();
    
    connection.start(function () {
        $('#submitButton').removeAttr('disabled');
    });
    

    By default, hubConnection directs all traffic to the server from which the calling HTML originated. However, by providing the url parameter you can direct traffic to a secondary server if that's your preference.

    var connection = $.hubConnection('http://mysite.azurewebsites.net');
    

    The new, strongly-typed hubConnection object exposes methods recognized and supported by Visual Studio's JavaScript IntelliSense features. This feature alone makes it an attractive alternative to $.connection if you're new to SignalR coding, and eases development if you're already familiar with the original methodology.

    One of the methods exposed by hubConnection, the createProxy method, will be examined in the next section. This feature brings syntax to JavaScript previously available to developers working with the native .NET SignalR clients.

    Client Hubs

    Improvements have been made for JavaScript developers who plan on working with SignalR hubs. Via the hubConnection.createProxy method, an object is returned to the calling code that offers more syntactic sugar and IntelliSense support over previous releases.

    Consider the ChatHub class, that provides basic chat functionality.

    [HubName("chat")]
    public class ChatHub : Hub
    {
        public void SendMessage(dynamic message)
        {
            Clients.receiveMessage(message);
        }
    }
    

    Connecting to this hub using the plugin is as simple as calling the hub's name. In this case, the hub has been explicitly named using the HubName attribute.

    var chat = connection.createProxy('chat');
    

    To use the chat variable in JavaScript code to call the SendMessage method on the hub, the invoke method can be executed. In the example code below, a JavaScript object is created to represent the form's current values, and the object is then transmitted to the ChatHub instance via the second parameter of the invoke method.

    $(function () {
        var connection = $.hubConnection(),
            chat = connection.createProxy('chat');
    
        connection.start(function () {
            $('#submitButton').removeAttr('disabled');
        });
    
        $('#submitButton').click(function () {
            var msg = {
                username: $('#username').val(),
                message: $('#message').val()
            };
    
            chat.invoke('SendMessage', msg);
        });
    });
    

    The event-handling syntax available in Client Hubs has also been improved via addition of the on method. This method handles events that are fired from within the server-side hub class, and defines how those event's arguments will be used in the calling code.

    chat.on('receiveMessage', function (m) {
        $('#messages').append('<li><b>' + m.username + '</b>:' + m.message + '</li>');
    });
    

    Parity with Windows 8 HTML/JavaScript

    Windows 8 development provides HTML and JavaScript developers a familiar platform on which to develop, and all of these SignalR JavaScript features are available to Windows 8 developes who want to use HTML and JavaScript as their target development paradigm. The code for web pages is the same as it is for Windows 8 applications, and the new release of SignalR maintains this approach and makes real-time applications written in HTML and JavaScript available on both the desktop and in the browser.

    Improved Logging

    The hubConnection object's logging property enables toggling the logging features on or off.

    connection.logging = true;
    

    When activated, SignalR outputs detailed logs, which make troubleshooting and debugging much easier. The screen shot below shows the nature of the output available when using the debugging tools in Internet Explorer.

    Improved Exception Support

    Improved diagnostics was a fundamental component of the 0.5.3 release. Along with logging improvements, native exception-handling improvements in SignalR make it easier to determine the nature of errors when they arise. When code in the ChatHub is modified to support the business-logic of verifying that each message is associated with a specific username, the probability of exceptions ocurring up-stream in the communication process elevates. Using the console window available in Internet Explorer, you can observe as SignalR exceptions occur. As in this case, a username wasn't present, the application throws an exception to be handled by the client.

    public void SendMessage(dynamic message)
    {
        var user = message.username;
    
        if (String.IsNullOrEmpty(message.username.ToString()))
        {
            throw new ApplicationException("No username provided!");
        }
    
        Clients.receiveMessage(message);
    }
    

    The console pane shows the exception handling in practice. As errors occur in the server functionality they are wrapped in SignalR exception details.

    In the native .NET coding environment, the extended exceptions support will wrap exceptions that happen on a remote hub so that the nature of the exception will be made available during development. The call to Exception.GetError below shows how a SignalR call resulting with an unhandled exception can be evaluated to obtain information about the error that occurred on the remote client.

    private static void Connect()
    {
        var connection = new HubConnection("http://localhost:58416/");
        var chat = connection.CreateProxy("chat");
        chat.On<string>("addMessage", Console.WriteLine);
        try
        {
            connection.Start().Wait();
            string msg = null;
            while ((msg = Console.ReadLine()) != null)
            {
                chat.Invoke("send", msg).Wait();
            }
        }
        catch (Exception ex)
        {
            using (var error = ex.GetError()) // NEW ERROR HANDLING FEATURES
            {
                Console.WriteLine(error.StatusCode);
            }
        }
    }
    

    Server Sent Events in All Clients

    Previous verisons of the SignalR clients for Windows Phone and Silverlight only supported the Long Polling transport. 0.5.3 adds support for Server Sent Events to these clients meaning all clients are now able to receive messags over an open HTTP stream. This support is enabled by default so you don't have to change your application in any way to get the benefit.

    Typed Representations of Client Subsets

    New in 0.5.3 is the ability to reference a filtered list of the active clients as a single object instance. Referencing a group of clients using the familiar index-style nomenclature results in the return of an instance of the IClientProxy interface. Take the code below, which illustrates this new feature by segmenting a set of clients based on which group or room into which they're currently placed.

    public void DynamicInvoke(string method)
    {
        IClientProxy callerProxy = Caller;
        IClientProxy allClientsProxy = Clients;
        IClientProxy groupProxy = Clients["foo"];
        groupProxy.Invoke(method);
    }
    

    Self-hosting Authentication Improvements

    If your architecture provides you the opportunity to host SignalR outside of ASP.NET in a self-hosting manner, new authentication functionality is provided in the 0.5.3 release. The code below demonstrates how the new AuthenticationSchemes property of the self-hosting server supports the System.Net.AuthenticationSchemes enum type.

    static void Main(string[] args)
    {
        Debug.Listeners.Add(new ConsoleTraceListener());
        Debug.AutoFlush = true;
    
        string url = "http://*:8081/";
        var server = new Server(url);
        server.Configuration.DisconnectTimeout = TimeSpan.Zero;
        server.AuthenticationSchemes = AuthenticationSchemes.Ntlm;
    
        server.MapHubs();
    
        server.Start();
    
        Console.WriteLine("Server running on {0}", url);
    
        while (true)
        {
            ConsoleKeyInfo ki = Console.ReadKey(true);
            if (ki.Key == ConsoleKey.X)
            {
                break;
            }
        }
    }
    

    Summary

    A comprehensive list of the release notes for the 0.5.3 is below (cloned from the GitHub.com repository page).

    • Improve logging for hubs in js client. (#505)
    • Can't pass querystring when creating HubConnection. (#581)
    • Improve errors for .NET client. (#515)
    • Make http streaming work with Win8 client. (a61ee958ed)
    • Fix bugs related to forever loading indicators on various browsers (#215), (#383), (#491)
    • Force shut down a client, server execution flow didn't go into IDisconnect.Disconnect () at all. (#511)
    • Transport fallback should fail if onFailed called and there's no good fallback. (#485)
    • Turn ReadStreamBuffering off for WP7 and Silverlight to enable SSE support. (18cb087037)
    • Connect/Disconnect events not firing in IE (#501)
    • Make dictionaries in bus case in sensitive. (5916a588f9)
    • Groups.Add within persistent connection fails under high crank load. (#388)
    • Use the HttpClient stack in silverlight. (b51a4144db)
    • Made reconnect timeout configurable on SSE transport. (6b869a4cd9)
    • Fix race condition when client sends immediately after connecting (#552)
    • Make access to the state thread safe in the .NET client. (8464514a8d)
    • Abort the request before calling close on the request in the .NET client. (50ee2b9b6c)
    • Throw if CreateProxy called after the connection is started. (89eb8e492c)
    • Fix caching negotiate response in Silverlight client (#522)
    • Serve silverlight's cross domain policy file for self hosted server. (eaec182fee)
    • Expose underlying AuthenticationSchemes property (52dbfbef12)
    • Made exception handling fixes to SSE stream reader (C# client) (7f0fd4ddc7)
    • Make event names and proxy names case insensitive. (#508)
    • Added hub events support to JavaScript client (using hubs without proxy) (97c984754f)
    • Made websocket implementation for self host on .NET 4.5. (e94d091100)
    • LongPolling broken on ASP.NET 4.5 (#496)
    • Prevented caching ajax requests on reconnect. (fbfc65371d)
    • Added consistent way to get a strongly typed representation of the connected clients (fa6d0b533e)

    Extra Information from OAuth/OpenId Provider

    $
    0
    0

    When you authenticate a user using the OAuth/OpenId providers, you can request for some extra information about the user if you have granted access for these providers to send this information.

    For eg if you login using Facebook, you can request information such as Gender, country etc.

    Each provider has different set of data that you can retrieve. I am not going to into the details of these different sets of data. In this post I am going to cover what kind of information can you retrieve from the implementations of the providers that we shipped with templates  in VS2012 and how can you retrieve this information.

    What kind of information can you retrieve

    Google

    • email
    • firstname
    • lastname
    • country

    https://developers.google.com/accounts/docs/OpenID is a good place to look for more information

    Facebook

    • id
    • Name
    • link
    • gender 
    • accesstoken

    http://developers.facebook.com/docs/ is a good place to look for more information

      Twitter

      • name
      • location
      • description
      • url
      • accesstoken

      https://dev.twitter.com/docs/auth/oauth/faq is a good place to look for more information

      How to retrieve this information

      This data is available when you login using anyone of the providers. In specifics to the code you can access this data after the authentication has happened. The data is returned as a dictionary. Following image shows a snapshot of the data returned from facebook provider

      oauthextradata


      Web Forms

      • Create the ASP.NET WebForm template
      • Goto Account\RegisterExternalLogin.cs
      • In the AuthenticationResult type we have Extradata dictionary bag which has this data
      var authResult = OpenAuth.VerifyAuthentication(redirectUrl);


      MVC

      • Create the internet template in MVC4
      • Goto the account controller in ExternalLoginCallBack
      • In the AuthenticationResult type we have Extradata dictionary bag which has this data
       AuthenticationResult result = 
                      OAuthWebSecurity.VerifyAuthentication(Url.Action("ExternalLoginCallback", new { ReturnUrl = returnUrl }));

      Web Pages

      • Create the webpages2 template
      • Goto ExternalLoginCallBack
      • In the AuthenticationResult type we have Extradata dictionary bag which has this data


       AuthenticationResult result = 
                      OAuthWebSecurity.VerifyAuthentication(Url.Action("ExternalLoginCallback", new { ReturnUrl = returnUrl }));


      In the following posts I will be spending more time showing you how you can customize our OAuth/OpenId stack and how you can customize and plugin your own providers

      Cross posted to http://blogs.msdn.com/b/pranav_rastogi/archive/2012/08/22/extra-information-from-oauth-openid-provider.aspx

      Web Deploy (MSDeploy) how to sync a folder

      $
      0
      0

      Today I saw the following question on StackOverflow MSDeploy - Deploying Contents of a Folder to a Remote IIS Server and decided to write this post to answer the question.

      Web Deploy (aka MSDeploy) uses a provider model and there are a good number of providers available out of the box. To give you an example of some of the providers; when syncing an IIS web application you will use iisApp, for an MSDeploy package you will use package, for a web server webServer, etc. If you want to sync a local folder to a remote IIS path then you can use the contentPath provider. You can also use this provider to sync a folder from one website to another website.

      The general idea of what we want to do in this case is to sync a folder from your PC to your IIS website. Calls to msdeploy.exe can be a bit verbose so let’s construct the command one step at at time. We will use the template below.

      msdeploy.exe -verb:sync -source:contentPath="" -dest:contentPath=""

      We use the sync verb to describe what we are trying to do, and then use the contentPath provider for both the source and the dest. Now let’s fill in what those values should be. For the source value you will need to pass in the full path to the folder that you want to sync. In my case the files are at C:\temp\files-to-pub. For the dest value you will give the path to the folder as an IIS path. In my case the website that I’m syncing to is named sayedupdemo so the IIS path that I want to sync is ‘sayedupdemo/files-to-pub’. Now that give us.

      msdeploy.exe –verb:sync -source:contentPath="C:\temp\files-to-pub" -dest:contentPath='sayedupdemo/files-to-pub'

      For the dest value we have not given any parameters indicating what server those command are supposed to be sent to. We will need to add those parameters. The parameters which typically need to be passed in are.

      • ComputerName – this is the URL or computer name which will handle the publish operation
      • Username – the username
      • Password – the password
      • AuthType – the authType to be used. Either NTLM or Basic. For WMSvc this is typically Basic, for Remote Agent Service this is NTLM

      In my case I’m publishing to a Windows Azure Web Site. So the values that I will use are:

      All of these values can be found in the .publishSettings file (can be downloaded from Web Site dashboard from WindowsAzure.com). For the ComputerName value you will need to append the name of your site to get the full URL. In the example above I manually added ?site=sayedupdemo, this is the same name as shown in the Azure portal. So now the command which we have is.

      msdeploy.exe 
          –verb:sync 
          -source:contentPath="C:\temp\files-to-pub" 
          -dest:contentPath='sayedupdemo/files-to-pub'
                  ,ComputerName="https://waws-prod-blu-001.publish.azurewebsites.windows.net/msdeploy.axd?site=sayedupdemo"
                  ,UserName='$sayedupdemo'
                  ,Password='thisIsNotMyRealPassword'
                  ,AuthType='Basic' 

      OK we are almost there! In my case I want to make sure that I do not delete any files from the server during this process. So I will also add –enableRule:DoNotDeleteRule. So our command is now.

      msdeploy.exe 
          –verb:sync 
          -source:contentPath="C:\temp\files-to-pub" 
          -dest:contentPath='sayedupdemo/files-to-pub'
                  ,ComputerName="https://waws-prod-blu-001.publish.azurewebsites.windows.net/msdeploy.axd?site=sayedupdemo"
                  ,UserName='$sayedupdemo'
                  ,Password='thisIsNotMyRealPassword'
                  ,AuthType='Basic' 
          -enableRule:DoNotDeleteRule 

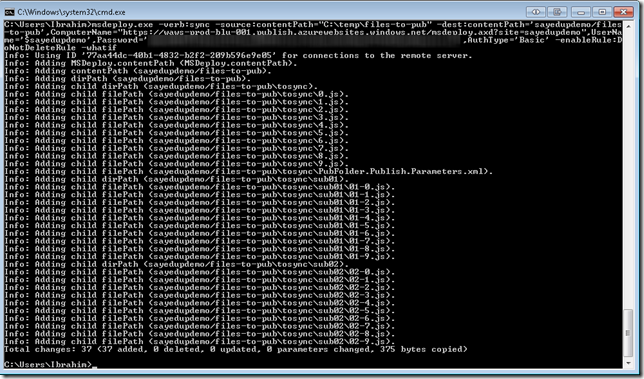
      At this point before I execute this command I’ll first execute it passing –whatif. This will give me a summary of what operations will be without actually causing any changes. When I do this the result is shown in the image below.

      SNAGHTML204f5cd

      After I verified that the changes are all intentional, I removed the –whatif and executed the command. After that the local files were published to the remote server. Now that I have synced the files each publish after this will be result in only changed files being published.

      If you want to learn how to snyc an individual file you can see my previous blog post How to take your web app offline during publishing.

      dest:auto

      In the case of the question it was asked with dest:auto, you can use that but you will have to pass in the IIS app name as a parameter and it will replace the path to the folder. Below is the command.

      msdeploy.exe 
          -verb:sync
          -source:contentPath="C:\temp\files-to-pub" 
          -dest:auto
              ,ComputerName="https://waws-prod-blu-001.publish.azurewebsites.windows.net/msdeploy.axd?site=sayedupdemo"
              ,UserName='$sayedupdemo'
              ,Password='thisIsNotMyRealPassword'
              ,AuthType='Basic' 
      -enableRule:DoNotDeleteRule 
      -setParam:value='sayedupdemo',kind=ProviderPath,scope=contentPath,match='^C:\\temp\\files-to-pub$'

      Cross posted to: http://sedodream.com/2012/08/20/WebDeployMSDeployHowToSyncAFolder.aspx

      Thanks,
      Sayed Ibrahim Hashimi @SayedIHashimi

      NuGet Gallery Performance Issues

      $
      0
      0

      Since August 16th, and especially since August 21st, the NuGet Gallery has been exhbiting intermittent performance issues. Some users are reporting errors when attempting to browse or search for NuGet packages from Visual Studio or other clients. Many users are reporting that browsing and searching are slow. There have also been timeout errors when browsing the gallery’s packages page.

      During this time, we have been communicating with many of you on twitter, under the #nuget tag, as well as in JabbR’s #nuget room. We truly appreciate your patience and understanding with us.

      Status

      We have been working to address these performance issues over the last several days, and we hope to have a deployment in place this evening (August 22nd, Pacific Time). It looks like the deployment will cause a short outage though–we will post more information about that when the details are available.

      Root Cause

      The root cause of the performance issues boils down to some sub-optimal queries that are used when searching the gallery–especially when searching from Visual Studio. There are a couple reasons these queries are slow:

      1. Some missing indexes that could significantly aide the search queries.
      2. Table columns that have nvarchar(max) as their data type when a size constraint can be applied. We are seeing that when these nvarchar(max) columns are used in ORDER BY clauses, it becomes a bottleneck.

      The deployment we’re preparing will address both of these issues by adding size constraints to many fields and then creating several new indexes. Unfortunately, the process of altering the Packages and PackageRegistrations tables and then creating these new indexes is going to take some time to apply – during that time, the database will be rather unresponsive. Again, when we know more about the timing of the outage, we’ll share the details.

      Expected NuGet Downtime - August 22 11pm-12am PDT

      $
      0
      0

      As mentioned in a previous post, we’ve been working to address some performance problems on the NuGet Gallery.

      The fixes we have in place include some time-consuming database migrations. During our dry run deployments, we found that virtually all requests to the database will time out while these migrations are running. We have decided to take the precaution of shutting the gallery down during these migrations to ensure the best and fastest possible deployment. We are sorry for the inconvenience this will cause.

      Timing

      The nuget.org website is expected to be down from 11pm-12am PDT tonight. During this time, all requests to browse, search, install, or update packages will fail. You will see errors in Visual Studio when you use the Online tab in the Manage NuGet Packages dialog.

      Live Updates

      Please follow @nuget, or the #nuget tag on twitter for live updates. You can also check in on JabbR’s #nuget room.

      http://blog.nuget.org will be updated once the deployment is completed.

      Workarounds

      Many users have found Scott Hanselman’s tips on How to access NuGet when NuGet.org is down (or you’re on a plane) to be helpful.

      Deployment Process

      During this downtime, we will be doing the following:

      1. Creating a pre-migration database backup
      2. Executing the database migrations against the database
      3. Performing a post-migration database backup
      4. Deploying changes to the gallery web application
      5. Verifying the successful deployment within a Staging instance of our Web Role

      Once we have verified the successful staging deployment, we will swap the instances over to production. At that time service will resume.

      If you’re curious about what is getting deployed, feel free to check out the commit history on the master branch in our GitHub repository at https://github.com/NuGet/NuGetGallery. The changes being deployed are from August 21st and 22nd.

      Feature Request

      Out of this situation comes a new feature request for the gallery: read-only mode. Ideally, deployments of this type could be handled by putting the gallery into a read-only mode and performing the deployment to a new web role with a copy of the database while the read-only gallery stays online. We will invest in setting up that model to be used in the future.

      Source: http://blog.nuget.org/20120822/nuget-expected-downtime.html 

      Viewing all 7144 articles
      Browse latest View live


      <script src="https://jsc.adskeeper.com/r/s/rssing.com.1596347.js" async> </script>