Quantcast
Channel: ASP.NET Blog
Viewing all 7144 articles
Browse latest View live

ASP.NET Core updates in .NET Core 3.1 Preview 2

$
0
0

.NET Core 3.1 Preview 2 is now available. This release is primarily focused on bug fixes, but it contains a few new features as well.

Here’s what’s new in this release for ASP.NET Core:

  • New component tag helper
  • Prevent default actions for events in Blazor apps
  • Stop event propagation in Blazor apps
  • Validation of nested models in Blazor forms
  • Detailed errors during Blazor app development

See the release notes for additional details and known issues.

Get started

To get started with ASP.NET Core in .NET Core 3.1 Preview 2 install the .NET Core 3.1 Preview 2 SDK.

If you’re on Windows using Visual Studio, for the best experience we recommend installing the latest preview of Visual Studio 2019 16.4. Installing Visual Studio 2019 16.4 will also install .NET Core 3.1 Preview 2, so you don’t need to separately install it. For Blazor development with .NET Core 3.1, Visual Studio 2019 16.4 is required.

Alongside this .NET Core 3.1 Preview 2 release, we’ve also released a Blazor WebAssembly update. To install the latest Blazor WebAssembly template also run the following command:

dotnet new -i Microsoft.AspNetCore.Blazor.Templates::3.1.0-preview2.19528.8

Upgrade an existing project

To upgrade an existing ASP.NET Core 3.1 Preview 1 project to 3.1 Preview 2:

  • Update all Microsoft.AspNetCore.* package references to 3.1.0-preview2.19528.8

See also the full list of breaking changes in ASP.NET Core 3.1.

That’s it! You should now be all set to use .NET Core 3.1 Preview 2!

New component tag helper

Using Razor components from views and pages is now more convenient with the new component tag helper.

Previously, rendering a component from a view or page involved using the RenderComponentAsync HTML helper.

@(await Html.RenderComponentAsync<Counter>(RenderMode.ServerPrerendered, new { IncrementAmount = 10 }))

The new component tag helper simplifies the syntax for rendering components from pages and views. Simply specify the type of the component you wish to render as well as the desired render mode. You can also specify component parameters using attributes prefixed with param-.

<component type="typeof(Counter)" render-mode="ServerPrerendered" param-IncrementAmount="10" />

The different render modes allow you to control how the component is rendered:

RenderMode Description
Static Renders the component into static HTML.
Server Renders a marker for a Blazor Server application. This doesn’t include any output from the component. When the user-agent starts, it uses this marker to bootstrap the Blazor app.
ServerPrerendered Renders the component into static HTML and includes a marker for a Blazor Server app. When the user-agent starts, it uses this marker to bootstrap the Blazor app.

Prevent default actions for events in Blazor apps

You can now prevent the default action for events in Blazor apps using the new @oneventname:preventDefault directive attribute. For example, the following component displays a count in a text box that can be changed by pressing the “+” or “-” keys:

<p>Press "+" or "-" in change the count.</p>
<input value="@count" @onkeypress="@KeyHandler" @onkeypress:preventDefault />

@code {
    int count = 0;

    void KeyHandler(KeyboardEventArgs ev)
    {
        if (ev.Key == "+")
        {
            count++;
        }
        else if (ev.Key == "-")
        {
            count--;
        }
    }
}

The @onkeypress:preventDefault directive attribute prevents the default action of showing the text typed by the user in the text box. Specifying this attribute without a value is equivalent to @onkeypress:preventDefault="true". The value of the attribute can also be an expression: @onkeypress:preventDefault="shouldPreventDefault". You don’t have to define an event handler to prevent the default action; both features can be used independently.

Stop event propagation in Blazor apps

Use the new @oneventname:stopPropagation directive attribute to stop event propagation in Blazor apps.

In the following example, checking the checkbox prevents click events from the child div from propagating to the parent div:

<input @bind="stopPropagation" type="checkbox" />
<div @onclick="OnClickParentDiv">
    Parent div
    <div @onclick="OnClickChildDiv" @onclick:stopPropagation="stopPropagation">
        Child div
    </div>
</div>

<button @onclick="OnClick">Click me!</button>

@code {
    bool stopPropagation;

    void OnClickParentDiv() => Console.WriteLine("Parent div clicked.");
    void OnClickChildDiv() => Console.WriteLine("Child div clicked.");
}

Detailed errors during Blazor app development

When your Blazor app isn’t functioning properly during development, it’s important to get detailed error information so that you can troubleshoot and fix the issues. Blazor apps now display a gold bar at the bottom of the screen when an error occurs.

During development, in Blazor Server apps, the gold bar will direct you to the browser console where you can see the exception that has occurred.

Blazor detailed errors in development

In production, the gold bar notifies the user that something has gone wrong, and recommends the user to refresh the browser.

Blazor detailed errors in production

The UI for this error handling experience is part of the updated Blazor project templates so that it can be easily customized:

_Host.cshtml

<div id="blazor-error-ui">
    <environment include="Staging,Production">
        An error has occurred. This application may no longer respond until reloaded.
    </environment>
    <environment include="Development">
        An unhandled exception has occurred. See browser dev tools for details.
    </environment>
    <a href="" class="reload">Reload</a>
    <a class="dismiss">🗙</a>
</div>

Validation of nested models in Blazor forms

Blazor provides support for validating form input using data annotations with the built-in DataAnnotationsValidator. However, the DataAnnotationsValidator only validates top-level properties of the model bound to the form.

To validate the entire object graph of the bound model, try out the new ObjectGraphDataAnnotationsValidator available in the experimental Microsoft.AspNetCore.Blazor.DataAnnotations.Validation package:

<EditForm Model="@model" OnValidSubmit="@HandleValidSubmit">
    <ObjectGraphDataAnnotationsValidator />
    ...
</EditForm>

The Microsoft.AspNetCore.Blazor.DataAnnotations.Validation is not slated to ship with .NET Core 3.1, but is provided as an experimental package to get early feedback.

Give feedback

We hope you enjoy the new features in this preview release of ASP.NET Core! Please let us know what you think by filing issues on GitHub.

Thanks for trying out ASP.NET Core!

The post ASP.NET Core updates in .NET Core 3.1 Preview 2 appeared first on ASP.NET Blog.


Blazor 0.7.0 experimental release now available

$
0
0

Blazor 0.7.0 is now available! This release focuses on enabling component coordination across ancestor-descendent relationships. We've also added some improvements to the debugging experience.

Here's what's new in the Blazor 0.7.0 release:

  • Cascading values and parameters
  • Debugging improvements

A full list of the changes in this release can be found in the Blazor 0.7.0 release notes.

Get Blazor 0.7.0

Install the following:

  1. .NET Core 2.1 SDK (2.1.500 or later).
  2. Visual Studio 2017 (15.9 or later) with the ASP.NET and web development workload selected.
  3. The latest Blazor Language Services extension from the Visual Studio Marketplace.
  4. The Blazor templates on the command-line:

    dotnet new -i Microsoft.AspNetCore.Blazor.Templates
    

You can find getting started instructions, docs, and tutorials for Blazor at https://blazor.net.

Upgrade an existing project to Blazor 0.7.0

To upgrade a Blazor 0.6.0 project to 0.7.0:

  • Install the prerequisites listed above.
  • Update the Blazor packages and .NET CLI tool references to 0.7.0. The upgraded Blazor project file should look like this:

    <Project Sdk="Microsoft.NET.Sdk.Web">
    
    <PropertyGroup>
        <TargetFramework>netstandard2.0</TargetFramework>
        <RunCommand>dotnet</RunCommand>
        <RunArguments>blazor serve</RunArguments>
        <LangVersion>7.3</LangVersion>
    </PropertyGroup>
    
    <ItemGroup>
        <PackageReference Include="Microsoft.AspNetCore.Blazor.Browser" Version="0.7.0" />
        <PackageReference Include="Microsoft.AspNetCore.Blazor.Build" Version="0.7.0" />
        <DotNetCliToolReference Include="Microsoft.AspNetCore.Blazor.Cli" Version="0.7.0" />
    </ItemGroup>
    
    </Project>
    

That's it! You're now ready to try out the latest Blazor features.

Cascading values and parameters

Blazor components can accept parameters that can be used to flow data into a component and impact the component's rendering. Parameter values are provided from parent component to child component. Sometimes, however, it's inconvenient to flow data from an ancestor component to a descendent component, especially when there are many layers in between. Cascading values and parameters solve this problem by providing a convenient way for an ancestor component to provide a value that is then available to all descendent components. They also provide a great way for components to coordinate.

For example, if you wanted to provide some theme information for a specific part of your app you could flow the relevant styles and classes from component to component, but this would be tedious and cumbersome. Instead, a common ancestor component can provide the theme information as a cascading value that descendents can accept as a cascading parameter and then consume as needed.

Let's say the following ThemeInfo class specifies all of the theme information that you want to flow down the component hierarchy so that all of the buttons within that part of your app share the same look and feel:

public class ThemeInfo 
{
    public string ButtonClass { get; set; }
}

An ancestor component can provide a cascading value using the CascadingValue component. The CascadingValue component wraps a subtree of the component hierarchy and specifies a single value that will be available to all components within that subtree. For example, we could specify the theme info in our application layout as a cascading parameter for all components that make up the layout body like this:

@inherits BlazorLayoutComponent

<div class="sidebar">
    <NavMenu />
</div>

<div class="main">
    <div class="top-row px-4">
        <a href="http://blazor.net" target="_blank" class="ml-md-auto">About</a>
    </div>

    <CascadingValue Value="@theme">
        <div class="content px-4">
            @Body
        </div>
    </CascadingValue>
</div>

@functions {
    ThemeInfo theme = new ThemeInfo { ButtonClass = "btn-success" };
}

To make use of cascading values, components can declare cascading parameters using the [CascadingParameter] attribute. Cascading values are bound to cascading parameters by type. In the following example the Counter component is modified to have a cascading parameter that binds to the ThemeInfo cascading value, which is then used to set the class for the button.

@page "/counter"

<h1>Counter</h1>

<p>Current count: @currentCount</p>

<button class="btn @ThemeInfo.ButtonClass" onclick="@IncrementCount">Click me</button>

@functions {
    int currentCount = 0;

    [CascadingParameter] protected ThemeInfo ThemeInfo { get; set; }

    void IncrementCount()
    {
        currentCount++;
    }
}

When we run the app we can see that the new style is applied:

Counter with cascading parameter

Cascading parameters also enable components to collaborate across the component hierarchy. For example, let's say you have a TabSet component that contains a number of Tab components, like this:

<TabSet>
    <Tab Title="First tab">
        <h4>First tab</h4>
        This is the first tab.
    </Tab>

    @if (showSecondTab)
    {
        <Tab Title="Second">
            <h4>Second tab</h4>
            You can toggle me.
        </Tab>
    }

    <Tab Title="Third">
        <h4>Third tab</h4>

        <label>
            <input type="checkbox" bind=@showSecondTab />
            Toggle second tab
        </label>
    </Tab>
</TabSet>

In this example the child Tab components are not explicitly passed as parameters to the TabSet. Instead they are simply part of the child content of the TabSet. But the TabSet still needs to know about each Tab so that it can render the headers and the active tab. To enable this coordination without requiring any specific wire up from the user, the TabSet component can provide itself as a cascading value that can then be picked up by the descendent Tab components:

In TabSet.cshtml

<!-- Display the tab headers -->
<CascadingValue Value=this>
    <ul class="nav nav-tabs">
        @ChildContent
    </ul>
</CascadingValue>

This allows the descendent Tab components to capture the containing TabSet as a cascading parameter, so they can add themselves to the TabSet and coordinate on which Tab is active:

In Tab.cshtml

[CascadingParameter] TabSet ContainerTabSet { get; set; }

Check out the full TabSet sample here.

Debugging improvements

In Blazor 0.5.0 we added some very preliminary support for debugging client-side Blazor apps in the browser. While this initial debugging support demonstrated that debugging .NET apps in the browser was possible, it was still a pretty rough experience. Blazor 0.7.0 picks up the latest runtime updates, which includes some fixes that makes the debugging experience more reliable. You can now more reliably set and remove breakpoints, and the reliability of step debugging has been improved.

Improved Blazor debugging

Give feedback

We hope you enjoy this latest preview release of Blazor. As with previous releases, your feedback is important to us. If you run into issues or have questions while trying out Blazor, file issues on GitHub. You can also chat with us and the Blazor community on Gitter if you get stuck or to share how Blazor is working for you. After you've tried out Blazor for a while please let us know what you think by taking our in-product survey. Click the survey link shown on the app home page when running one of the Blazor project templates:

Blazor survey

Thanks for trying out Blazor!

Razor support in Visual Studio Code now in Preview

$
0
0

Earlier this week we released a preview of support for working with Razor files (.cshtml) in the C# extension for Visual Studio Code (1.17.1). This initial release introduces C# completions, directive completions, and basic diagnostics (red squiggles for errors) for ASP.NET Core projects.

Prerequisites

To use this preview of Razor support in Visual Studio Code install the following:

If you already installed VS Code and the C# extension in the past, make sure you have updated to the latest versions of both.

Get started

To try out the new Razor tooling, create a new ASP.NET Core web app and then edit any Razor (.cshtml) file.

  1. Open Visual Studio Code
  2. Select Terminal > New Terminal
  3. In the new terminal run:

    dotnet new webapp -o WebApp1`
    code -r WebApp1
    
  4. Open About.cshtml

  5. Try out HTML completions

    HTML completions

  6. And Razor directive completions

    Directive completions

  7. And C# completions

    C# completions

  8. You also get diagnostics (red squiggles)

    C# diagnostics

Limitations and known issues

This is the first alpha release of the Razor tooling for Visual Studio Code, so there are a number of limitations and known issues:

  • Razor editing is currently only supported in ASP.NET Core projects (no support for ASP.NET projects or Blazor projects yet)
  • Support for tag helpers and formatting is not yet implemented
  • Limited support for colorization
  • Loss of HTML completions following C# less than (<) operator
  • Error squiggles misaligned for expressions near the start of a new line
  • Incorrect errors in Blazor projects for event bindings
  • Emmet based abbreviation expansion is not yet supported

Note that if you need to disable the Razor tooling for any reason:

  • Open the Visual Studio Code User Settings: File -> Preferences -> Settings
  • Search for "razor"
  • Check the "Razor: Disabled" checkbox

Feedback

Even though the functionality of Razor tooling is currently pretty limited, we are shipping this preview now so that we can start collecting feedback. Any issues or suggestions for the Razor tooling in Visual Studio Code should be reported on the https://github.com/aspnet/Razor.VSCode repo.

To help us diagnose any reported issues please provide the following information in the GitHub issue:

  1. Razor (cshtml) file content
  2. Generated C# code from the Razor CSharp output
    • Right-click inside your .cshtml file and select "Command Palette"
    • Search for and select "Razor: Show Razor CSharp"
  3. Verbose Razor log output
    • See instructions for capturing the Razor log output here
  4. OmniSharp log output
    • Open VS Code's "Output" pane
    • In the dropdown choose "OmniSharp Log"

What's next?

Next up we are working on tag helper support. This will include support for tag helper completions and IntelliSense. Once we have tag helper tooling support in place we can then start work on enabling Blazor tooling support as well. Follow our progress and join in the conversation on the https://github.com/aspnet/Razor.VSCode repo.

Thanks for trying out this early preview!

Announcing ASP.NET Core 2.2, available today!

$
0
0

I’m happy to announce that ASP.NET Core 2.2 is available as part of .NET Core 2.2 today!

How to get it

You can download the new .NET Core SDK (2.2.100) for your dev machine and build servers from the .NET Core 2.2 download page. New Windows Server hosting, runtime installers and binary archives are also available from this page for updating servers.

This release updates .NET Core, ASP.NET Core, and Entity Framework Core to version 2.2.0. The new SDK version is 2.2.100. Visual Studio requirements are as follows:

Visual Studio 2019 16.0 Preview 1, also available today, includes the .NET Core SDK 2.2.100 as an optional component.

What’s new?

The main theme for this ASP.NET Core release was to improve developer productivity and platform functionality with regard to building Web/HTTP APIs. As usual, we made some performance improvements as well. We’ve posted about these features as part of the preview releases and you as such you can read about them by following the links below:

Health Checks integration with BeatPulse

We’re happy to announce that the BeatPulse project now supports the new Health Checks API, which means you can easily add checks for dozens of popular systems and dependencies using their great support. Here’s a message from the BeatPulse team about their support for our new Health Checks API:

BeatPulse is a community driven project that was created to provide health checking mechanisms for systems, networking and a wide variety of services that are common within the enterprise, e.g. SqlServer, MySql,Postgress, Redis, Kafka and many more . When Microsoft announced ASP.NET Core Health Checks for the 2.2 roadmap, the BeatPulse team ported all the existing liveness packages and features to work with the new Microsoft Health Checks abstractions at the repository AspNetCore.Diagnostics.HealthChecks. Apart from all the health checking packages, the BeatPulse team also incorporates other features like pulse tracking (Application Insights and Prometheus), failure notifications and a UI interface were we can configure different monitored systems and have a global view of health status. This UI is available as a Docker image published in Docker Hub.

More coming soon

When we announced planning for ASP.NET Core 2.2, we mentioned a number of features that aren’t detailed above, including API Authorization with IdentityServer4, Open API (Swagger) driven client code generation, and the HTTP REPL command line tool. These features are still being worked on and aren’t quite ready for release, however we expect to make them available as add-ons in the coming months. Thanks for your patience while we complete these experiences and get them ready for you all to try out.

Migrating a project to ASP.NET Core 2.2

To migrate an ASP.NET Core project from 2.1 to 2.2, open the project’s .csproj file and change the value of the TargetFramework element to netcoreapp2.2. You do not need to do this if you’re targeting .NET Framework 4.x.

Finish by updating your NuGet package references to the latest stable versions. Note that projects targeting .NET Core (rather than .NET Framework) should not have a package version specified for the Microsoft.AspNetCore.App package reference as this will be managed automatically by the SDK. Doing so will now result in a build warning.

For more information on upgrading to ASP.NET Core 2.2 see here.

Support life cycle

ASP.NET Core 2.2 is the latest release in the “Current” .NET Core train. This represents the first release since the declaration of 2.1 LTS that reestablishes a separate LTS and Current train. The Current train is where new features, enhancements, and regular bug fixes are applied and is recommended for most customers. Note that both LTS and Current releases receive servicing updates for security and critical stability fixes. It is currently expected that 2.2 will the last non-servicing release in the 2.x life cycle, and as such customers not using an LTS release will need to migrate to 3.0 GA, within 3 months of its release in the second half of 2019 in order to remain supported.

Read more about the .NET Core support policy here.

Availability in Azure App Service

The .NET Core 2.2 SDK, runtime, and updated ASP.NET Core IIS Module are in the process of being deployed to Azure App Service regions around the world. We expect this to be completed before the end of December 2018.

Some regions may receive the updated runtime before the updated ASP.NET Core IIS Module (ANCM), which is required by default for projects targeting ASP.NET Core 2.2. It’s also a requirement for the new in-process hosting feature. If you receive startup errors after deploying to Azure App Service, try configuring your project to use the existing version of ANCM by setting the AspNetCoreModule property to the value “AspNetCoreModule”, e.g.:

<PropertyGroup>
    <TargetFramework>netcoreapp2.2</TargetFramework>
    <AspNetCoreModuleName>AspNetCoreModule</AspNetCoreModuleName>
    <AspNetCoreHostingModel>OutOfProcess</AspNetCoreHostingModel>
</PropertyGroup>

Once the target region has been updated with the latest ANCM version, you can remove that property altogether and redeploy the application to have it switch to using the new ANCM.

This release also adds better 64-bit support for .NET Core in Azure App Service. If you’re running your ASP.NET Core application on .NET Core 2.2 with in-process hosting, you can simply enable the 64-bit option in the Azure Portal and the site will now run in a 64-bit process. For other information on how to run your ASP.NET Core application in a 64-bit process in Azure App Service with other configurations, see this article.

Giving feedback

As always, please provide us feedback by logging issues at https://github.com/aspnet/AspNetCore. We look forward to hearing from you!

ASP.NET Core updates in .NET Core 3.0 Preview 2

$
0
0

.NET Core 3.0 Preview 2 is now available and it includes a bunch of new updates to ASP.NET Core.

Here's the list of what's new in this preview:

  • Razor Components
  • SignalR client-to-server streaming
  • Pipes on HttpContext
  • Generic host in templates
  • Endpoint routing updates

Get started

To get started with ASP.NET Core in .NET Core 3.0 Preview 2 install the .NET Core 3.0 Preview 2 SDK

If you're on Windows using Visual Studio, you'll also want to install the latest preview of Visual Studio 2019.

Upgrade an existing project

To upgrade an existing an ASP.NET Core app to .NET Core 3.0 Preview 2, follow the migrations steps in the ASP.NET Core docs.

Add package for Json.NET

As part of the work to tidy up the ASP.NET Core shared framework, Json.NET is being removed from the shared framework and now needs to be added as a package.

To add back Json.NET support to an ASP.NET Core 3.0 project:

Runtime compilation removed

As a consequence of cleaning up the ASP.NET Core shared framework to not depend on Roslyn, support for runtime compilation of pages and views has also been removed in this preview release. Instead compilation of pages and views is performed at build time. In a future preview update we will provide a NuGet packages for optionally enabling runtime compilation support in an app.

Other breaking changes and announcements

For a full list of other breaking changes and announcements for this release please see the ASP.NET Core Announcements repo.

Build modern web UI with Razor Components

Razor Components are a new way to build interactive client-side web UI with ASP.NET Core. This release of .NET Core 3.0 Preview 2 adds support for Razor Components to ASP.NET Core and for hosting Razor Components on the server. For those of you who have been following along with the experimental Blazor project, Razor Components represent the integration of the Blazor component model into ASP.NET Core along with the server-side Blazor hosting model. ASP.NET Core Razor Components is a new capability in ASP.NET Core to host Razor Components on the server over a real-time connection.

Working with Razor Components

Razor Components are self-contained chunks of user interface (UI), such as a page, dialog, or form. Razor Components are normal .NET classes that define UI rendering logic and client-side event handlers, so you can write rich interactive web apps without having to write any JavaScript. Razor components are typically authored using Razor syntax, a natural blend of HTML and C#. Razor Components are similar to Razor Pages and MVC Views in that they both use Razor. But unlike pages and views, which are built around a request/reply model, components are used specifically for handling UI composition.

To create, build, and run your first ASP.NET Core app with Razor Components run the following from the command line:

dotnet new razorcomponents -o WebApplication1
cd WebApplication1
dotnet run

Or create an ASP.NET Core Razor Components in Visual Studio 2019:

Razor Components template

The generated solution has two projects: a server project (WebApplication1.Server), and a project with client-side web UI logic written using Razor Components (WebApplication1.App). The server project is an ASP.NET Core project setup to host the Razor Components.

Razor Components solution

Why two projects? In part it's to separate the UI logic from the rest of the application. There is also a technical limitation in this preview that we are using the same Razor file extension (.cshtml) for Razor Components that we also use for Razor Pages and Views, but they have different compilation models, so they need to kept separate. In a future preview we plan to introduce a new file extension for Razor Components (.razor) so that you can easily host your components, pages, and views all in the same project.

When you run the app you should see multiple pages (Home, Counter, and Fetch data) on different tabs. On the Counter page you can click a button to increment a counter without any page refresh. Normally this would require writing JavaScript, but here everything is written using Razor Components in C#!

Razor Components app

Here's what the Counter component code looks like:

@page "/counter"

<h1>Counter</h1>

<p>Current count: @currentCount</p>

<button class="btn btn-primary" onclick="@IncrementCount">Click me</button>

@functions {
    int currentCount = 0;

    void IncrementCount()
    {
        currentCount+=1;
    }
}

Making a request to /counter, as specified by the @page directive at the top, causes the component to render its content. Components render into an in-memory representation of the render tree that can then be used to update the UI in a very flexible and efficient way. Each time the "Click me" button is clicked the onclick event is fired and the IncrementCount method is called. The currentCount gets incremented and the component is rendered again. The runtime compares the newly rendered content with what was rendered previously and only the changes are then applied to the DOM (i.e. the updated count).

You can use components from other components using an HTML-like syntax where component parameters are specified using attributes or child content. For example, you can add a Counter component to the app's home page like this:

@page "/"

<h1>Hello, world!</h1>

Welcome to your new app.

<Counter />

To add a parameter to the Counter component update the @functions block to add a property decorated with the [Parameter] attribute:

@functions {
    int currentCount = 0;

    [Parameter] int IncrementAmount { get; set; } = 1;

    void IncrementCount()
    {
        currentCount+=IncrementAmount;
    }
}

Now you can specify IncrementAmount parameter value using an attribute like this:

<Counter IncrementAmount="10" />

The Home page then has it's own counter that increments by tens:

Count by tens

This is just an intro to what Razor Components are capable of. Razor Components are based on the Blazor component model and they support all of the same features (parameters, child content, templates, lifecycle events, component references, etc.). To learn more about Razor Components check out the component model docs and try out building your first Razor Components app yourself.

Hosting Razor Components

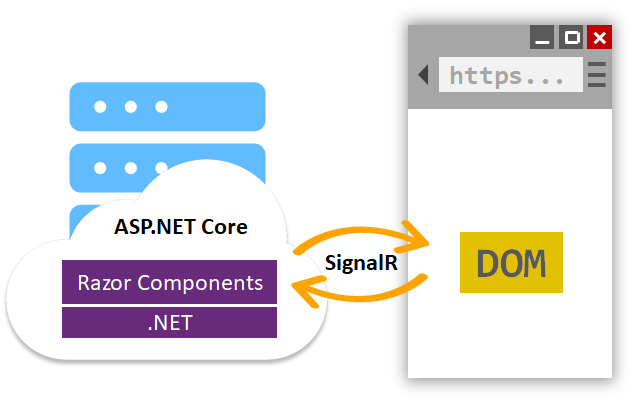
Because Razor Components decouple a component's rendering logic from how the UI updates get applied, there is a lot of flexibility in how Razor Components can be hosted. ASP.NET Core Razor Components in .NET Core 3.0 adds support for hosting Razor Components on the server in an ASP.NET Core app where all UI updates are handled over a SignalR connection. The runtime handles sending UI events from the browser to the server and then applies UI updates sent by the server back to the browser after running the components. The same connection is also used to handle JavaScript interop calls.

ASP.NET Core Razor Components

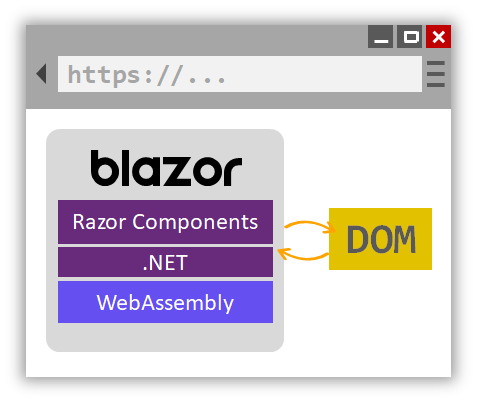
Alternatively, Blazor is an experimental single page app framework that runs Razor Components directly in the browser using a WebAssembly based .NET runtime. In Blazor apps the UI updates from the Razor Components are all applied in process directly to the DOM.

Blazor

Support for the client-side Blazor hosting model using WebAssembly won't ship with ASP.NET Core 3.0, but we are working towards shipping it with a later release.

Regardless of which hosting model you use for your Razor Components, the component model is the same. The same Razor Components can be used with either hosting model. You can even switch your app back and forth from being a client-side Blazor app or Razor Components running in ASP.NET Core using the same components as long as your components haven't taken any server specific dependencies.

JavaScript interop

Razor Components can also use client-side JavaScript if needed. From a Razor Component you can call into any browser API or into an existing JavaScript library running in the browser. .NET library authors can use JavaScript interop to provide .NET wrappers for JavaScript APIs, so that they can be conveniently called from Razor Components.

public class ExampleJsInterop
{
    public static Task<string> Prompt(this IJSRuntime js, string text)
    {
        // showPrompt is implemented in wwwroot/exampleJsInterop.js
        return js.InvokeAsync<string>("exampleJsFunctions.showPrompt", text);
    }
}
@inject IJSRuntime JS

<button onclick="@OnClick">Show prompt</button>

@functions {
    string name;

    async Task OnClick() {
        name = await JS.Prompt("Hi! What's you're name?");
    }
}

Both Razor Components and Blazor share the same JavaScript interop abstraction, so .NET libraries relying on JavaScript interop are usable by both types of apps. Check out the JavaScript interop docs for more details on using JavaScript interop and the Blazor community page for existing JavaScript interop libraries.

Sharing component libraries

Components can be easily shared and reused just like you would normal .NET classes. Razor Components can be built into component libraries and then shared as NuGet packages. You can find existing component libraries on the Blazor community page.

The .NET Core 3.0 Preview 2 SDK doesn't include a project template for Razor Component Class Libraries yet, but we expect to add one in a future preview. In meantime, you can use Blazor Component Class Library template.

dotnet new -i Microsoft.AspNetCore.Blazor.Templates::0.8.0-preview-19104-04 
dotnet new blazorlib

In this preview release ASP.NET Core Razor Components don't yet support using static assets in component libraries, so the support for component class libraries is pretty limited. However, in a future preview we expect to add this support for using static assets from a library just like you can in Blazor today.

Integration with MVC Views and Razor Pages

Razor Components can be used with your existing Razor Pages and MVC apps. There is no need to rewrite existing views or pages to use Razor Components. Components can be used from within a view or page. When the page or view is rendered, any components used will be prerendered at the same time.

To render a component from a Razor Page or MVC View in this release, use the RenderComponentAsync<TComponent> HTML helper method:

<div id="Counter">
    @(await Html.RenderComponentAsync<Counter>(new { IncrementAmount = 10 }))
</div>

Components rendered from pages and views will be prerendered, but are not yet interactive (i.e. clicking the Counter button doesn't do anything in this release). This will get addressed in a future preview, along with adding support for rendering components from pages and views using the normal element and attribute syntax.

While views and pages can use components the converse is not true: components can't use views and pages specific features, like partial views and sections. If you want to use a logic from partial view in a component you'll need to factor that logic out first as a component.

Cross platform tooling

Visual Studio 2019 comes with built-in editor support for Razor Components including completions and diagnostics in the editor. You don't need to install any additional extensions.

Razor Components tooling

Razor Component tooling isn't available yet in Visual Studio for Mac or Visual Studio Code, but it's something we are actively working on.

A bright future for Blazor

In parallel with the ASP.NET Core 3.0 work, we will continue ship updated experimental releases of Blazor to support hosting Razor Components client-side in the browser (we'll have more to share on the latest Blazor update shortly!). While in ASP.NET Core 3.0 we will only support hosting Razor Components in ASP.NET Core, we are also working towards shipping Blazor and support for running Razor Components in the browser on WebAssembly in a future release.

SignalR client-to-server streaming

With ASP.NET Core SignalR we added Streaming support, which enables streaming return values from server-side methods. This is useful for when fragments of data will come in over a period of time.

With .NET Core 3.0 Preview 2 we've added client-to-server streaming. With client-to-server streaming, your server-side methods can take instances of a ChannelReader<T>. In the C# code sample below, the StartStream method on the Hub will receive a stream of strings from the client.

public async Task StartStream(string streamName, ChannelReader<string> streamContent)
{
    // read from and process stream items
    while (await streamContent.WaitToReadAsync(Context.ConnectionAborted))
    {
        while (streamContent.TryRead(out var content))
        {
            // process content
        }
    }
}

Clients would use the SignalR Subject (or an RxJS Subject) as an argument to the streamContent parameter of the Hub method above.

let subject = new signalR.Subject();
await connection.send("StartStream", "MyAsciiArtStream", subject);

The JavaScript code would then use the subject.next method to handle strings as they are captured and ready to be sent to the server.

subject.next("example");
subject.complete();

Using code like the two snippets above, you can create real-time streaming experiences. For a preview of what you can do with client-side streaming with SignalR, take a look at the demo site, streamr.azurewebsites.net. If you create your own stream, you can stream ASCII art representations of image data being captured by your local web cam to the server, where it will be bounced out to other clients who are watching your stream.

Client-to-server Streaming with SignalR

System.IO.Pipelines on HttpContext

In ASP.NET Core 3.0, we're working on consuming the System.IO.Pipelines API and exposing it in ASP.NET Core to allow you to write more performant applications.

In Preview 2, we're exposing the request body pipe and response body pipe on the HttpContext that you can directly read from and write to respectively in addition to maintaining the existing Stream-based APIs.
While these pipes are currently just wrappers over the existing streams, we will directly expose the underlying pipes in a future preview.

Here's an example that demonstrates using both the request body and response body pipes directly.

public void Configure(IApplicationBuilder app, IHostingEnvironment env)
{
    if (env.IsDevelopment())
    {
        app.UseDeveloperExceptionPage();
    }

    app.UseRouting(routes =>
    {
        routes.MapGet("/", async context =>
        {
            await context.Response.WriteAsync("Hello World");
        });

        routes.MapPost("/", async context =>
        {
            while (true)
            {
                var result = await context.Request.BodyPipe.ReadAsync();
                var buffer = result.Buffer;

                if (result.IsCompleted)
                {
                    break;
                }

                context.Request.BodyPipe.AdvanceTo(buffer.End);
            }
        });
    });
}

Generic host in templates

The templates have been updated to use the Generic Host instead of WebHostBuilder as they have in the past:

public static void Main(string[] args)
{
    CreateHostBuilder(args).Build().Run();
}

public static IHostBuilder CreateHostBuilder(string[] args) =>
    Host.CreateDefaultBuilder(args)
        .ConfigureWebHostDefaults(webBuilder =>
        {
            webBuilder.UseStartup<Startup>();
        });

This is part of the ongoing plan started in 2.0 to better integrate ASP.NET Core with other server scenarios that are not web specific.

What about IWebHostBuilder?

The IWebHostBuilder interface that is used with WebHostBuilder today will be kept, and is the type of the webBuilder used in the sample code above. We intend to deprecate and eventually remove WebHostBuilder itself as its functionality will be replaced by HostBuilder, though the interface will remain.

The biggest difference between WebHostBuilder and HostBuilder is that you can no longer inject arbitrary services into your Startup.cs. Instead you will be limited to the IHostingEnvironment and IConfiguration interfaces. This removes a behavior quirk related to injecting services into Startup.cs before the ConfigureServices method is called. We will publish more details on the differences between WebHostBuilder and HostBuilder in a future deep-dive post.

Endpoint routing updates

We're excited to start introducing more of the Endpoint Routing story that began in 2.2. Endpoint routing allows frameworks like MVC as well as other routable things to mix with middleware in a way that hasn't been possible before. This is now present in the project templates in 3.0.0-preview-2, we'll continue to add more richness as we move closer to a final release.

Here's an example:

public void Configure(IApplicationBuilder app, IHostingEnvironment env)
{
    if (env.IsDevelopment())
    {
        app.UseDeveloperExceptionPage();
    }

    app.UseStaticFiles();

    app.UseRouting(routes =>
    {
        routes.MapApplication();

        routes.MapGet("/hello", context =>
        {
            return context.Response.WriteAsync("Hi there!");    
        });

        routes.MapHealthChecks("/healthz");
    });

    app.UseAuthentication();
    app.UseAuthorization();
}

There's a few things to unpack here.

First, the UseRouting(...) call adds a new Endpoint Routing middleware. UseRouting is at the core of many of the templates in 3.0 and replaces many of the features that were implemented inside UseMvc(...) in the past.

Also notice that inside UseRouting(...) we're setting up a few things. MapApplication() brings in MVC controllers and pages for routing. MapGet(...) shows how to wire up a request delegate to routing. MapHealthChecks(...) hooks up the health check middleware, but by plugging it into routing.

What might be surprising to see is that some middleware now come after UseRouting. Let's tweak this example to demonstrate why that is valuable.

public void Configure(IApplicationBuilder app, IHostingEnvironment env)
{
    if (env.IsDevelopment())
    {
        app.UseDeveloperExceptionPage();
    }

    app.UseStaticFiles();

    app.UseRouting(routes =>
    {
        routes.MapApplication();

        routes.MapGet("/hello", context =>
        {
            return context.Response.WriteAsync("Hi there! Here's your secret message");    
        })
        .RequireAuthorization(new AuthorizeAttribute(){ Roles = "secret-messages", });

        routes.MapHealthChecks("/healthz").RequireAuthorization("admin");
    });

    app.UseAuthentication();
    app.UseAuthorization();
}

Now I've added an AuthorizeAttribute to my request delegate. This is just like placing [Authorize(Roles = "secret-messages")] on an action method in a controller. We've also given the health checks middleware an authorization policy as well (by policy name).

This works because the following steps happen in order (ignoring what happens before routing):

  1. UseRouting(...) makes a routing decision – selecting an Endpoint
  2. UseAuthorization() looks at the Endpoint that was selected and runs the corresponding authorization policy
  3. hidden… At the end of the middleware pipeline the Endpoint is executed (if no endpoint was matched then a 404 response is returned)

So think of UseRouting(...) as making a deferred routing decision – where middleware that appear after it run in the middle. Any middleware that run after routing can see the results and read or modify the route data and chosen endpoint. When processing reaches the end of the pipeline, then the endpoint is invoked.

What is an Endpoint and why did we add this?

An Endpoint is a new primitive to help frameworks (like MVC) be friends with middleware. Fundamentally an Endpoint is a request delegate (something that can execute) plus a bag of metadata (policies).

Here's an example middleware – you can use this to examine endpoints in the debugger or by printing to the console:

app.Use(next => (context) =>
{
    var endpoint = context.GetEndpoint();
    if (endpoint != null)
    {
        Console.WriteLine("Name: " + endpoint.DisplayName);
        Console.WriteLine("Route: " + (endpoint as RouteEndpoint)?.RoutePattern);
        Console.WriteLine("Metadata: " + string.Join(", ", endpoint.Metadata));
    }

    return next(context);
});

In the past we haven't had a good solution when we've wanted to implement a policy like CORS or Authorization in both middleware and MVC. Putting a middleware in the pipeline feels very good because you get to configure the order. Putting filters and attributes on methods in controllers feels really good when you need to apply policies to different parts of the application. Endpoints bring togther all of these advantages.

As an addition problem – what do you do if you're writing the health checks middleware? You might want to secure your middleware in a way that developers can customize. Being able to leverage the ASP.NET Core features for this directly avoids the need to build in support for cross-cutting concerns in every component that serves HTTP.

In addition to removing code duplication from MVC, the Endpoint + Middleware solution can be used by any other ASP.NET Core-based technologies. You don't even need to use UseRouting(...) – all that is required to leverage the enhancements to middleware is to set an Endpoint on the HttpContext.

What's integrated with this?

We added the new authorize middleware so that you can start doing more powerful security things with just middleware. The authorize middleware can accept a default policy that applies when there's no endpoint, or the endpoint doesn't specify a policy.

CORS is also now endpoint routing aware and will use the CORS policy specified on an endpoint.

MVC also plugs in to endpoint routing and will create endpoints for all of your controllers and pages. MVC can now be used with the CORS and authorize features and will largely work the same. We've long had confusion about whether to use the CORS middleware or CORS filters in MVC, the updated guidance is to use both. This allows you to provide CORS support to other middleware or static files, while still applying more granular CORS policies with the existing attributes.

Health checks also provide methods to register the health checks middleware as a router-ware (as shown above). This allows you to specify other kinds of policies for health checks.

Finally, new in ASP.NET Core 3.0 preview 2 is host matching for routes. Placing the HostAttribute on an MVC controller or action will prompt the routing system to require the specified domain or port. Or you can use RequireHost in your Startup.cs:

app.UseRouting(routes =>
{
    routes.MapGet("/", context => context.Response.WriteAsync("Hi Contoso!"))
        .RequireHost("contoso.com");

    routes.MapGet("/", context => context.Response.WriteAsync("Hi AdventureWorks!"))
        .RequireHost("adventure-works.com");

    routes.MapHealthChecks("/healthz").RequireHost("*:8080");
});

Do you think that there are things that are missing from the endpoint story? Are there more things we should make smarter or more integrated? Please let us know what you'd like to see.

Give feedback

We hope you enjoy the new features in this preview release of ASP.NET Core! Please let us know what you think by filing issues on Github.

Make the most of your monthly Azure Credits

$
0
0

If you weren’t aware, Visual Studio subscribers have free monthly Azure credits, that are ideal for experimenting with and learning about Azure services. When you activate this benefit, it creates a separate Azure subscription with a monthly credit balance that renews each month while you remain an active Visual Studio subscriber. If the credits run out before the end of the month the subscription is suspended until more credits are available. No surprises, no cost, and no credit card required for any of it!

The table below shows you how many Azure credits you get based on your type of Visual Studio subscription:

Visual Studio subscription type Monthly Azure Credits Activate Credits
Visual Studio Professional (standard subscription) $50 activate
Visual Studio Test Professional $50 activate
MSDN Platforms $100 activate
Visual Studio Enterprise (standard subscription) $150 activate
Visual Studio Enterprise (BizSpark) $150 activate
Visual Studio Enterprise (MPN) $150 activate

Now that you know how many Azure Credits you get every month for free, you are probably wondering what you can spend it on! We have put together the following simple table to help you get going:

Azure Service Tier Estimated Monthly Cost
App Service Shared $9.49
Storage General Purpose V2 (1GB) $1.06
SQL Single DB (5DTUs, 2GB) $4.90
CosmosDB 1GB $23.61
Functions Dynamic First 1M executions free (up to 400K GB-s)
Monitor Application Insights First 1GB free
Key Vault Standard $0.03 (per 10k operations)
Service Bus Basic $0.05 (per 1M operations)
Redis Basic (C0: 250MB Cache) $16.06

Hopefully, you found this information helpful and you are on your way to make use of your Azure credits. If you are interested in the cost of an Azure service you didn’t see in the table above, try the Azure price calculator. If you have any questions or problems just leave us a comment below.

Blazor 0.8.0 experimental release now available

$
0
0

Blazor 0.8.0 is now available! This release updates Blazor to use Razor Components in .NET Core 3.0 and adds some critical bug fixes.

Get Blazor 0.8.0

To get started with Blazor 0.8.0 install the following:

  1. .NET Core 3.0 Preview 2 SDK (3.0.100-preview-010184)
  2. Visual Studio 2019 (Preview 2 or later) with the ASP.NET and web development workload selected.
  3. The latest Blazor extension from the Visual Studio Marketplace.
  4. The Blazor templates on the command-line:

    dotnet new -i Microsoft.AspNetCore.Blazor.Templates::0.8.0-preview-19104-04
    

You can find getting started instructions, docs, and tutorials for Blazor at https://blazor.net.

Upgrade to Blazor 0.8.0

To upgrade your existing Blazor apps to Blazor 0.8.0 first make sure you've installed the prerequisites listed above.

To upgrade a standalone Blazor 0.7.0 project to 0.8.0:

  • Update the Blazor packages and .NET CLI tool references to 0.8.0-preview-19104-04.
  • Replace any package reference to Microsoft.AspNetCore.Blazor.Browser with a reference to Microsoft.AspNetCore.Blazor.
  • Replace BlazorComponent with ComponentBase.
  • Update overrides of SetParameters on components to override SetParametersAsync instead.
  • Replace BlazorLayoutComponent with LayoutComponentBase
  • Replace IBlazorApplicationBuilder with IComponentsApplicationBuilder.
  • Replace any using statements for Microsoft.AspNetCore.Blazor.* with Microsoft.AspNetCore.Components.*, except leave Microsoft.AspNetCore.Blazor.Hosting in Program.cs
  • In index.html update the script reference to reference components.webassembly.js instead of blazor.webassembly.js

To upgrade an ASP.NET Core hosted Blazor app to 0.8.0:

  • Update the client-side Blazor project as described previously.
  • Update the ASP.NET Core app hosting the Blazor app to .NET Core 3.0 by following the migrations steps in the ASP.NET Core docs.
    • Update the target framework to be netcoreapp3.0
    • Remove any package reference to Microsoft.AspNetCore.App or Microsoft.AspNetCore.All
    • Upgrade any non-Blazor Microsoft.AspNetCore.* package references to version 3.0.0-preview-19075-0444
    • Remove any package reference to Microsoft.AspNetCore.Razor.Design
    • To enable JSON support, add a package reference to Microsoft.AspNetCore.Mvc.NewtonsoftJson and updateStartup.ConfigureServices to call services.AddMvc().AddNewtonsoftJson()
  • Upgrade the Microsoft.AspNetCore.Blazor.Server package reference to 0.8.0-preview-19104-04
  • Add a package reference to Microsoft.AspNetCore.Components.Server
  • In Startup.ConfigureServices simplify any call to app.AddResponseCompression to call the default overload without specifying WebAssembly or binary data as additional MIME types to compress.
  • In Startup.Configure add a call to app.UseBlazorDebugging() after the existing call to app.UseBlazor<App.Startup>()
  • Remove any unnecessary use of the Microsoft.AspNetCore.Blazor.Server namespace.

To upgrade a Blazor class library to 0.8.0:

  • Replace the package references to Microsoft.AspNetCore.Blazor.Browser and Microsoft.AspNetCore.Blazor.Build with references to Microsoft.AspNetCore.Components.Browser and Microsoft.AspNetCore.Components.Build and update the versions to 3.0.0-preview-19075-0444.
  • In the project file for the library change the project SDK from "Microsoft.NET.Sdk.Web" to "Microsoft.NET.Sdk.Razor".

Server-side Blazor is now ASP.NET Core Razor Components in .NET Core 3.0

As was recently announced, server-side Blazor is now shipping as ASP.NET Core Razor Components in .NET Core 3.0. We've integrated the Blazor component model into ASP.NET Core 3.0 and renamed it to Razor Components. Blazor 0.8.0 is now built on Razor Components and enables you to host Razor Components in the browser on WebAssembly.

Upgrade a server-side Blazor project to ASP.NET Core Razor Components in .NET Core 3.0

If you've been working with server-side Blazor, we recommend upgrading to use ASP.NET Core Razor Components in .NET Core 3.0.

To upgrade a server-side Blazor app to ASP.NET Core Razor Components:

  • Update the client-side Blazor project as described previously, except replace the script reference to blazor.server.js with components.server.js
  • Update the ASP.NET Core app hosting the Razor Components to .NET Core 3.0 as described previously.
  • In the server project:
    • Upgrade the Microsoft.AspNetCore.Blazor.Server package reference to 0.8.0-preview-19104-04
    • Add a package reference to Microsoft.AspNetCore.Components.Server version 3.0.0-preview-19075-0444
    • Replace the using statement for Microsoft.AspNetCore.Blazor.Server with Microsoft.AspNetCore.Components.Server
    • Replace services.AddServerSideBlazor with services.AddRazorComponents and app.UseServerSideBlazor with app.UseRazorComponents.
    • In the Startup.Configure method add app.UseStaticFiles() just prior to calling app.UseRazorComponents.
    • Move the wwwroot folder from the Blazor app project to the ASP.NET Core server project

Switching between ASP.NET Core Razor Components and client-side Blazor

Sometimes it's convenient to be able to switch between running your Razor Components on the server (ASP.NET Core Razor Components) and on the client (Blazor). For example, you might run on the server during development so that you can easily debug, but then publish your app to run on the client.

To update an ASP.NET Core hosted Blazor app so that it can be run as an ASP.NET Core Razor Components app:

  • Move the wwwroot folder from the client-side Blazor project to the ASP.NET Core server project.
  • In the server project:
    • Update the script tag in index.html to point to components.server.js instead of components.webassembly.js.
    • Add a call to services.AddRazorComponents<Client.Startup>() in the Startup.ConfigureServices method.
    • Add a call to app.UseStaticFiles() in the Startup.Configure method prior to the call to UseMvc.
    • Replace the call to UseBlazor with app.UseRazorComponents<Client.Startup>()
  • If you're using dependency injection to inject an HttpClient into your components, then you'll need to add an HttpClient as a service in your server's Startup.ConfigureServices method.

Tooling for Blazor projects is now included with Visual Studio 2019

Previously to get tooling support for Blazor projects you needed to install the Blazor extension for Visual Studio. Starting with Visual Studio 2019 Preview 2, tooling support for Razor Components (and hence Blazor apps) is already included without having to install anything else. The Blazor extension is now only needed to install the Blazor project templates in Visual Studio.

Runtime improvements

Blazor 0.8.0 includes some .NET runtime improvements like improved runtime performance on Chrome and an improved IL linker. In our performance benchmarks, Blazor 0.8.0 performance on Chrome is now about 25% faster. You can now also reference existing libraries like Json.NET from a Blazor app without any additional linker configuration:

@functions {
    WeatherForecast[] forecasts;

    protected override async Task OnInitAsync()
    {
        var json = await Http.GetStringAsync("api/SampleData/WeatherForecasts");
        forecasts = Newtonsoft.Json.JsonConvert.DeserializeObject<WeatherForecast[]>(json);
    }
}

Known issues

There are a couple of known issues with this release that you may run into:

  • "It was not possible to find any compatible framework version. The specified framework 'Microsoft.NETCore.App', version '2.0.0' was not found.": You may see this error when building a Blazor app because the IL linker currently requires .NET Core 2.x to run. To work around this issue, either install .NET Core 2.2 or disable IL linking by setting the <BlazorLinkOnBuild>false</BlazorLinkOnBuild> property in your project file.
  • "Unable to generate deps.json, it may have been already generated.": You may see this error when running a standalone Blazor app and you haven't yet restored packages for any .NET Core apps. To workaround this issue create any .NET Core app (ex dotnet new console) and then rerun the Blazor app.

These issues will be addressed in a future Blazor update.

Future updates

This release of Blazor was primarily focused on first integrating Razor Components into ASP.NET Core 3.0 and then rebuilding Blazor on top of that. Going forward, we plan to ship Blazor updates with each .NET Core 3.0 update.

Blazor, and support for running Razor Components on WebAssembly in the browser, won't ship with .NET Core 3.0, but we continue to work towards shipping Blazor some later date.

Give feedback

We hope you enjoy this latest preview release of Blazor. As with previous releases, your feedback is important to us. If you run into issues or have questions while trying out Blazor, file issues on GitHub. You can also chat with us and the Blazor community on Gitter if you get stuck or to share how Blazor is working for you. After you've tried out Blazor for a while please let us know what you think by taking our in-product survey. Click the survey link shown on the app home page when running one of the Blazor project templates:

Blazor survey

Thanks for trying out Blazor!

Changes to the web and JSON editor APIs in Visual Studio 2019

$
0
0

In Visual Studio 2019 Preview 2, The Web Tools team made some changes to improve extensibility features for extension developers. To standardize interfaces, the CSS, HTML, JSON and CSHTML editors renamed their assemblies as per the following table:

Old New
Microsoft.CSS.Core Microsoft.WebTools.Languages.Css
Microsoft.CSS.Editor Microsoft.WebTools.Languages.Css.Editor
Microsoft.Html.Core Microsoft.WebTools.Languages.Html
Microsoft.Html.Editor Microsoft.WebTools.Languages.Html.Editor
Microsoft.VisualStudio.Html.Package Microsoft.WebTools.Languages.Html.VS
Microsoft.JSON.Core Microsoft.WebTools.Languages.Json
Microsoft.JSON.Editor Microsoft.WebTools.Languages.Json.Editor
Microsoft.VisualStudio.JSON.Package Microsoft.WebTools.Languages.Json.VS
Microsoft.VisualStudio.Web.Extensions Microsoft.WebTools.Languages.Extensions
Microsoft.Web.Core Microsoft.WebTools.Languages.Shared
Microsoft.Web.Editor Microsoft.WebTools.Languages.Shared.Editor

To avoid potential parse issues, the JSON parse tree changed behavior. When you call JsonParserService.GetTreeAsync, you now get a snapshot of the JSON parse tree. As an extension developer, you can now request and maintain snapshots of the JSON parse tree.


Announcing an easier way to use latest certificates from Key Vault

$
0
0

Posting on behalf of Prashanth Yerramilli

When we launched Azure Key Vault a few years ago, it solved a major problem users had which was that storing sensitive and/or secret information in code or config files in plain text causes multiple problems including security exposure. Users stored their secrets in a safe store like Key Vault and used a URI to fetch the secret material. This service has been wildly popular and has become a standard for cloud applications. It is used by fledling startups to Fortune 500 companies world over.

Developers use Key Vault to store their adhoc secrets, certificates and keys used for encryption. And to follow best security practices they create secrets that are short lived. An example of typical flow in this case could be

  • Step 1: Developer creates a certificate in Key Vault
  • Step 2: Developer sets the lifetime of the secret to be 30 day. In other words developer asks Key Vault to re-create the certificate every 30 days. Developer also chooses to receive an email when a certificate is about to expire
  • Step 3: Developer writes a polling service to check if the certificate has indeed expired

In the above scenario there are few challenges for the customer. They would have to write a polling service that constantly checks if the certificate has expired and if so they wait for the new certificate and then bind it in Windows Certificate manager.
Now what if developer doesn’t have to poll. And also if the developer doesn’t have to bind the new certificate in Windows Certificate manager. To solve this exact problem we built a Key Vault Virtual Machine Extension.

Azure virtual machine (VM) extensions are small applications that provide post-deployment configuration and automation tasks on Azure VMs. For example, if a virtual machine requires software installation, anti-virus protection, or to run a script inside of it, a VM extension can be used. Azure VM extensions can be run with the Azure CLI, PowerShell, Azure Resource Manager templates, and the Azure portal. Extensions can be bundled with a new VM deployment, or run against any existing system.
To learn more about VM Extensions please click here

Key Vault VM Extension is supposed to do just that as explained in the steps below

  • Step 1: Create a Key Vault and create an Azure Windows Virtual Machine
  • Step 2: Install the Key Vault VM Extension on the VM
  • Step 3: Configure Key Vault VM Extension to monitor a specific vault by specifying how often it should fetch the certificate

By doing the above steps the latest certificate is bound correctly in Windows Certificate Manager. This feature enables auto-rotation of SSL certificates, without necessitating a re-deployment or binding.

In the lifecycle of secrets management fetching the latest version of the secret (for the purpose of this article a certificate) is just as important as storing it securely. To solve this problem, on an Azure Virtual Machine, we’ve created a VM Extension for Windows. A Linux version is coming soon.
Virtual Machine Extensions are small applications that provide post-deployment configuration and automation tasks on Azure VMs. In this case the Key Vault Virtual Machine extension once installed fetches the latest version of the certificate at a specified interval and automatically binds the latest version of the certificate in the certificate store on Windows. As you can see this feature enables auto-rotation of SSL certificates, without necessitating a re-deployment or binding.

Also before we begin going through the tutorial, we need to understand a concept called Managed Identities.
Your code needs credentials to authenticate to cloud services, but you want to limit the visibility of those credentials as much as possible. Ideally, they never appear on a developer’s workstation or get checked-in to source control. Azure Key Vault can store credentials securely so they aren’t in your code, but to retrieve them you need to authenticate to Azure Key Vault. To authenticate to Key Vault, you need a credential! A classic bootstrap problem. Through the magic of Azure and Azure AD, MI provides a “bootstrap identity” that makes it much simpler to get things started.

Here’s how it works: When you enable MI for an Azure resource such as a virtual machine, Azure creates a Service Principal (an identity) for that resource in Azure AD, and injects the credentials (of that identity) into the resource (in this case a virtual machine).

  1. Your code calls a local MI endpoint to get an access token
  2. MI uses the locally injected credentials to get an access token from Azure AD
  3. Your code uses this access token to authenticate to an Azure service

Managed Identities

Now within Managed Identities there are 2 types

  1. System Assigned managed identity is enabled directly on an Azure service instance. When the identity is enabled, Azure creates an identity for the instance in the Azure AD tenant that’s trusted by the subscription. The lifecycle of the identity is managed by Azure and is tied to the Azure service instance.
  2. User Assigned managed identity is created as a standalone Azure resource. Users first create an identity and then assign that identity to one or more Azure resources.

In this tutorial I will demonstrate how to create a Azure Virtual Machine with an ARM template which also includes creating a Key Vault VM Extension on the VM.

Prerequisites

Step 1

After the prerequisites are complete, create an System Assigned identity by following this tutorial

Step 2

Assign the newly created System Assigned identity to access to your Key Vault

  • Go to https://portal.azure.com and navigate to your Key Vault
  • Select Access Policies section and Add New by searching for the User Assigned identity
    AccessPolicies

Step 3

Create or Update a VM with the following ARM template
You can view full the ARM template here and the ARM Parameters file here.

The most minimal settings in the ARM template are shown below:

     {
            "secretsManagementSettings": {
                "observedCertificates": [
                    "<KeyVault URI of a secret to be monitored/retrieved, in versionless format: https://myVaultName.vault.azure.net/secrets/myCertName">,
                    "<more entries here>", 
                "pollingIntervalInS": "[parameters('kvvmextPollingInterval')]",
                ]
            }
        }

As you can see we only specify the observedCertificates parameter and polling Interval in seconds


Note: Your observedCertificates urls should be of the form:
https://myVaultName.vault.azure.net/secrets/myCertName 

and not:

https://myVaultName.vault.azure.net/certificates/myCertName 

Reason being the /secrets path returns the full certificate, inluding the private key, while the /certificates path does not.

By following this tutorial you can create a VM with the above specified template

The above tutorial assumes that you are storing your certificates on Windows Certificate Manager. And so the VM Extension pulls down the latest certificates at a specified interval and automatically binds those certificates in your certificate manager.

That’s all folks!

Linux Version: We’re actively working on a VM Extension for Linux and would love to hear any feedback you might have.

We are eager to hear from you about your use cases and how we can evolve the VM Extension to help you. So please reach out to us and add your feature requests to the Azure feedback forum. If you run into issues using the VM extension please reach out to us on StackOverflow.


Prashanth Yerramilli, Senior Program Manager, Azure Key Vault

Prashanth Yerramilli Profile Pic Prashanth Yerramilli is the Key Vault Program Manager on the Azure Security team. He has over 10 years of Software Engineering experience and brings to the team love for creating the ultimate development experience.

Prashanth can be reached at:
-Twitter @yvprashanth1
-GitHub https://github.com/yvprashanth

Microsoft’s Developer Blogs are Getting an Update

$
0
0

In the coming days, we’ll be moving our developer blogs to a new platform with a modern, clean design and powerful features that will make it easy for you to discover and share great content. This week, you’ll see the Visual Studio, IoTDev, and Premier Developer blogs move to a new URL  – while additional developer blogs will transition over the coming weeks. You’ll continue to receive all the information and news from our teams, including access to all past posts. Your RSS feeds will continue to seamlessly deliver posts and any of your bookmarked links will re-direct to the new URL location.

We’d love your feedback

Our most inspirational ideas have come from this community and we want to make sure our developer blogs are exactly what you need. Share your thoughts about the current blog design by taking our Microsoft Developer Blogs survey and tell us what you think! We would also love your suggestions for future topics that our authors could write about. Please use the survey to share what kinds of information, tutorials, or features you would like to see covered in future posts.

Frequently Asked Questions

For the most-asked questions, see the FAQ below. If you have any additional questions, ideas, or concerns that we have not addressed, please let us know by submitting feedback through the Developer Blogs FAQ page.

Will Saved/Bookmarked URLs Redirect?

Yes. All existing URLs will auto-redirect to the new site. If you discover any broken links, please report them through the FAQ feedback page.

Will My Feed Reader Still Send New Posts?

Yes, your RSS feed will continue to work through your current set-up. If you encounter any issues with your RSS feed, please report it with details about your feed reader.

Which Blogs Are Moving?

This migration involves the majority of our Microsoft developer blogs so expect to see changes to our Visual Studio, IoTDev, and Premier Developer blogs this week. The rest will be migrated in waves over the next few weeks.

We appreciate all of the feedback so far and look forward to showing you what we’ve been working on! For additional information about this blog migration, please refer to our Developer Blogs FAQ.

Migrating your existing on-prem SQL Server database to Azure SQL DB

$
0
0

If you are in the process of moving an existing .NET application to Azure, it’s likely you’ll have to migrate an existing, on-prem SQL database as well. There are a few different ways you can go about this, so let’s go through them.

Data Migration Assistant (downtime required)

The Data Migration Assistant (download | documentation) is free, easy to use, slick and extremely powerful! It can:

  • Evaluate if your database is ready to migrate and produce a readiness report (command line support included)
  • Provide recommendations for how to remediate migration blocking issues
  • Recommend the minimum Azure SQL Database SKU based on performance counter data of your existing database
  • Perform the actual migration of schema, data and objects (server roles, logins, etc.)

After a successful migration, applications will be able to connect to the target SQL server databases seamlessly. There are currently a couple of limitations, but the majority of databases shouldn’t be impacted. If this sounds interesting, check out the full tutorials on how to migrate to Azure SQL DB and how to migrate to Azure SQL DB Managed Instance.

Azure Data Migration Service (no downtime required)

The Azure Data Migration Service allows you to move your on-prem database to Azure without taking it offline during the migration. Applications can keep on running while the migration is taking place. Once the database in Azure is ready you can switch your applications over immediately.

If this sounds interesting, check out the full tutorials on how to migrate to Azure SQL DB and how to migrate to Azure SQL DB Managed Instance without downtime.

SQL Server Management Studio (downtime required)

You are probably already familiar with SQL Server Management Studio (download | documentation), but if you are not it’s basically an IDE for SQL Server built on top of the Visual Studio shell and it’s free! Unlike the Data Migration Assistant, it cannot produce readiness reports nor can it suggest remediating actions, but it can perform the actual migration two different ways.

The first way is by selecting the command “Deploy Database to Microsoft Azure SQL Database…” which will bring up the migration wizard to take you through the process step by step:

The second way is by exporting the existing, on-prem database as a .bacpac file (docs to help with that) and then importing the .backpac file into Azure:


Resolving database migration compatibility issues

There are a wide variety of compatibility issues that you might encounter, depending both on the version of SQL Server in the source database and the complexity of the database you are migrating. Use the following resources, in addition to a targeted Internet search using your search engine of choices:

In addition to searching the Internet and using these resources, use the MSDN SQL Server community forums or StackOverflow. If you have any questions or problems just leave us a comment below.


ASP.NET Core and Blazor updates in .NET Core 3.0 Preview 8

$
0
0

.NET Core 3.0 Preview 8 is now available and it includes a bunch of new updates to ASP.NET Core and Blazor.

Here’s the list of what’s new in this preview:

  • Project template updates
    • Cleaned up top-level templates in Visual Studio
    • Angular template updated to Angular 8
    • Blazor templates renamed and simplified
    • Razor Class Library template replaces the Blazor Class Library template
  • Case-sensitive component binding
  • Improved reconnection logic for Blazor Server apps
  • NavLink component updated to handle additional attributes
  • Culture aware data binding
  • Razor Pages support for @attribute
  • New networking primitives for non-HTTP Servers
  • Unix domain socket support for the Kestrel Sockets transport
  • gRPC support for CallCredentials
  • ServiceReference tooling in Visual Studio
  • Diagnostics improvements for gRPC

Please see the release notes for additional details and known issues.

Get started

To get started with ASP.NET Core in .NET Core 3.0 Preview 8 install the .NET Core 3.0 Preview 8 SDK

If you’re on Windows using Visual Studio, install the latest preview of Visual Studio 2019.

.NET Core 3.0 Preview 8 requires Visual Studio 2019 16.3 Preview 2 or later

To install the latest Blazor WebAssembly template also run the following command:

dotnet new -i Microsoft.AspNetCore.Blazor.Templates::3.0.0-preview8.19405.7

Upgrade an existing project

To upgrade an existing an ASP.NET Core app to .NET Core 3.0 Preview 8, follow the migrations steps in the ASP.NET Core docs.

Please also see the full list of breaking changes in ASP.NET Core 3.0.

To upgrade an existing ASP.NET Core 3.0 Preview 7 project to Preview 8:

  • Update Microsoft.AspNetCore.* package references to 3.0.0-preview8.19405.7.
  • Update package references to Microsoft.AspNetCore.Components.Browser to instead reference Microsoft.AspNetCore.Components.Web.
  • In Razor components rename OnInit to OnInitialized and OnInitAsync to OnInitializedAsync.
  • In Blazor apps, update Razor component parameters to be public, as non-public component parameters now result in an error.
  • In Blazor WebAssembly apps that make use of the HttpClient JSON helpers, add a package reference to Microsoft.AspNetCore.Blazor.HttpClient.
  • On Blazor form components remove use of Id and Class parameters and instead use the HTML id and class attributes.
  • Rename ElementRef to ElementReference.
  • Remove backing field declarations when using @ref or specify the @ref:suppressField parameter to suppress automatic backing field generation.
  • Update calls to ComponentBase.Invoke to call ComponentBase.InvokeAsync.
  • Update uses of ParameterCollection to use ParameterView.
  • Update uses of IComponent.Configure to use IComponent.Attach.
  • Remove use of namespace Microsoft.AspNetCore.Components.Layouts.

You should hopefully now be all set to use .NET Core 3.0 Preview 8.

Project template updates

Cleaned up top-level templates in Visual Studio

Top level ASP.NET Core project templates in the “Create a new project” dialog in Visual Studio no longer appear duplicated in the “Create a new ASP.NET Core web application” dialog. The following ASP.NET Core templates now only appear in the “Create a new project” dialog:

  • Razor Class Library
  • Blazor App
  • Worker Service
  • gRPC Service

Angular template updated to Angular 8

The Angular template for ASP.NET Core 3.0 has now been updated to use Angular 8.

Blazor templates renamed and simplified

We’ve updated the Blazor templates to use a consistent naming style and to simplify the number of templates:

  • The “Blazor (server-side)” template is now called “Blazor Server App”. Use blazorserver to create a Blazor Server app from the command-line.
  • The “Blazor” template is now called “Blazor WebAssembly App”. Use blazorwasm to create a Blazor WebAssembly app from the command-line.
  • To create an ASP.NET Core hosted Blazor WebAssembly app, select the “ASP.NET Core hosted” option in Visual Studio, or pass the --hosted on the command-line

Create a new Blazor app

dotnet new blazorwasm --hosted

Razor Class Library template replaces the Blazor Class Library template

The Razor Class Library template is now setup for Razor component development by default and the Blazor Class Library template has been removed. New Razor Class Library projects target .NET Standard so they can be used from both Blazor Server and Blazor WebAssembly apps. To create a new Razor Class Library template that targets .NET Core and supports Pages and Views instead, select the “Support pages and views” option in Visual Studio, or pass the --support-pages-and-views option on the command-line.

Razor Class Library for Pages and Views

dotnet new razorclasslib --support-pages-and-views

Case-sensitive component binding

Components in .razor files are now case-sensitive. This enables some useful new scenarios and improves diagnostics from the Razor compiler.

For example, the Counter has a button for incrementing the count that is styled as a primary button. What if we wanted a Button component that is styled as a primary button by default? Creating a component named Button in previous Blazor releases was problematic because it clashed with the button HTML element, but now that component matching is case-sensitive we can create our Button component and use it in Counter without issue.

Button.razor

<button class="btn btn-primary" @attributes="AdditionalAttributes" @onclick="OnClick">@ChildContent</button>

@code {
    [Parameter]
    public EventCallback<UIMouseEventArgs> OnClick { get; set; }

    [Parameter]
    public RenderFragment ChildContent { get; set; }

    [Parameter(CaptureUnmatchedValues = true)]
    public IDictionary<string, object> AdditionalAttributes { get; set; }
}

Counter.razor

@page "/counter"

<h1>Counter</h1>

<p>Current count: @currentCount</p>

<Button OnClick="IncrementCount">Click me</Button>

@code {
    int currentCount = 0;

    void IncrementCount()
    {
        currentCount++;
    }
}

Notice that the Button component is pascal cased, which is the typical style for .NET types. If we instead try to name our component button we get a warning that components cannot start with a lowercase letter due to the potential conflicts with HTML elements.

Lowercase component warning

We can move the Button component into a Razor Class Library so that it can be reused in other projects. We can then reference the Razor Class Library from our web app. The Button component will now have the default namespace of the Razor Class Library. The Razor compiler will resolve components based on the in scope namespaces. If we try to use our Button component without adding a using statement for the requisite namespace, we now get a useful error message at build time.

Unrecognized component error

NavLink component updated to handle additional attributes

The built-in NavLink component now supports passing through additional attributes to the rendered anchor tag. Previously NavLink had specific support for the href and class attributes, but now you can specify any additional attribute you’d like. For example, you can specify the anchor target like this:

<NavLink href="my-page" target="_blank">My page</NavLink>

which would render:

<a href="my-page" target="_blank" rel="noopener noreferrer">My page</a>

Improved reconnection logic for Blazor Server apps

Blazor Server apps require a live connection to the server in order to function. If the connection or the server-side state associated with it is lost, then the the client will be unable to function. Blazor Server apps will attempt to reconnect to the server in the event of an intermittent connection loss and this logic has been made more robust in this release. If the reconnection attempts fail before the network connection can be reestablished, then the user can still attempt to retry the connection manually by clicking the provided “Retry” button.

However, if the server-side state associated with the connect was also lost (e.g. the server was restarted) then clients will still be unable to connect. A common situation where this occurs is during development in Visual Studio. Visual Studio will watch the project for file changes and then rebuild and restart the app as changes occur. When this happens the server-side state associated with any connected clients is lost, so any attempt to reconnect with that state will fail. The only option is to reload the app and establish a new connection.

New in this release, the app will now also suggest that the user reload the browser when the connection is lost and reconnection fails.

Reload prompt

Culture aware data binding

Data-binding support (@bind) for <input> elements is now culture-aware. Data bound values will be formatted for display and parsed using the current culture as specified by the System.Globalization.CultureInfo.CurrentCulture property. This means that @bind will work correctly when the user’s desired culture has been set as the current culture, which is typically done using the ASP.NET Core localization middleware (see Localization).

You can also manually specify the culture to use for data binding using the new @bind:culture parameter, where the value of the parameter is a CultureInfo instance. For example, to bind using the invariant culture:

<input @bind="amount" @bind:culture="CultureInfo.InvariantCulture" />

The <input type="number" /> and <input type="date" /> field types will by default use CultureInfo.InvariantCulture and the formatting rules appropriate for these field types in the browser. These field types cannot contain free-form text and have a look and feel that is controller by the browser.

Other field types with specific formatting requirements include datetime-local, month, and week. These field types are not supported by Blazor at the time of writing because they are not supported by all major browsers.

Data binding now also includes support for binding to DateTime?, DateTimeOffset, and DateTimeOffset?.

Razor Pages support for @attribute

Razor Pages now support the new @attribute directive for adding attributes to the generate page class.

For example, you can now specify that a page requires authorization like this:

@page
@attribute [Microsoft.AspNetCore.Authorization.Authorize]

<h1>Authorized users only!<h1>

<p>Hello @User.Identity.Name. You are authorized!</p>

New networking primitives for non-HTTP Servers

As part of the effort to decouple the components of Kestrel, we are introducing new networking primitives allowing you to add support for non-HTTP protocols.

You can bind to an endpoint (System.Net.EndPoint) by calling Bind on an IConnectionListenerFactory. This returns a IConnectionListener which can be used to accept new connections. Calling AcceptAsync returns a ConnectionContext with details on the connection. A ConnectionContext is similar to HttpContext except it represents a connection instead of an HTTP request and response.

The example below show a simple TCP Echo server hosted in a BackgroundService built using these new primitives.

public class TcpEchoServer : BackgroundService
{
    private readonly ILogger<TcpEchoServer> _logger;
    private readonly IConnectionListenerFactory _factory;
    private IConnectionListener _listener;

    public TcpEchoServer(ILogger<TcpEchoServer> logger, IConnectionListenerFactory factory)
    {
        _logger = logger;
        _factory = factory;
    }

    protected override async Task ExecuteAsync(CancellationToken stoppingToken)
    {
        _listener = await _factory.BindAsync(new IPEndPoint(IPAddress.Loopback, 6000), stoppingToken);

        while (true)
        {
            var connection = await _listener.AcceptAsync(stoppingToken);
            // AcceptAsync will return null upon disposing the listener
            if (connection == null)
            {
                break;
            }
            // In an actual server, ensure all accepted connections are disposed prior to completing
            _ = Echo(connection, stoppingToken);
        }

    }

    public override async Task StopAsync(CancellationToken cancellationToken)
    {
        await _listener.DisposeAsync();
    }

    private async Task Echo(ConnectionContext connection, CancellationToken stoppingToken)
    {
        try
        {
            var input = connection.Transport.Input;
            var output = connection.Transport.Output;

            await input.CopyToAsync(output, stoppingToken);
        }
        catch (OperationCanceledException)
        {
            _logger.LogInformation("Connection {ConnectionId} cancelled due to server shutdown", connection.ConnectionId);
        }
        catch (Exception e)
        {
            _logger.LogError(e, "Connection {ConnectionId} threw an exception", connection.ConnectionId);
        }
        finally
        {
            await connection.DisposeAsync();
            _logger.LogInformation("Connection {ConnectionId} disconnected", connection.ConnectionId);
        }
    }
}

Unix domain socket support for the Kestrel Sockets transport

We’ve updated the default sockets transport in Kestrel to add support Unix domain sockets (on Linux, macOS, and Windows 10, version 1803 and newer). To bind to a Unix socket, you can call the ListenUnixSocket() method on KestrelServerOptions.

public static IHostBuilder CreateHostBuilder(string[] args) =>
    Host.CreateDefaultBuilder(args)
        .ConfigureWebHostDefaults(webBuilder =>
        {
            webBuilder
                .ConfigureKestrel(o =>
                {
                    o.ListenUnixSocket("/var/listen.sock");
                })
                .UseStartup<Startup>();
        });

gRPC support for CallCredentials

In preview8, we’ve added support for CallCredentials allowing for interoperability with existing libraries like Grpc.Auth that rely on CallCredentials.

Diagnostics improvements for gRPC

Support for Activity

The gRPC client and server use Activities to annotate inbound/outbound requests with baggage containing information about the current RPC operation. This information can be accessed by telemetry frameworks for distributed tracing and by logging frameworks.

EventCounters

The newly introduced Grpc.AspNetCore.Server and Grpc.Net.Client providers now emit the following event counters:

  • total-calls
  • current-calls
  • calls-failed
  • calls-deadline-exceeded
  • messages-sent
  • messages-received
  • calls-unimplemented

You can use the dotnet counters global tool to view the metrics emitted.

dotnet counters monitor -p <PID> Grpc.AspNetCore.Server

ServiceReference tooling in Visual Studio

We’ve added support in Visual Studio that makes it easier to manage references to other Protocol Buffers documents and Open API documents.

ServiceReference

When pointed at OpenAPI documents, the ServiceReference experience in Visual Studio can generated typed C#/TypeScript clients using NSwag.

When pointed at Protocol Buffer (.proto) files, the ServiceReference experience will Visual Studio can generate gRPC service stubs, gRPC clients, or message types using the Grpc.Tools package.

SignalR User Survey

We’re interested in how you use SignalR and the Azure SignalR Service, and your opinions on SignalR features. To that end, we’ve created a survey we’d like to invite any SignalR customer to complete. If you’re interested in talking to one of the engineers from the SignalR team about your ideas or feedback, we’ve provided an opportunity to enter your contact information in the survey, but that information is not required. Help us plan the next wave of SignalR features by providing your feedback in the survey.

Give feedback

We hope you enjoy the new features in this preview release of ASP.NET Core and Blazor! Please let us know what you think by filing issues on GitHub.

Thanks for trying out ASP.NET Core and Blazor!

Correction: 8/14/2019

An earlier version of this blog post referenced a productivity feature in Blazor to automatically generate backing fields for elements that utilized the @ref attribute. Unfortunately, we missed a critical design flaw which prevents this from working end-to-end. For more information check out this announcement.

The post ASP.NET Core and Blazor updates in .NET Core 3.0 Preview 8 appeared first on ASP.NET Blog.

Redesigning Configuration Refresh for Azure App Configuration

$
0
0

Overview

Since its inception, the .NET Core configuration provider for Azure App Configuration has provided the capability to monitor changes and sync them to the configuration within a running application. We recently redesigned this functionality to allow for on-demand refresh of the configuration. The new design paves the way for smarter applications that only refresh the configuration when necessary. As a result, inactive applications no longer have to monitor for configuration changes unnecessarily.
 

Initial design : Timer-based watch

In the initial design, configuration was kept in sync with Azure App Configuration using a watch mechanism which ran on a timer. At the time of initialization of the Azure App Configuration provider, users could specify the configuration settings to be updated and an optional polling interval. In case the polling interval was not specified, a default value of 30 seconds was used.

public static IWebHost BuildWebHost(string[] args)
{
    WebHost.CreateDefaultBuilder(args)
        .ConfigureAppConfiguration((hostingContext, config) =>
        {
            // Load settings from Azure App Configuration
            // Set up the provider to listen for changes triggered by a sentinel value
            var settings = config.Build();
            string appConfigurationEndpoint = settings["AzureAppConfigurationEndpoint"];

            config.AddAzureAppConfiguration(options =>
            {
                options.ConnectWithManagedIdentity(appConfigurationEndpoint)
                        .Use(keyFilter: "WebDemo:*")
                        .WatchAndReloadAll(key: "WebDemo:Sentinel", label: LabelFilter.Null);
            });

            settings = config.Build();
        })
        .UseStartup<Startup>()
        .Build();
}

For example, in the above code snippet, Azure App Configuration would be pinged every 30 seconds for changes. These calls would be made irrespective of whether the application was active or not. As a result, there would be unnecessary usage of network and CPU resources within inactive applications. Applications needed a way to trigger a refresh of the configuration on demand in order to be able to limit the refreshes to active applications. Then unnecessary checks for changes could be avoided.

This timer-based watch mechanism had the following fundamental design flaws.

  1. It could not be invoked on-demand.
  2. It continued to run in the background even in applications that could be considered inactive.
  3. It promoted constant polling of configuration rather than a more intelligent approach of updating configuration when applications are active or need to ensure freshness.
     

New design : Activity-based refresh

The new refresh mechanism allows users to keep their configuration updated using a middleware to determine activity. As long as the ASP.NET Core web application continues to receive requests, the configuration settings continue to get updated with the configuration store.

The application can be configured to trigger refresh for each request by adding the Azure App Configuration middleware from package Microsoft.Azure.AppConfiguration.AspNetCore in your application’s startup code.

public void Configure(IApplicationBuilder app, IHostingEnvironment env)
{
    app.UseAzureAppConfiguration();
    app.UseMvc();
}

At the time of initialization of the configuration provider, the user can use the ConfigureRefresh method to register the configuration settings to be updated with an optional cache expiration time. In case the cache expiration time is not specified, a default value of 30 seconds is used.

public static IWebHost BuildWebHost(string[] args)
{
    WebHost.CreateDefaultBuilder(args)
        .ConfigureAppConfiguration((hostingContext, config) =>
        {
            // Load settings from Azure App Configuration
            // Set up the provider to listen for changes triggered by a sentinel value
            var settings = config.Build();
            string appConfigurationEndpoint = settings["AzureAppConfigurationEndpoint"];

            config.AddAzureAppConfiguration(options =>
            {
                options.ConnectWithManagedIdentity(appConfigurationEndpoint)
                        .Use(keyFilter: "WebDemo:*")
                        .ConfigureRefresh((refreshOptions) =>
                        {
                            // Indicates that all settings should be refreshed when the given key has changed
                            refreshOptions.Register(key: "WebDemo:Sentinel", label: LabelFilter.Null, refreshAll: true);
                        });
            });

            settings = config.Build();
        })
        .UseStartup<Startup>()
        .Build();
}

In order to keep the settings updated and avoid unnecessary calls to the configuration store, an internal cache is used for each setting. Until the cached value of a setting has expired, the refresh operation does not update the value. This happens even when the value has changed in the configuration store.  

Try it now!

For more information about Azure App Configuration, check out the following resources. You can find step-by-step tutorials that would help you get started with dynamic configuration using the new refresh mechanism within minutes. Please let us know what you think by filing issues on GitHub.

Overview: Azure App configuration
Tutorial: Use dynamic configuration in an ASP.NET Core app
Tutorial: Use dynamic configuration in a .NET Core app
Related Blog: Configuring a Server-side Blazor app with Azure App Configuration

The post Redesigning Configuration Refresh for Azure App Configuration appeared first on ASP.NET Blog.

ASP.NET Core and Blazor updates in .NET Core 3.0 Preview 9

$
0
0

.NET Core 3.0 Preview 9 is now available and it contains a number of improvements and updates to ASP.NET Core and Blazor.

Here’s the list of what’s new in this preview:

  • Blazor event handlers and data binding attributes moved to Microsoft.AspNetCore.Components.Web
  • Blazor routing improvements
    • Render content using a specific layout
    • Routing decoupled from authorization
    • Route to components from multiple assemblies
  • Render multiple Blazor components from MVC views or pages
  • Smarter reconnection for Blazor Server apps
  • Utility base component classes for managing a dependency injection scope
  • Razor component unit test framework prototype
  • Helper methods for returning Problem Details from controllers
  • New client API for gRPC
  • Support for async streams in streaming gRPC responses

Please see the release notes for additional details and known issues.

Get started

To get started with ASP.NET Core in .NET Core 3.0 Preview 9 install the .NET Core 3.0 Preview 9 SDK.

If you’re on Windows using Visual Studio, install the latest preview of Visual Studio 2019.

.NET Core 3.0 Preview 9 requires Visual Studio 2019 16.3 Preview 3 or later.

To install the latest Blazor WebAssembly template also run the following command:

dotnet new -i Microsoft.AspNetCore.Blazor.Templates::3.0.0-preview9.19424.4

Upgrade an existing project

To upgrade an existing ASP.NET Core app to .NET Core 3.0 Preview 9, follow the migrations steps in the ASP.NET Core docs.

Please also see the full list of breaking changes in ASP.NET Core 3.0.

To upgrade an existing ASP.NET Core 3.0 Preview 8 project to Preview 9:

  • Update all Microsoft.AspNetCore.* package references to 3.0.0-preview9.19424.4
  • In Blazor apps and libraries:
    • Add a using statement for Microsoft.AspNetCore.Components.Web in your top level _Imports.razor file (see Blazor event handlers and data binding attributes moved to Microsoft.AspNetCore.Components.Web below for details)
    • Add a using statement for Microsoft.AspNetCore.Components.Authorization in your top level _Imports.razor file. In Blazor WebAssembly apps also add a package reference to Microsoft.AspNetCore.Components.Authorization.
    • Update all Blazor component parameters to be public.
    • Update implementations of IJSRuntime to return ValueTask<T>.
    • Replace calls to MapBlazorHub<TComponent> with a single call to MapBlazorHub.
    • Update calls to RenderComponentAsync and RenderStaticComponentAsync to use the new overloads to RenderComponentAsync that take a RenderMode parameter (see Render multiple Blazor components from MVC views or pages below for details).
    • Update App.razor to use the updated Router component (see Blazor routing improvements below for details).
    • (Optional) Remove page specific _Imports.razor file with the @layout directive to use the default layout specified through the router instead.
    • Remove any use of the PageDisplay component and replace with LayoutView, RouteView, or AuthorizeRouteView as appropriate (see Blazor routing improvements below for details).
    • Replace uses of IUriHelper with NavigationManager.
    • Remove any use of @ref:suppressField.
    • Replace the previous RevalidatingAuthenticationStateProvider code with the new RevalidatingIdentityAuthenticationStateProvider code from the project template.
    • Replace Microsoft.AspNetCore.Components.UIEventArgs with System.EventArgs and remove the “UI” prefix from all EventArgs derived types (UIChangeEventArgs -> ChangeEventArgs, etc.).
    • Replace DotNetObjectRef with DotNetObjectReference.
    • Replace OnAfterRender() and OnAfterRenderAsync() implementations with OnAfterRender(bool firstRender) or OnAfterRenderAsync(bool firstRender).
    • Remove any usage of IComponentContext and move any logic that should not run during prerendering into OnAfterRender or OnAfterRenderAsync.
  • In gRPC projects:
    • Update calls to GrpcClient.Create with a call GrpcChannel.ForAddress to create a new gRPC channel and new up your typed gRPC clients using this channel.
    • Rebuild any project or project dependency that uses gRPC code generation for an ABI change in which all clients inherit from ClientBase instead of LiteClientBase. There are no code changes required for this change.
    • Please also see the grpc-dotnet announcement for all changes.

You should now be all set to use .NET Core 3.0 Preview 9!

Blazor event handlers and data binding attributes moved to Microsoft.AspNetCore.Components.Web

In this release we moved the set of bindings and event handlers available for HTML elements into the Microsoft.AspNetCore.Components.Web.dll assembly and into the Microsoft.AspNetCore.Components.Web namespace. This change was made to isolate the web specific aspects of the Blazor programming from the core programming model. This section provides additional details on how to upgrade your existing projects to react to this change.

Blazor apps

Open the application’s root _Imports.razor and add @using Microsoft.AspNetCore.Components.Web. Blazor apps get a reference to the Microsoft.AspNetCore.Components.Web package implicitly without any additional package references, so adding a reference to this package isn’t necessary.

Blazor libraries

Add a package reference to the Microsoft.AspNetCore.Components.Web package package if you don’t already have one. Then open the root _Imports.razor file for the project (create the file if you don’t already have it) and add @using Microsoft.AspNetCore.Components.Web.

Troubleshooting guidance

With the correct references and using statement for Microsoft.AspNetCore.Components.Web, event handlers like @onclick and @bind should be bold font and colorized as shown below when using Visual Studio.

Events and binding working in Visual Studio

If @bind or @onclick are colorized as a normal HTML attribute, then the @using statement is missing.

Events and binding not recognized

If you’re missing a using statement for the Microsoft.AspNetCore.Components.Web namespace, you may see build failures. For example, the following build error for the code shown above indicates that the @bind attribute wasn’t recognized:

CS0169  The field 'Index.text' is never used
CS0428  Cannot convert method group 'Submit' to non-delegate type 'object'. Did you intend to invoke the method?

In other cases you may get a runtime exception and the app fails to render. For example, the following runtime exception seen in the browser console indicates that the @onclick attribute wasn’t recognized:

Error: There was an error applying batch 2.
DOMException: Failed to execute 'setAttribute' on 'Element': '@onclick' is not a valid attribute name.

Add a using statement for the Microsoft.AspNetCore.Components.Web namespace to address these issues. If adding the using statement fixed the problem, consider moving to the using statement app’s root _Imports.razor so it will apply to all files.

If you add the Microsoft.AspNetCore.Components.Web namespace but get the following build error, then you’re missing a package reference to the Microsoft.AspNetCore.Components.Web package:

CS0234  The type or namespace name 'Web' does not exist in the namespace 'Microsoft.AspNetCore.Components' (are you missing an assembly reference?)

Add a package reference to the Microsoft.AspNetCore.Components.Web package to address the issue.

Blazor routing improvements

In this release we’ve revised the Blazor Router component to make it more flexible and to enable new scenarios. The Router component in Blazor handles rendering the correct component that matches the current address. Routable components are marked with the @page directive, which adds the RouteAttribute to the generated component classes. If the current address matches a route, then the Router renders the contents of its Found parameter. If no route matches, then the Router component renders the contents of its NotFound parameter.

To render the component with the matched route, use the new RouteView component passing in the supplied RouteData from the Router along with any desired parameters. The RouteView component will render the matched component with its layout if it has one. You can also optionally specify a default layout to use if the matched component doesn’t have one.

<Router AppAssembly="typeof(Program).Assembly">
    <Found Context="routeData">
        <RouteView RouteData="routeData" DefaultLayout="typeof(MainLayout)" />
    </Found>
    <NotFound>
        <h1>Page not found</h1>
        <p>Sorry, but there's nothing here!</p>
    </NotFound>
</Router>

Render content using a specific layout

To render a component using a particular layout, use the new LayoutView component. This is useful when specifying content for not found pages that you still want to use the app’s layout.

<Router AppAssembly="typeof(Program).Assembly">
    <Found Context="routeData">
        <RouteView RouteData="routeData" DefaultLayout="typeof(MainLayout)" />
    </Found>
    <NotFound>
        <LayoutView Layout="typeof(MainLayout)">
            <h1>Page not found</h1>
            <p>Sorry, but there's nothing here!</p>
        </LayoutView>
    </NotFound>
</Router>

Routing decoupled from authorization

Authorization is no longer handled directly by the Router. Instead, you use the AuthorizeRouteView component. The AuthorizeRouteView component is a RouteView that will only render the matched component if the user is authorized. Authorization rules for specific components are specified using the AuthorizeAttribute. The AuthorizeRouteView component also sets up the AuthenticationState as a cascading value if there isn’t one already. Otherwise, you can still manually setup the AuthenticationState as a cascading value using the CascadingAuthenticationState component.

<Router AppAssembly="@typeof(Program).Assembly">
    <Found Context="routeData">
        <AuthorizeRouteView RouteData="@routeData" DefaultLayout="@typeof(MainLayout)" />
    </Found>
    <NotFound>
        <CascadingAuthenticationState>
            <LayoutView Layout="@typeof(MainLayout)">
                <p>Sorry, there's nothing at this address.</p>
            </LayoutView>
        </CascadingAuthenticationState>
    </NotFound>
</Router>

You can optionally set the NotAuthorized and Authorizing parameters of the AuthorizedRouteView component to specify content to display if the user is not authorized or authorization is still in progress.

<Router AppAssembly="@typeof(Program).Assembly">
    <Found Context="routeData">
        <AuthorizeRouteView RouteData="@routeData" DefaultLayout="@typeof(MainLayout)">
            <NotAuthorized>
                <p>Nope, nope!</p>
            </NotAuthorized>
        </AuthorizeRouteView>
    </Found>
</Router>

Route to components from multiple assemblies

You can now specify additional assemblies for the Router component to consider when searching for routable components. These assemblies will be considered in addition to the specified AppAssembly. You specify these assemblies using the AdditionalAssemblies parameter. For example, if Component1 is a routable component defined in a referenced class library, then you can support routing to this component like this:

<Router
    AppAssembly="typeof(Program).Assembly"
    AdditionalAssemblies="new[] { typeof(Component1).Assembly }>
    ...
</Router>

Render multiple Blazor components from MVC views or pages

We’ve reenabled support for rendering multiple components from a view or page in a Blazor Server app. To render a component from a .cshtml file, use the Html.RenderComponentAsync<TComponent>(RenderMode renderMode, object parameters) HTML helper method with the desired RenderMode.

RenderMode Description Supports parameters?
Static Statically render the component with the specified parameters. Yes
Server Render a marker where the component should be rendered interactively by the Blazor Server app. No
ServerPrerendered Statically prerender the component along with a marker to indicate the component should later be rendered interactively by the Blazor Server app. No

Support for stateful prerendering has been removed in this release due to security concerns. You can no longer prerender components and then connect back to the same component state when the app loads. We may reenable this feature in a future release post .NET Core 3.0.

Blazor Server apps also no longer require that the entry point components be registered in the app’s Configure method. Only a single call to MapBlazorHub() is required.

Smarter reconnection for Blazor Server apps

Blazor Server apps are stateful and require an active connection to the server in order to function. If the network connection is lost, the app will try to reconnect to the server. If the connection can be reestablished but the server state is lost, then reconnection will fail. Blazor Server apps will now detect this condition and recommend the user to refresh the browser instead of retrying to connect.

Blazor Server reconnect rejected

Utility base component classes for managing a dependency injection scope

In ASP.NET Core apps, scoped services are typically scoped to the current request. After the request completes, any scoped or transient services are disposed by the dependency injection (DI) system. In Blazor Server apps, the request scope lasts for the duration of the client connection, which can result in transient and scoped services living much longer than expected.

To scope services to the lifetime of a component you can use the new OwningComponentBase and OwningComponentBase<TService> base classes. These base classes expose a ScopedServices property of type IServiceProvider that can be used to resolve services that are scoped to the lifetime of the component. To author a component that inherits from a base class in Razor use the @inherits directive.

@page "/users"
@attribute [Authorize]
@inherits OwningComponentBase<Data.ApplicationDbContext>

<h1>Users (@Service.Users.Count())</h1>
<ul>
    @foreach (var user in Service.Users)
    {
        <li>@user.UserName</li>
    }
</ul>

Note: Services injected into the component using @inject or the InjectAttribute are not created in the component’s scope and will still be tied to the request scope.

Razor component unit test framework prototype

We’ve started experimenting with building a unit test framework for Razor components. You can read about the prototype in Steve Sanderson’s Unit testing Blazor components – a prototype blog post. While this work won’t ship with .NET Core 3.0, we’d still love to get your feedback early in the design process. Take a look at the code on GitHub and let us know what you think!

Helper methods for returning Problem Details from controllers

Problem Details is a standardized format for returning error information from an HTTP endpoint. We’ve added new Problem and ValidationProblem method overloads to controllers that use optional parameters to simplify returning Problem Detail responses.

[Route("/error")]
public ActionResult<ProblemDetails> HandleError()
{
    return Problem(title: "An error occurred while processing your request", statusCode: 500);
}

New client API for gRPC

To improve compatibility with the existing Grpc.Core implementation, we’ve changed our client API to use gRPC channels. The channel is where gRPC configuration is set and it is used to create strongly typed clients. The new API provides a more consistent client experience with Grpc.Core, making it easier to switch between using the two libraries.

// Old
using var httpClient = new HttpClient() { BaseAddress = new Uri("https://localhost:5001") };
var client = GrpcClient.Create<GreeterClient>(httpClient);

// New
var channel = GrpcChannel.ForAddress("https://localhost:5001");
var client = new GreeterClient(channel);

var reply = await client.GreetAsync(new HelloRequest { Name = "Santa" });

Support for async streams in streaming gRPC responses

gRPC streaming responses return a custom IAsyncStreamReader type that can be iterated on to receive all response messages in a streaming response. With the addition of async streams in C# 8, we’ve added a new extension method that makes for a more ergonomic API while consuming streaming responses.

// Old
while (await requestStream.MoveNext(CancellationToken.None))
{
  var message = requestStream.Current;
  // …
}

// New and improved
await foreach (var message in requestStream.ReadAllAsync())
{
  // …
}

Give feedback

We hope you enjoy the new features in this preview release of ASP.NET Core and Blazor! Please let us know what you think by filing issues on GitHub.

Thanks for trying out ASP.NET Core and Blazor!

The post ASP.NET Core and Blazor updates in .NET Core 3.0 Preview 9 appeared first on ASP.NET Blog.

ASP.NET Core and Blazor updates in .NET Core 3.0 Release Candidate 1

$
0
0

.NET Core 3.0 Release Candidate 1 (RC1) is now available. This release contains only a handful of bug fixes and closely represents what we expect to release for .NET Core 3.0.

Please see the release notes for additional details and known issues.

Get started

To get started with ASP.NET Core in .NET Core 3.0 RC1 install the .NET Core 3.0 RC1 SDK.

If you’re on Windows using Visual Studio, install the latest preview of Visual Studio 2019.

.NET Core 3.0 RC1 requires Visual Studio 2019 16.3 Preview 4 or later.

There is also a Blazor WebAssembly preview update available with this release. This update to Blazor WebAssembly still has a Preview 9 version, but carries an updated build number. This is not a release candidate for Blazor WebAssembly. Blazor WebAssembly isn’t expected to ship as a stable release until some time after .NET Core 3.0 ships (details coming soon!).

To install the latest Blazor WebAssembly template run the following command:

dotnet new -i Microsoft.AspNetCore.Blazor.Templates::3.0.0-preview9.19457.4

Upgrade an existing project

To upgrade an existing ASP.NET Core app to .NET Core 3.0 Preview 9, follow the migrations steps in the ASP.NET Core docs.

Please also see the full list of breaking changes in ASP.NET Core 3.0.

To upgrade an existing ASP.NET Core 3.0 Preview 9 project to RC1:

  • Update all Microsoft.AspNetCore.* package references to 3.0.0-rc1.19457.4
  • Update all Microsoft.AspNetCore.Blazor.* package references to 3.0.0-preview9.19457.4
  • Update all Microsoft.Extensions.* package references to 3.0.0-rc1.19456.10

That’s it You should now be all set to use .NET Core 3.0 RC1!

Give feedback

We hope you enjoy the new features in this preview release of ASP.NET Core and Blazor! Please let us know what you think by filing issues on GitHub.

Thanks for trying out ASP.NET Core and Blazor!

The post ASP.NET Core and Blazor updates in .NET Core 3.0 Release Candidate 1 appeared first on ASP.NET Blog.


ASP.NET Core and Blazor updates in .NET Core 3.0

$
0
0

ASP.NET Core and Blazor updates in .NET Core 3.0

Today we are thrilled to announce the release of .NET Core 3.0! .NET Core 3.0 is ready for production use, and is loaded with lots of great new features for building amazing web apps with ASP.NET Core and Blazor.

Some of the big new features in this release of ASP.NET Core include:

  • Build rich interactive client-side web apps using C# instead of JavaScript using Blazor).
  • Create high-performance backend services with gRPC.
  • SignalR now has support for automatic reconnection and client-to-server streaming.
  • Generate strongly typed client code for Web APIs with OpenAPI documents.
  • Endpoint routing integrated through the framework.
  • HTTP/2 now enabled by default in Kestrel.
  • Authentication support for Web APIs and single-page apps integrated with IdentityServer
  • Support for certificate and Kerberos authentication.
  • Integrates with the new System.Text.Json serializer.
  • New generic host sets up common hosting services like dependency injection (DI), configuration, and logging.
  • New Worker Service template for building long-running services.
  • New EventCounters created for requests per second, total requests, current requests, and failed requests.
  • Startup errors now reported to the Windows Event Log when hosted in IIS.
  • Request pipeline integrated with with System.IO.Pipelines.
  • Performance improvements across the entire stack.

You can find all the details about what’s new in ASP.NET Core in .NET Core 3.0 in the What’s new in ASP.NET Core 3.0 topic.

See the .NET Core 3.0 release notes for additional details and known issues.

Get started

To get started with ASP.NET Core in .NET Core 3.0 install the .NET Core 3.0 SDK.

If you’re on Windows using Visual Studio, install Visual Studio 2019 16.3, which includes .NET Core 3.0.

Note: .NET Core 3.0 requires Visual Studio 2019 16.3 or later.

There is also a Blazor WebAssembly preview update available with this release. This update to Blazor WebAssembly still has a Preview 9 version, but carries an updated build number. Blazor WebAssembly is still in preview and is not part of the .NET Core 3.0 release.

To install the latest Blazor WebAssembly template run the following command:

dotnet new -i Microsoft.AspNetCore.Blazor.Templates::3.0.0-preview9.19465.2

Upgrade an existing project

To upgrade an existing ASP.NET Core app to .NET Core 3.0, follow the migrations steps in the ASP.NET Core docs.

See the full list of breaking changes in ASP.NET Core 3.0.

To upgrade an existing ASP.NET Core 3.0 RC1 project to 3.0:

  • Update all Microsoft.AspNetCore.* and Microsoft.Extensions.* package references to 3.0.0
  • Update all Microsoft.AspNetCore.Blazor.* package references to 3.0.0-preview9.19465.2

That’s it! You should now be all set to use .NET Core 3.0!

Join us at .NET Conf!

Please join us at .NET Conf to learn all about the new features in .NET Core 3.0 and to celebrate the release with us! .NET Conf is a live streaming event open to everyone, and features talks from many talented speakers from the .NET team and the .NET community. Check out the schedule and attend a local event near you. Or join the Virtual Attendee Party for the chance to win prizes!

Give feedback

We hope you enjoy the new features in this release of ASP.NET Core and Blazor in .NET Core 3.0! We are eager to hear about your experiences with this latest .NET Core release. Let us know what you think by filing issues on GitHub.

Thanks for using ASP.NET Core and Blazor!

The post ASP.NET Core and Blazor updates in .NET Core 3.0 appeared first on ASP.NET Blog.

Setting HTTP header attributes to enable Azure authentication/authorization using HTTPRepl

$
0
0
Posted on behalf of Ahmed Metwally

The HTTP Read-Eval-Print Loop (REPL) is a lightweight, cross-platform command-line tool that’s supported everywhere .NET Core is supported. It’s used for making HTTP requests to test ASP.NET Core web APIs and view their results. You can use the HTTPRepl to navigate and interrogate any API in the same manner that you would navigate a set of folders on a file system. If the service that you are testing has a swagger.json file, specifying that file to HTTPRepl will enable auto-completion.

To install the HTTP REPL, run the following command:

>dotnet tool install -g Microsoft.dotnet-httprepl


For more information on how to use HTTPRepl, read Angelos’ post on the ASP.NET blog. As we continue to improve the tool, we look to add new commands to facilitate the use of HTTPRepl with different types of secure API services. As of this release, HTTPRepl supports authentication and authorization schemes achievable through header manipulation, like basic, bearer token, and digest authentication. For example, to use a bearer token to authenticate to a service, use the command “set header”. Set the “Authorization” header to the bearer token value using the following command:

>set header Authorization “bearer <token_value>”


And replace <token_value> with your authorization bearer token for the service. Don’t forget to use the quotation marks to wrap the word bearer along with the <token_value> in the same literal string. Otherwise, the tool will treat them as two different values and will fail to set the header properly. To ensure that the header in the HTTP request is being formatted as expected, enable echoing using the “echo on” command.

Using the “set header” command, you can leverage HTTPRepl to test and navigate any secure REST API service including your Azure-hosted API services or the Azure Management API. To access a secure service hosted on Azure, you need a bearer token. Get a bearer token for your Azure subscription, using the Azure CLI to get an access token for the required Azure subscription:

>az login


Copy your subscription ID from the Azure portal and paste it in the “az account set” command:

>az account set --subscription "<subscription ID>" 

>az account get-access-token 

{ 
  "accessToken": "<access_token_will_be_displayed_here>", 
  "expiresOn": "<expiry date/time will be displayed here>", 
  "subscription": "<subscription ID>", 
  "tenant": "<tenant ID>", 
  "tokenType": "Bearer" 
} 


Copy the text that appears in place of <access_token_will_be_displayed_here>. This is your access token. Finally, run HTTPRepl:

>httprepl
(disconnected)~ connect https://management.azure.com
Using a base address of https://management.azure.com/
Unable to find a swagger definition
https://management.azure.com/~ set header Authorization "bearer <em>&lt;paste_token_here&gt;</em>"
https://management.azure.com/~ cd subscriptions
https://management.azure.com/subscriptions/~ cd <subscription_ID>


For example, to search for a list of your Azure app services, issue the “get” command for the list of sites through the Microsoft web provider:

  https://management.azure.com/subscriptions/<subscription_ID>/~ get providers/Microsoft.Web/sites?api-version=2016-08-01
  HTTP/1.1 200 OK
  Cache-Control: no-cache
  Content-Length: 35948
  Content-Type: application/json; charset=utf-8
  Date: Thu, 19 Sep 2019 23:04:03 GMT
  Expires: -1
  Pragma: no-cache
  Strict-Transport-Security: max-age=31536000; includeSubDomains
  X-Content-Type-Options: nosniff
  x-ms-correlation-request-id: <em>xxxxxxxx-xxxx-xxxx-xxxx-xxxxxxxxxxxx</em>
  x-ms-original-request-ids: <em>xxxxxxxx-xxxx-xxxx-xxxx-xxxxxxxxxxxx;xxxxxxxx-xxxx-xxxx-xxxx-xxxxxxxxxxxx</em>
  x-ms-ratelimit-remaining-subscription-reads: 11999
  x-ms-request-id: xxxxxxxx-xxxx-xxxx-xxxx-xxxxxxxxxxxx
  x-ms-routing-request-id: WESTUS:xxxxxxxxxxxxxxxx:xxxxxxxx-xxxx-xxxx-xxxx-xxxxxxxxxx
  {
    "value": [
<list of azure resources>
    ]
  }
  https://management.azure.com/subscriptions/<subscription_ID>/~

You can use the full list of Azure REST APIs to browse and manage services in your Azure subscriptions. For more details on how HTTPRepl works, please check the ASPNET blog. To use HTTPRepl, download and install the global tool from the .NET Core CLI.

Give us feedback

It’s not HTTPie, it’s not Curl, but it’s also not PostMan. It’s something that you run and stays running and its aware of its current context. We find this experience valuable, but ultimately what matters the most is what you think. Please let us know your opinion by leaving comments below or on GitHub.


Ahmed Metwally, Sr. Program Manager, .NET dev tools @ahmedMsftAhmed is a Program Manager on the .NET tooling team focused on improving web development for .NET developers.

The post Setting HTTP header attributes to enable Azure authentication/authorization using HTTPRepl appeared first on ASP.NET Blog.

Blazor Server in .NET Core 3.0 scenarios and performance

$
0
0

Since the release of Blazor Server with .NET Core 3.0 last month lots of folks have shared their excitement with us about being able to build client-side web UI with just .NET and C#. At the same time, we’ve also heard lots of questions about what Blazor Server is, how it relates to Blazor WebAssembly, and what scenarios Blazor Server is best suited for. Should you choose Blazor Server for your client-side web UI needs, or wait for Blazor WebAssembly? This post seeks to answer these questions, and to provide insights into how Blazor Server performs at scale and how we envision Blazor evolving in the future.

What is Blazor Server?

Blazor Server apps host Blazor components on the server and handle UI interactions over a real-time SignalR connection. As the user interacts with the app, the UI events are sent to the server over the connection to be handled by the various components that make up the app. When a component handles a UI event, it’s rendered based on its updated state. Blazor compares the newly rendered output with what was rendered previously and send the changes back to the browser and applies them to the DOM.

Blazor Server

Since Blazor Server apps run on .NET Core on the server, they enjoy all the benefits of running on .NET Core including great runtime performance and tooling. Blazor Server apps can leverage the full ecosystem of .NET Standard libraries without any browser imposed limitations.

When should I use Blazor Server?

Blazor Server enables you to add rich interactive UI to your .NET apps today without having to write JavaScript. If you need the interactivity of a single-page app in your .NET app, then Blazor Server is a great solution.

Blazor Server can be used to write completely new apps or to complement existing MVC and Razor Pages apps. There’s no need to rewrite existing app logic. Blazor is designed to work together with MVC and Razor Pages, not replace them. You can continue to use MVC and Razor Pages for your server-rendering needs while using Blazor for client-side UI interactions.

Blazor Server works best for scenarios where you have a reliable low-latency network connection, which is normally achieved when the client and server are geographically on the same continent. Apps that require extremely high fidelity instant updates on every tiny mouse twitch, like real-time games or drawing apps, are not a good fit for Blazor Server. Because Blazor Server apps require an active network connection, offline scenarios are not supported.

Blazor Server is also useful when you want to offload work from the client to the server. Blazor Server apps require only a small download to establish the connection with the server and to process UI interactions. All the hard work of running the app logic and rendering the UI is then done on the server. This means Blazor Server apps load fast even as the app functionality grows. Because the client side of a Blazor Server app is so thin, it’s a great solution for apps that need to run on low-powered devices.

Using Blazor Server at scale

Blazor Server can scale from small internal line of business apps to large internet scale apps. While .NET Core 3.0 was still in preview we tested Blazor Server to see what its baseline scale characteristics look like. We put a Blazor Server app under load with active clients and monitored the latency of the user interactions. In our tests, a single Standard_D1_v2 instance on Azure (1 vCPU, 3.5 GB memory) could handle over 5,000 concurrent users without any degradation in latency. A Standard_D3_V2 instance (4 vCPU, 14GB memory) handled well over 20,000 concurrent clients. The main bottleneck for handling further load was available memory. Will you see this level of scale in your own app? That will depend in large part on how much additional memory your app requires per user. But for many apps, we believe this level of scale out is quite reasonable. We also plan to post additional updates on improvements in Blazor Server scalability in the weeks ahead. So stay tuned!

What is Blazor WebAssembly?

Blazor is a UI framework that can run in different environments. When you build UI components using Blazor, you get the flexibility to choose how and where they are hosted and run. As well as running your UI components on the server with Blazor Server, you can run those same components on the client with Blazor WebAssembly. This flexibility means you can adapt to your users’ needs and avoid the risk of being tied to a specific app hosting model.

Blazor WebAssembly apps host components in the browser using a WebAssembly-based .NET runtime. The components handle UI events and execute their rendering logic directly in the browser. Blazor WebAssembly apps use only open web standards to run .NET code client-side, without the need for any browser plugins or code transpilation. Just like with Blazor Server apps, the Blazor framework handles comparing the newly rendered output with what was rendered previous and updates the DOM accordingly, but with Blazor WebAssembly the UI rendering is handled client-side.

Blazor WebAssembly

When should I use Blazor WebAssembly?

Blazor WebAssembly is still in preview and isn’t yet ready for production use yet. If you’re looking for a production ready solution, then Blazor Server is what we’d recommend.

Once Blazor WebAssembly ships (May 2020), it will enable running Razor components and .NET code in the browser on the user’s device. Blazor WebAssembly apps help offload work from the server to the client. A Blazor WebAssembly app can leverage the client device’s compute, memory, and storage resources, as well as other resources made available through standard browser APIs.

Blazor WebAssembly apps don’t require the use of .NET on the server and can be used to build static sites. A Blazor WebAssembly app is just a bunch of static files that can be hosted using any static site hosting solution, like GitHub pages or Azure Static Website Hosting. When combined with a service worker, a Blazor WebAssembly app can function completely offline.

When combined with .NET on the server, Blazor WebAssembly enables full stack web development. You can share code, leverage the .NET ecosystem, and reuse your existing .NET skills and infrastructure.

Including a .NET runtime with your web app does increase the app size, which will impact load time. While there are a variety of techniques to mitigate this (prerendering on the server, HTTP caching, IL linking, etc.), Blazor WebAssembly may not be the best choice for apps that are very sensitive to download size and load time.

Blazor WebAssembly apps also require a browser that supports WebAssembly. WebAssembly is supported by all modern browsers, including mobile and desktop browsers. However, if you need to support older browsers without WebAssembly support then Blazor WebAssembly isn’t for you.

Blazor WebAssembly is optimized for UI rendering scenarios, but isn’t currently great for running CPU intensive workloads. Blazor WebAssembly apps today use a .NET IL interpreter to execute your .NET code, which doesn’t have the same performance as a native .NET runtime with JIT compilation. We’re working to better address this scenario in the future by adding support for compiling your .NET code directly to WebAssembly instead of using an interpreter.

You can change your mind later

Regardless of whether you choose Blazor Server or Blazor WebAssembly, you can always change your mind later. All Blazor apps use a common component model, Razor components. The same components can be hosted in a Blazor Server app or a Blazor WebAssembly app. So if you start with one Blazor hosting model and then later decide you want to switch to a different one, doing so is very straight forward.

What’s next for Blazor?

After shipping Blazor WebAssembly, we plan to expand Blazor to support not just web apps, but also Progressive Web Apps (PWAs), hybrid apps, and even fully native apps.

  • Blazor PWAs: PWAs are web apps that leverage the latest web standards to provide a more native-like experience. PWAs can support offline scenarios, push notifications, and OS integrations, like support for pinning the app to your home screen or the Windows Start menu.
  • Blazor Hybrid: Hybrid apps are native apps that use web technologies for the UI. Examples include Electron apps and mobile apps that render to a web view. Blazor Hybrid apps don’t run on WebAssembly, but instead use a native .NET runtime like .NET Core or Xamarin. You can find an experimental sample for using Blazor with Electron on GitHub.
  • Blazor Native: Blazor apps today render HTML, but the renderer can be replaced to render native controls instead. A Blazor Native app runs natively on the devices and uses a common UI abstraction to render native controls for that device. This is very similar to how frameworks like Xamarin Forms or React Native work today.

These three efforts are all currently experimental. We expect to have official previews of support for Blazor PWAs and Blazor Hybrid apps using Electron in the .NET 5 time frame (Nov 2020). There isn’t a road map for Blazor Native support yet, but it’s an area we are actively investigating.

Summary

With .NET Core 3.0, you can build rich interactive client-side UI today with Blazor Server. Blazor Server is a great way to add client-side functionality to your existing and new web apps using your existing .NET skills and assets. Blazor Server is built to scale for all your web app needs. Blazor WebAssembly is still in preview, but is expected to ship in May of next year. In the future we expect to continue to evolve Blazor to support PWAs, hybrid apps, and native apps. For now, we hope you’ll give Blazor Server a try by installing .NET Core 3.0!

The post Blazor Server in .NET Core 3.0 scenarios and performance appeared first on ASP.NET Blog.

ASP.NET Core updates in .NET Core 3.1 Preview 1

$
0
0

.NET Core 3.1 Preview 1 is now available. This release is primarily focused on bug fixes, but it contains a few new features as well.

Here’s what’s new in this release for ASP.NET Core:

  • Partial class support for Razor components
  • Pass parameters to top-level components
  • Support for shared queues in HttpSysServer
  • Breaking changes for SameSite cookies

Alongside this .NET Core 3.1 Preview 1 release, we’ve also released a Blazor WebAssembly update, which now requires .NET Core 3.1. To use Blazor WebAssembly you will need to install .NET Core 3.1 Preview 1 as well as the latest preview of Visual Studio.

See the release notes for additional details and known issues.

Get started

To get started with ASP.NET Core in .NET Core 3.1 Preview 1 install the .NET Core 3.1 Preview 1 SDK.

If you’re on Windows using Visual Studio, for the best experience we recommend installing the latest preview of Visual Studio 2019 16.4. Installing Visual Studio 2019 16.4 will also install .NET Core 3.1 Preview 1, so you don’t need to separately install it. For Blazor development with .NET Core 3.1, Visual Studio 2019 16.4 is required.

To install the latest Blazor WebAssembly template run the following command:

dotnet new -i Microsoft.AspNetCore.Blazor.Templates::3.1.0-preview1.19508.20

Upgrade an existing project

To upgrade an existing ASP.NET Core 3.0 project to 3.1 Preview 1:

  • Update any projects targeting netcoreapp3.0 to target netcoreapp3.1
  • Update all Microsoft.AspNetCore.* package references to 3.1.0-preview1.19506.1

See also the full list of breaking changes in ASP.NET Core 3.1.

That’s it! You should now be all set to use .NET Core 3.1 Preview 1!

Partial class support for Razor components

Razor components are now generated as partial classes. You can author the code for a Razor component using a code-behind file defined as a partial class instead of defining all the code for the component in a single file.

For example, instead of defining the default Counter component with an @code block, like this:

Counter.razor

@page "/counter"

<h1>Counter</h1>

<p>Current count: @currentCount</p>

<button class="btn btn-primary" @onclick="IncrementCount">Click me</button>

@code {
    int currentCount = 0;

    void IncrementCount()
    {
        currentCount++;
    }
}

You can now separate out the code into a code-behind file using a partial class like this:

Counter.razor

@page "/counter"

<h1>Counter</h1>

<p>Current count: @currentCount</p>

<button class="btn btn-primary" @onclick="IncrementCount">Click me</button>

Counter.razor.cs

namespace BlazorApp1.Pages
{
    public partial class Counter
    {
        int currentCount = 0;

        void IncrementCount()
        {
            currentCount++;
        }
    }
}

Pass parameters to top-level components

Blazor Server apps can now pass parameters to top-level components during the initial render. Previously you could only pass parameters to a top-level component with RenderMode.Static. With this release, both RenderMode.Server and RenderModel.ServerPrerendered are now supported. Any specified parameter values are serialized as JSON and included in the initial response.

For example, you could prerender a Counter component with a specific current count like this:

@(await Html.RenderComponentAsync<Counter>(RenderMode.ServerPrerendered, new { CurrentCount = 123 }))

Support for shared queues in HttpSysServer

In addition to the existing behavior where HttpSysServer created anonymous request queues, we’ve added to ability to create or attach to an existing named HTTP.sys request queue.
This should enable scenarios where the HTTP.Sys controller process that owns the queue is independent to the listener process making it possible to preserve existing connections and enqueued requests between across listener process restarts.

public static IHostBuilder CreateHostBuilder(string[] args) =>
    Host.CreateDefaultBuilder(args)
        .ConfigureWebHostDefaults(webBuilder =>
        {
            // ...
            webBuilder.UseHttpSys(options =>
            {
                options.RequestQueueName = "MyExistingQueue",
                options.RequestQueueMode = RequestQueueMode.CreateOrAttach
            })
        });

Breaking changes for SameSite cookies

This release updates the behavior of SameSite cookies in ASP.NET Core to conform to the latest standards being enforced by browsers. For details on these changes and their impact on existing apps see https://github.com/aspnet/Announcements/issues/390.

Give feedback

We hope you enjoy the new features in this preview release of ASP.NET Core! Please let us know what you think by filing issues on GitHub.

Thanks for trying out ASP.NET Core!

The post ASP.NET Core updates in .NET Core 3.1 Preview 1 appeared first on ASP.NET Blog.

Upcoming SameSite Cookie Changes in ASP.NET and ASP.NET Core

$
0
0

SameSite is a 2016 extension to HTTP cookies intended to mitigate cross site request forgery (CSRF). The original design was an opt-in feature which could be used by adding a new SameSite property to cookies. It had two values, Lax and Strict. Setting the value to Lax indicated the cookie should be sent on navigation within the same site, or through GET navigation to your site from other sites. A value of Strict limited the cookie to requests which only originated from the same site. Not setting the property at all placed no restrictions on how the cookie flowed in requests. OpenIdConnect authentication operations (e.g. login, logout), and other features that send POST requests from an external site to the site requesting the operation, can use cookies for correlation and/or CSRF protection. These operations would need to opt-out of SameSite, by not setting the property at all, to ensure these cookies will be sent during their specialized request flows.

Google is now updating the standard and implementing their proposed changes in an upcoming version of Chrome. The change adds a new SameSite value, “None”, and changes the default behavior to “Lax”. This breaks OpenIdConnect logins, and potentially other features your web site may rely on, these features will have to use cookies whose SameSite property is set to a value of “None”. However browsers which adhere to the original standard and are unaware of the new value have a different behavior to browsers which use the new standard as the SameSite standard states that if a browser sees a value for SameSite it does not understand it should treat that value as “Strict”. This means your .NET website will now have to add user agent sniffing to decide whether you send the new None value, or not send the attribute at all.

.NET will issue updates to change the behavior of its SameSite attribute behavior in .NET 4.7.2 and in .NET Core 2.1 and above to reflect Google’s introduction of a new value. The updates for the .NET Framework will be available on November 19th as an optional update via Microsoft Update and WSUS if you use the “Check for Update” functionality. On December 10th it will become widely available and appear in Microsoft Update without you having to specifically check for updates. .NET Core updates will be available with .NET Core 3.1 starting with preview 1, in November.

.NET Core 3.1 will contain an updated enum definition, SameSite.Unspecified which will not set the SameSite property.

The OpenIdConnect middleware for Microsoft.Owin v4.1 and .NET Core will be updated at the same time as their .NET Framework and .NET updates, however we cannot introduce the user agent sniffing code into the framework, this must be implemented in your site code. The implementation of agent sniffing will vary according to what version of ASP.NET or ASP.NET Core you are using and the browsers you wish to support.

For ASP.NET 4.7.2 with Microsoft.Owin 4.1.0 agent sniffing can be implemented using ICookieManager;

public class SameSiteCookieManager : ICookieManager
{
  private readonly ICookieManager _innerManager;

  public SameSiteCookieManager() : this(new CookieManager())
  {
  }

  public SameSiteCookieManager(ICookieManager innerManager)
  {
    _innerManager = innerManager;
  }

  public void AppendResponseCookie(IOwinContext context, string key, string value,
                                   CookieOptions options)
  {
    CheckSameSite(context, options);
    _innerManager.AppendResponseCookie(context, key, value, options);
  }

  public void DeleteCookie(IOwinContext context, string key, CookieOptions options)
  {
    CheckSameSite(context, options);
    _innerManager.DeleteCookie(context, key, options);
  }

  public string GetRequestCookie(IOwinContext context, string key)
  {
    return _innerManager.GetRequestCookie(context, key);
  }

  private void CheckSameSite(IOwinContext context, CookieOptions options)
  {
    if (options.SameSite == SameSiteMode.None && DisallowsSameSiteNone(context))
    {
        options.SameSite = null;
    }
  }

  public static bool DisallowsSameSiteNone(IOwinContext context)
  {
    // TODO: Use your User Agent library of choice here.
    var userAgent = context.Request.Headers["User-Agent"];
    return userAgent.Contains("BrokenUserAgent") ||
           userAgent.Contains("BrokenUserAgent2")
  }
}

And then configure OpenIdConnect settings to use the new CookieManager;

app.UseOpenIdConnectAuthentication(
    new OpenIdConnectAuthenticationOptions
    {
    // … Your preexisting options … 
    CookieManager = new SameSiteCookieManager(new SystemWebCookieManager())
});

SystemWebCookieManager will need the .NET 4.7.2 or later SameSite patch installed to work correctly.

For ASP.NET Core you should install the patches and then implement the agent sniffing code within a cookie policy. For versions prior to 3.1 replace SameSiteMode.Unspecified with (SameSiteMode)(-1).

private void CheckSameSite(HttpContext httpContext, CookieOptions options)
{
    if (options.SameSite == SameSiteMode.None)
    {
        var userAgent = httpContext.Request.Headers["User-Agent"].ToString();
        // TODO: Use your User Agent library of choice here.
        if (/* UserAgent doesn’t support new behavior */)
        {
               // For .NET Core < 3.1 set SameSite = (SameSiteMode)(-1)
               options.SameSite = SameSiteMode.Unspecified;
         }
    }
}

public void ConfigureServices(IServiceCollection services)
{
    services.Configure<CookiePolicyOptions>(options =>
    {
        options.MinimumSameSitePolicy = SameSiteMode.Unspecified;
        options.OnAppendCookie = cookieContext => 
            CheckSameSite(cookieContext.Context, cookieContext.CookieOptions);
        options.OnDeleteCookie = cookieContext => 
            CheckSameSite(cookieContext.Context, cookieContext.CookieOptions);
    });
}

public void Configure(IApplicationBuilder app)
{
    app.UseCookiePolicy(); // Before UseAuthentication or anything else that writes cookies.
    app.UseAuthentication();
    // …
}

Under testing with the Azure Active Directory team we have found the following checks work for all the common user agents that Azure Active Directory sees that don’t understand the new value.

public static bool DisallowsSameSiteNone(string userAgent)
{
    // Cover all iOS based browsers here. This includes:
    // - Safari on iOS 12 for iPhone, iPod Touch, iPad
    // - WkWebview on iOS 12 for iPhone, iPod Touch, iPad
    // - Chrome on iOS 12 for iPhone, iPod Touch, iPad
    // All of which are broken by SameSite=None, because they use the iOS networking stack
    if (userAgent.Contains("CPU iPhone OS 12") || userAgent.Contains("iPad; CPU OS 12"))
    {
        return true;
    }

    // Cover Mac OS X based browsers that use the Mac OS networking stack. This includes:
    // - Safari on Mac OS X.
    // This does not include:
    // - Chrome on Mac OS X
    // Because they do not use the Mac OS networking stack.
    if (userAgent.Contains("Macintosh; Intel Mac OS X 10_14") && 
        userAgent.Contains("Version/") && userAgent.Contains("Safari"))
    {
        return true;
    }

    // Cover Chrome 50-69, because some versions are broken by SameSite=None, 
    // and none in this range require it.
    // Note: this covers some pre-Chromium Edge versions, 
    // but pre-Chromium Edge does not require SameSite=None.
    if (userAgent.Contains("Chrome/5") || userAgent.Contains("Chrome/6"))
    {
        return true;
    }

    return false;
}

This browser list is by no means canonical and you should validate that the common browsers and other user agents your system supports behave as expected once the update is in place.

Chrome 80 is scheduled to turn on the new behavior in February or March 2020, including a temporary mitigation added in Chrome 79 Beta. If you want to test the new behavior without the mitigation use Chromium 76. Older versions of Chromium are available for download.

If you cannot update your framework versions by the time Chrome turns the new behavior in early 2020 you may be able to change your OpenIdConnect flow to a Code flow, rather than the default implicit flow that ASP.NET and ASP.NET Core uses, but this should be viewed as a temporary measure.

We strongly encourage you to download the updated .NET Framework and .NET Core versions when they become available in November and start planning your update before Chrome’s changes are rolled out.

The post Upcoming SameSite Cookie Changes in ASP.NET and ASP.NET Core appeared first on ASP.NET Blog.

Viewing all 7144 articles
Browse latest View live


<script src="https://jsc.adskeeper.com/r/s/rssing.com.1596347.js" async> </script>